Do you have a question about the PERDIX SHEARWATER and is the answer not in the manual?
Lists the key features of the Perdix Al, including wireless pressure monitoring and flexible display setup.
Instructions on how to install the wireless transmitter on a scuba tank first stage regulator.
Steps to turn on the transmitter by opening the tank valve, which wakes up upon detecting pressure.
Procedure to turn off the transmitter by closing the tank valve and purging the system.
Guide to enable the Air Integration feature on the Perdix dive computer via the System Setup menu.
Instructions on pairing the transmitter by entering its unique serial number into the T1/T2 Setup menu.
How to configure the main screen to permanently display Air Integration information.
Confirmation that AI setup is complete and the device is ready for diving.
Configuration settings for the Air Integration system, including Al Mode, GTR Mode, and Units.
Settings for individual transmitters, including serial number, rated, and reserve pressure.
Setting the tank's rated pressure to scale the gas pressure bar graph accurately.
Setting the reserve pressure for low pressure warnings and GTR calculations.
Option to reset the transmitter's serial number, effectively unpairing it.
How to add AI information to a configurable spot on the main screen for permanent display.
Accessing AI information via the bottom info line by pressing the right button twice.
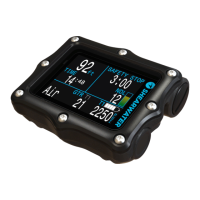
Displays current tank pressure and a graphical bar representation.
Shows Gas Time Remaining in minutes at current depth and SAC rate.
Displays Surface Air Consumption rate, normalized to 1 ATA.
A compact display showing multiple AI data points in a smaller format.
Explains Surface Air Consumption calculation, averaging over two minutes and normalization.
Details Gas Time Remaining calculation based on current SAC and reserve pressure.
Table of common warning and error displays and their meanings.
Steps to resolve "No Comms" errors, including checking serial numbers and range.
Step-by-step guide for replacing the transmitter's 3V Lithium CR2 battery.
| pressure range | 0 to 4350 PSI (0 to 300 Bar) |
|---|---|
| temperature | 22°F to 140°F (-6°C to 60°C) |
| battery type | CR2 Lithium |
| battery life | 300 dive hours at two 1-hour dives per day, up to 5 year shelf life |
| warning level | < 2.75V |
| critical level | < 2.50V |
| internal over-pressure relief valve | Yes |
| wireless range | 3 ft (1 m) |
|---|---|
| depth rating | 500 ft (150 m) |
| size | 2.95” (V) x 1.38” (Diameter), 75mm (L) x 35mm (Diameter) |
| weight | 0.26 lbs (116g) |
| packaged size | 3.74” (L) x 2.56” (W) x 2.17” (H), 95mm (L) x 65mm (W) x 55mm (H) |
| packaged weight | 0.40 lbs (180g) |