REMOVING SHIPPING WEDGE:
CAUTION:
The handle socket may be held down by a wedge under pressure. Remove wedge carefully.
1. Press on the Handle Socket (7) to relieve pressure on the wedge.
2. Remove the wedge from between handle socket and bar.
3. Slowly raise the handle socket until pressure is released. Keep wedge for future use.
ATTACHING HANDLE:
1. Slide the upper handle into the lower handle. Line the button on the lower handle up with the hole in
the upper handle until it clicks into place.
2. Loosen the Handle Release Bolt (9) and insert the grooved end of the handle into the handle socket.
3. Tighten the handle release bolt. Gently pull up on the handle to make sure that it is secure.
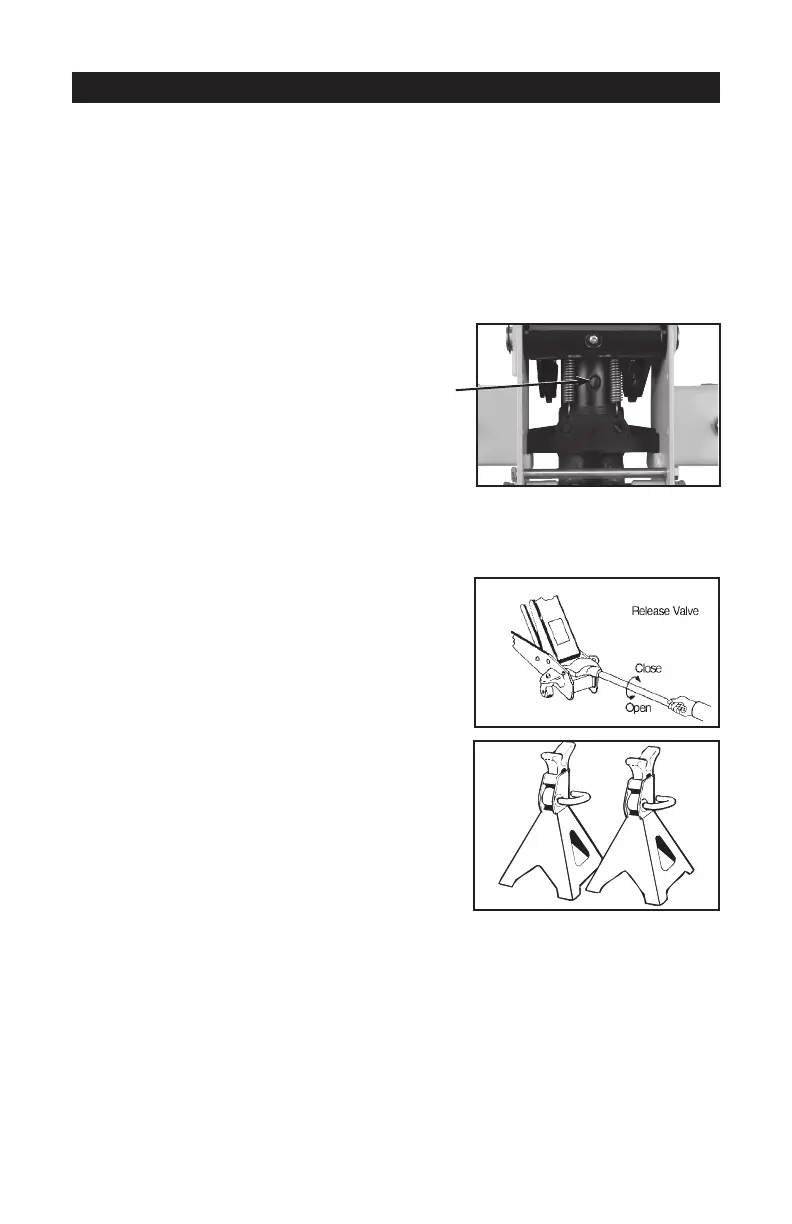
BLEEDING TRAPPED AIR:
1. With the jack fully lowered, remove both screws on the
end of the cover plate that is closer to the saddle.
Swing cover plate open.
2. Removethellplugontopofthecylinder.
Check that the oil level inside the cylinder just
covers the top of the piston. (See Figure 1)
3. Turn the handle counter-clockwise to open the valve.
4. Pump the handle up and down quickly 10 to 15 times
to force air from the system.
5. Replacethellplug,closethecoverplateandre-installthescrews.
BEFORE USING YOUR JACK:
1. Place pump handle over release valve and turn counter-
clockwise no more than two turns to open.
2.
Pump jack about 6 full strokes to ensure complete distribution
ofhydraulicuid.
(See Figure 2)
3. Repeat above steps as needed.
TO RAISE:
1. Park vehicle on a hard level surface safely away from
oncomingtrafc.
2. Turnoffthevehicle’sengine.
3. Placethevehicle’stransmissioninPARK,ifequippedwith
an automatic, or in its lowest gear, if equipped with a
manual transmission.
4. Setthevehicle’semergencybrakeandblockthewheels
that are not being lifted.
5.
Refertovehicleowner’smanualforproperjackingprocedures
.
Liftonlyonareasofvehicleasspeciedbymanufacturer.
6. Make certain that load is centered on saddle.
7. Insert handle into handle socket and turn clockwise to close.
8. Pump to raise load to desired height.
9. ALWAYS support load with jack stands (See Figure 3). Place jack stands of appropriate capacity
(not included) beneath the vehicle at locations recommended by the vehicle manufacturer. DO NOT
get under the vehicle without jack stands. Jacks are not designed to maintain heavy loads for long
periods of time. DO NOT attempt to put jack stands simultaneously under both ends of vehicle or
under one side of vehicle.
Note: When using two jack stands, they must be at the same height.
10.
SLOWLY turn the release valve counterclockwise to lower vehicle onto jack stands and remove jack.
IMPORTANT: NEVER MOVE JACK WHEN THE HANDLE IS OPERATING LEVER OR THE VALVE
SLEEVE. DAMAGE TO THE PUMPING UNIT MAY OCCUR.
OPERATION
Figure 2
Figure 3
4
NOTICE: During shipment or handling, air in the jack can become trapped in the hydraulic system
causing the jack to malfunction.
Fill Plug
Figure 1