5
PM54 must be activated using the Atlas Portal before applying power. The PM54 will not oper-
ate unless it has been activated.
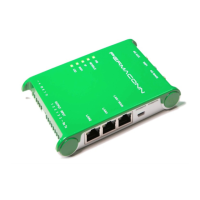
Place the PM54 housing in the space where you intend to install it. Do not mount the PM54
yet, as it may need to be moved to obtain a better signal strength.
Screw the antennas onto the 4G Main & Aux SMA connectors; note a single antenna con-
nected to 4G Main is sufficient if the installation is not using the 4G Router feature.
Apply 10 - 15Vdc to the power terminals. Power is normally obtained from the Alarm Panel. If
you are using an independent power supply make sure that you have a common negative.
The ‗HB‘ LED indicates signal strength and if the processor is operating.
Operational + Good Signal = [Green – Blinking]
Operational + Low Signal = [Red Blinking]
The PM54 may take up to 3 minutes to come ‗online‘
Connection to the cellular network is indicated by the
‗MOBILE‘ LED = [Green – Steady On]
If the signal strength is low you need to reposition the antenna and/or the unit or make use of a
high gain antenna.
To verify signal strength ‗Ping‘ the communicator using the Atlas portal. Signal strength must
be better than -94dBm for reliable communications.
If you are using the on-site internet, connect a CAT5/6 cable between the PM54 WAN port and
the local router or network point. The PM54 will automatically obtain an IP address if it is set to
DHCP (Reset).
Connection to the internet is indicated by the ‗IP‘ LED. [Green – Steady On]
A four wire connection is required between the Alarm Panel dialler and the PM54.
Option 1: Plug the original alarm panel dialler lead into the 611 socket on the
PM54 to connect the alarm panel.
Option 2: Use a 4 core cable between PM45 and alarm panel dialler terminals. Connection
diagrams available: https://www.permaconn.com/installer-zone/technical-addendums
‗Ring‘ & ‗Tip‘ as the input and ‗R1‘ & ‗T1‘ as the return line. If the return line is not connected
the ‗CID‘ LED will be [Red - On] indicating a fault. This lead is also used to monitor the inter-
connectivity between the Alarm Panel dialler and the PM54. If the dialler lead is removed a
‗Dialler Lead Interface Fail‘ event will be sent to the Monitoring Centre. This will indicate that
the panel has lost connectivity with the PM54
.
Installation Procedure PM54
PM54 Installation Manual v1 RDCCO_2195_E_IN