Smart 32 Remote Control Panel User Guide
Publication 81-9059-0727-0, Rev. A
April 2014
Proprietary Information of
PESA
4-1
Chapter 4 Operation
4.1 B
RIEF
I
NTRODUCTION TO
S
MART
32
P
ANEL
O
PERATION
Before a Smart 32 panel can communicate with the system controller or
control any part of the router system, it must be configured for integration
with the system and added to the controller configuration file loaded in the
system controller. Configuration and set-up is done using Cattrax, PESA’s
software control application installed on a Windows
®
based “host”
computer. Complete instructions for installing and operating Cattrax are
provided in documentation for the application.
Refer to the PESA Remote Control Panel Configuration Paragraph of the
PERC3000 User Guide (PESA Document 81905907160) for complete
instructions for creating or editing a controller configuration file, including
adding a Smart 32 or other PESA control panel.
During the configuration process there are several operating parameters and characteristics that must be
assigned to each panel. These are briefly introduced below:
Level Include Lists: Level Include lists are created through a Cattrax configuration page and allow you
to assign the switching levels that a Smart 32 panel is allowed to control. Each is a named list that may
contain any or all of the system switching levels. A level list is associated to a control panel through the
Panels Configuration page. Once a list is created it may be used with multiple panels.
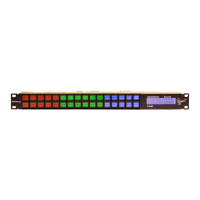
Panel Key Lists: Smart 32 panels provide 16 pages of 32 pushbutton keys, used for command and data
entry. Individual keys for a specific panel and a specific key page can be assigned a function or value by
associating a Panel Key List to the panel. A unique panel key list must be created for each panel type,
but the same list can be associated to any number of panels of the same type in order to clone the key
functions on each panel. Panel key lists can be created for specific applications as a means of controlling
access to the router by certain operators or operator station requirements.
Status Level: Status level specifies the switching level that the panel initially statuses by default when a
destination is selected, and no specific level has been selected from the level select keys. This is also the
switching level that the panel uses as the reference level when indicating breakaway routing conditions.
Default Destination: Default destination specifies the router destination the panel controls and for
which the panel displays status when initially powered-up or following a reset.
Button Images: Through the Button Images page of Cattrax, you create a text or graphic label for each
router resource or control function that may be assigned to a panel key. The specific label is displayed
on any Smart 32 or Touch 72 panel key assigned to that resource or control function.
Button Colors: Through the Button Colors page of Cattrax, you can modify the factory default color
scheme for key function identification.