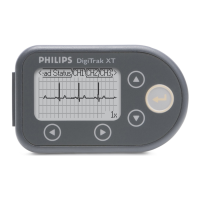
Using the DigiTrak XT Recorder
1-6 DigiTrak XT Recorder Instructions for Use
About Recorder Functions
The following table describes the recorder screens and menus.
Table 1-1 DigiTrak XT recorder functions
Screen Description
Lead Status Displays the connection status of each lead.
CH1, CH2, CH3 Displays the signal trace in real time with pacer pulse marks, if
selected. There is one screen for each ECG channel.
The gain setting is the same for all channels and is displayed in
the lower right corner of the screen.
If Pacer Detector is on, the pacer pulse marks are displayed
below the trace to indicate each pacer pulse detection and you
can adjust the threshold for pacemaker spike detection.
Settings Determines the following recorder settings:
Record Time – 24, 48, 72, 96, 168 hr
Pacer Detector – ON or OFF. (The default for pacer detect is OFF.
It must be turned
ON for each procedure in which it will be used
or saved as part of the default settings.)
Language – English, Spanish, German, French, Italian, Portuguese,
Swedish, Dutch
Contrast – 20- 95%
Sample Rate – 175 s/s
Resolution – 10 bit
Save as Default – Yes or No. The default for saving settings is
No. Yes
saves the current configuration (including date and time
settings) as the default.
Date/Time Set the following date and time options:
Month, Day, Year
Date Format – MM/DD/YYYY, YYYY/MM/DD, DD/MM/YYYY,
YYYY/DD/MM
Hour and Minute
Auto DST – ON or OFF. Daylight savings time uses the United
States convention.
Time Format – 12 or 24 hr