Using the DigiTrak XT Recorder
1-14 DigiTrak XT Recorder Instructions for Use
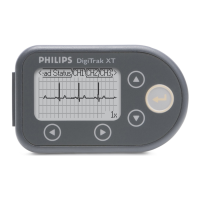
Step Four — Checking the Lead Status and ECG Signal
Quality
To check the lead status
1
Make sure a fresh AAA battery is in the recorder.
The recorder turns on as soon as you put in a battery. The recorder performs a self-test and
the splash screen appears for a couple of seconds, with the message
Press any key to start
displayed at the bottom of the screen. If the cable is not connected, the message No Cable
appears at the bottom of the screen and you cannot proceed.
2 Insert the patient cable (lead set) into the recorder connector. Press firmly to be sure it is
seated properly.
3 Press any button to enter the menus.
If you entered patient information, it is displayed. Otherwise, the
Leads Status tab appears.
NOTE All patient information is displayed on the recorder if you entered it using the Holter 2.9 software.
Although previous versions of software store the patient information and display it on the report, only
the patient name is displayed on the recorder screen.
4
Use the arrow buttons to select the Lead Status tab.
5 Check the diagram for loose connections.
– indicates a lead has a good patient connection
– (flashing) indicates a lead does not have a good patient connection
–
Leads OK or Leads Error message displayed
6 Use the arrow buttons to select the CH1, CH2, and CH3 tabs and check the ECG signal
quality.