Body Maintenance
The body may be cleaned with a damp cloth to remove
dust and scuff marks. More stubborn scuff marks on the
tank exterior can be removed with a vinyl cleaner.
Battery Maintenance
The batteries are deep cycle 12 volt batteries. The
lifetime of the batteries is limited by the number of charges
the batteries receive. To get the most life from the
batteries, charge them when the battery discharge LED
(Red) starts to blink (20% charge left). Use only the
on-board battery charger supplied to charge the batteries.
Periodically clean the top surface of the batteries and
the terminals, and check for loose connections. Use
a strong solution of baking soda and water. Brush the
solution sparingly over the battery tops, terminals, and
cable clamps. DO NOT ALLOW ANY BAKING SODA
SOLUTION TO ENTER THE BATTERIES! Use a wire
brush to clean the terminal posts and cable
connectors. After cleaning, apply a coating of clear battery
post protectant to the terminals and the cable connectors.
Keep the tops of the batteries clean and dry.
To prevent a possible short circuit, keep all metallic objects
off the top of the batteries. Replace any worn or damaged
wires.
Belt Maintenance (30")
APEC Part No: MP449100
1. Push machine to level surface.
2. Turn machine off and disconnect the battery pack.
3. Lift up on the front of the deck, placing the deck in
the pad change position.
4. Remove the pad retainer and pads from the pad
holders.
5. Remove the pad holders from each of the drive
pulleys, by removing the (4) bolts in the center of the
pad holder.
6. Locate and remove the (4) bolts that fasten the
pulley cover to the deck.
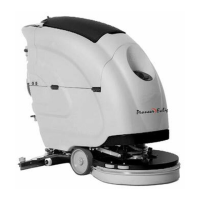
7. Rotate the deck belt. If there are excessive cracks in
the belt ribs and chunks that have broken off the ribs,
the belt needs to be replaced.
Replace Belt:
1. Place a 9/16" wrench on the bolt of the tensioner
idler pulley and rotate the tensioner downward.
2. With the tension removed, remove the belt from the
tensioner pulley.
3. Slowly allow the tensioner to rotate to a natural
position.
4. Remove the belt from the deck.
5. With belt removed, inspect all of the fasteners for
proper tightness. Also check the bearings for wear
and the condition of each pulley.
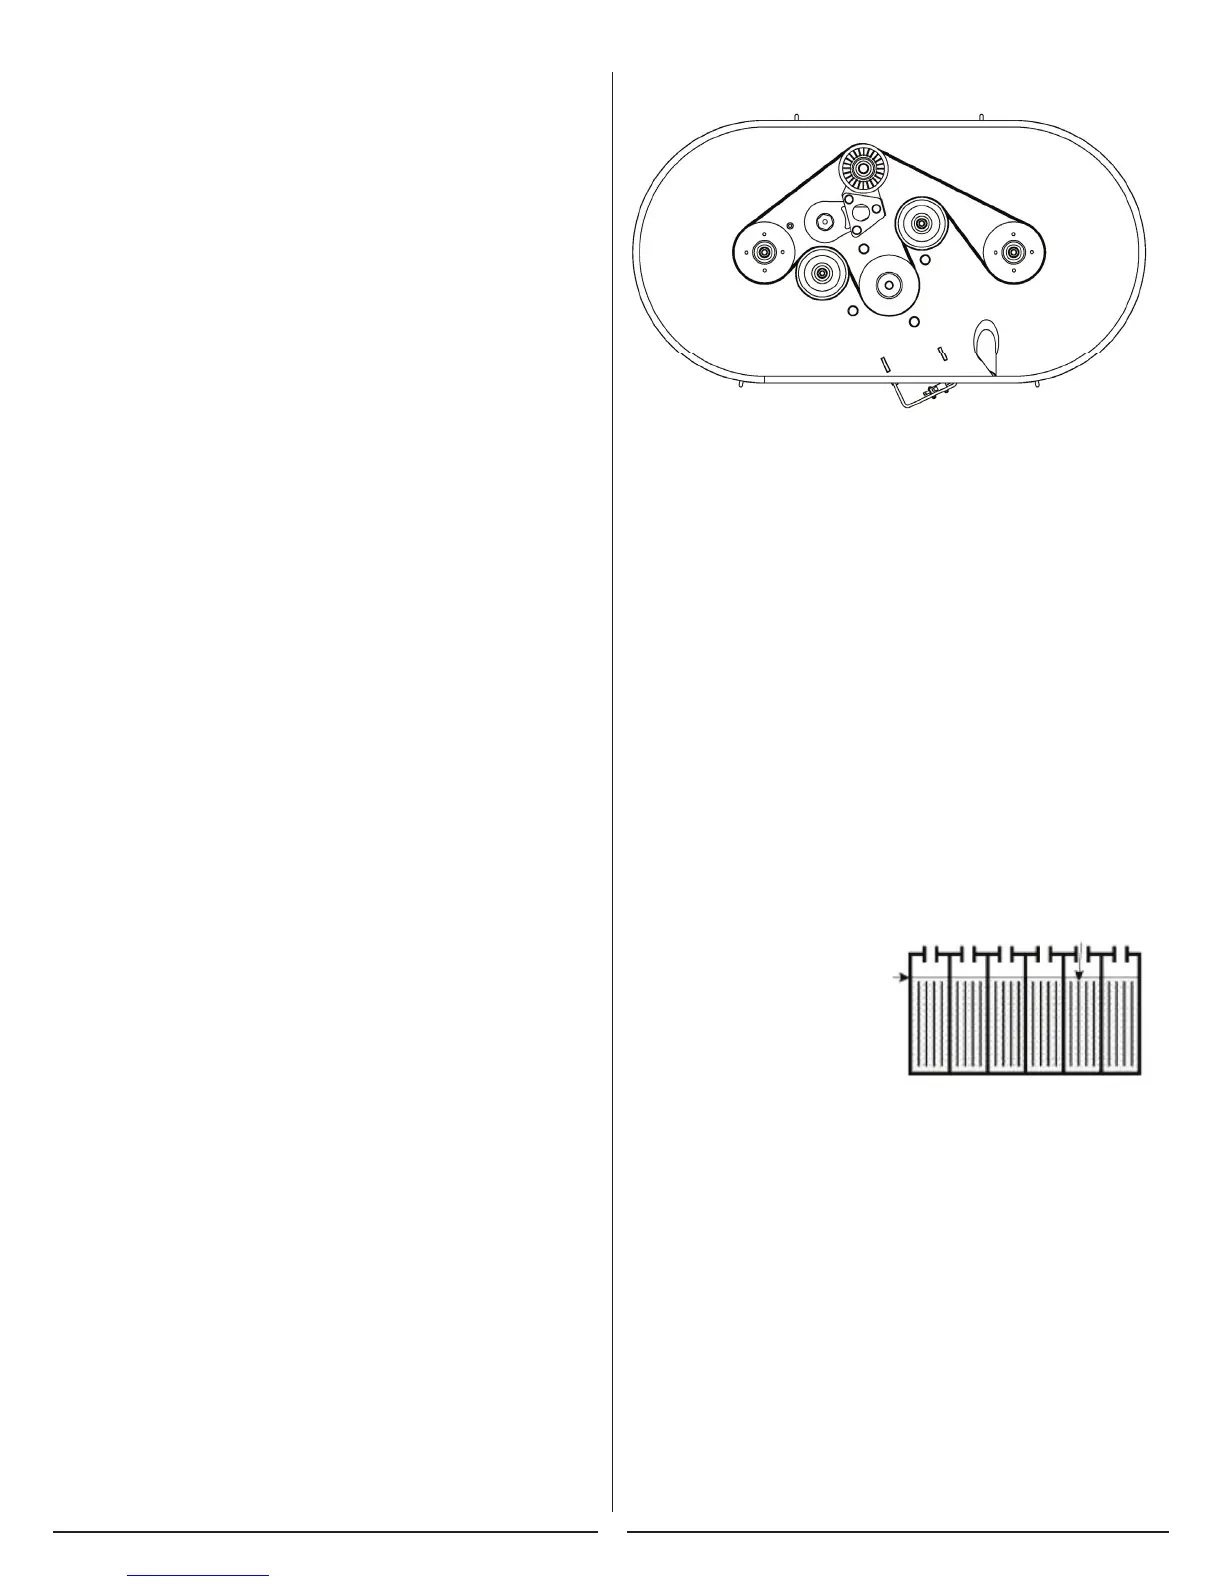
6. Install the new belt using the belt diagram.
7. Use a 9/16" wrench to rotate the tensioner down so
the new belt can be installed.
8. Slowly allow the tensioner to tighten against the belt.
9. Turn the belt through several revolutions to make
sure the belt tracks properly.
10. Reinstall the pulley cover.
11. Reinstall the padholders on to the drive pulleys.
12. Turn the pad holders to verify that there is no
interference.
13. Install pads onto the padholders.
14. Slowly lower the deck back to the operating position.
Lead Acid Batteries
Never add acid to the batteries, only distilled water.
Always keep the battery caps on, except when adding
water or taking hydrometer readings.
Check the electrolyte level in each battery cell before and
after charging, and after every 50 hours of operation. Do
not charge the batteries
unless the fluid is slightly
above the battery plates. If
needed, add just enough
distilled water to cover the
plates. Never add acid
to the batteries. Do not
overfill.
Measuring the specific gravity, using a hydrometer, is a
way to determine the charge level and condition of the
batteries. If one or more of the battery cells test lower
than the other battery cell (0.050 or more), the cell is
damaged, shorted, or is about to fail.
Sealed batteries no additional maintenance required.
CAUTION! When working with batteries, always wear eye
protection and protective clothing.
CAUTION! Batteries emit Hydrogen Gas. NO SMOKING!
CAUTION! Battery damage will occur if the electrolyte
level does not cover the battery plates.
15