1
2
3
4
SYMPTOM CAUSE SOLUTION
Motor fails to
start or kicks
on and off
A Unit must be plugged into a grounded power outlet.
B Check the line voltage, it must be in the range of 220 to 240V.
No or slow
water flow
through the
return fitting.
Filter pump is
not cleaning
the pool
properly(Cloudy
water,
green…..etc.)
Water leakage
A Fill the pool to the fill line. The suction fitting must be at least 4” under water.
A Maintain chlorine level between 1.0 to 1.6 ppm.
B Maintain pH level between 7.3 to 7.8.
C Clean or replace the filter cartridge.
A Tighten the hose clamps. Check the o-rings on the suction/return fittings.
Check hoses for damage. Replace if needed.
D Check filter for damage and holes. Replace new filter immediately.
E Check for obstructions(s) at the suction fitting and return fitting.
F Have the pool water sample tested by a pool supply store. Obtain opinions
on additional water treatment chemicals.
G Run pump more often, but never when the pump is in use. Clean/replace
filter cartridge more frequently.
B Check for obstructions(s) at the suction fitting and return fitting.
A Unit not plugged in
B Low voltage
A Low pool water level
A Chlorine level
B pH level
C Dirty filter cartridge
D Damaged filter
cartridge
E Slow water flow
F Other chemicals
required
G Pool water very dirty
B Inlet/Outlet clogged
C Dirty filter cartridge
A Suction/return hose
B Vent screw in Seal Top
C Seal Top
C Clean or replace the filter cartridge. A spare cartridge makes service more
convenient.
B Check O-ring 9 for damage. Replace if needed. Tighen the Vent Screw 8 .
C Check O-ring 11 for damage. Replace if needed. Tighten the Seal Top 10 .
TROUBLESHOOTING GUIDE
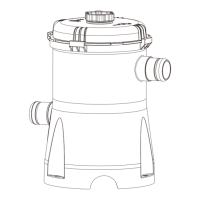
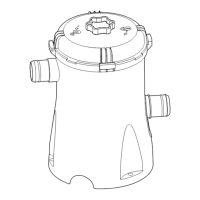
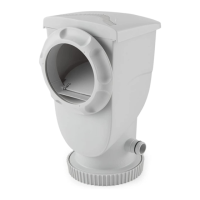
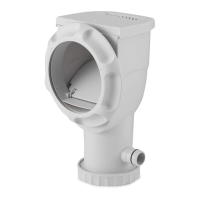
POOL PUMP DISASSEMBLY & STORAGE
1. Unplug the Power Filter Pump. Remove the Flow Diverter 3 ,Suction Fitting Screen 2 and Suction Fitting Base 1 from the Return Fitting and Suction Fitting
and flow plug with Plug 4 .
2. Slowly unscrew the Vent Screw 8 from the Seal Top 10 allowing the Filter Pump to depressurize.
3. Remove the Seal Top 10 by turning counter-clockwise.
4. Remove the Filter Cartridge 14 and remove any chlorine tablets left inside the core section of the filter.
5. Loosen all four Hose Clamps 6 , remove the Hoses 5 and allow water to drain out.
6. Clean and dry all filter pump parts including filter cartridges.
7. Liberally lubricate the O-rings 9 at the Seal Top 10 and Gasket 11 on the Canister 12 with petroleum jelly, and then reassemble it along with the Seal Top 10 ,
Vent Screw 8 onto the Canister 12 . Store all parts carefully. In a airtight plastic bag.
WARNING: UNPLUG THE POWER CORD BEFORE TROUBLESHOOTING THE FILTER PUMP.
14