4 | T Series
EN
Location
Install your T Series Amplier in well ventilated rack cabinets.
Secure both front and rear brackets to the rack.
Connect the AC Mains connector to a circuit breaker.
Install the amplier far from EMF emitting devices.
Avoid placing the amplier close to heat generating sources.
Cooling
The ventilation openings must not be impeded by any item, keep a
distance of at least 50 cm from the front and rear ventilation openings
of the amplier.
T Series implements a forced-air cooling system to maintain constant
operating temperatures. Air enters from the front panel, exiting at the
back of the amplier.
The cooling system features variable-speed DC fans controlled by
the heat sink mounted sensors. This ensures that fan noise and
internal dust accumulation are kept to a minimum.
In the rare case of overheating, the amplier is protected by limiting
the output power to levels that can be sustained at the actual
ambient temperature.
T Series ampliers can be stacked one on top of the other, leave one
rack unit empty every four to guarantee adequate air ow.
Cleaning
Use a dry cloth for cleaning the chassis and the front panel. Air lter
cleaning should be scheduled in accordance with the dust levels in
the amplier’s operating environment.
In order to take out the lters remove the 2 front covers by unscrewing
the two T8 Torx screws.
Use compressed air to remove the dust from lters, or wash it with
clean water (let the lters dry thoroughly before reinstalling them).
Package list
The box contains the following:
1x T Series amplier.
3x IEC power cords (region specic)
1x Documentation folder
Preliminary operations
Signal Grounding
There is no ground switch or terminal on the T Series amplier. The
unit’s signal grounding system is automatic. In order to limit hum
and/or interference entering the signal path, use balanced input
connections.
In the interests of safety, the unit MUST always operate with electrical
safety earth connected to the chassis via the dedicated Protective
Earth
wire.
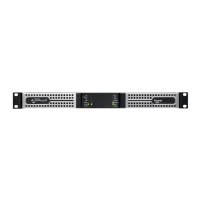
Connections
Two channel version, right to left:
• 2 x Speakon NL-4 (channel 1+2 and channel 2+n.c.)
Four channel version, right to left:
• 2 x Speakon NL-4 (channel 1+2 and channel 3+4)
Output connections
Get acquainted with the menu structure printed on the foldout cover
of this guide.
When entering the various screens some of the buttons will be lit,
indicating the availability of a usable function.
The 4 buttons closest to the display are used to select the channel(s),
multiple channels can also be selected at once.
When the cogwheel icon
is shown on the top right corner of the
display, pressing and holding the top right botton
2
for 2 seconds
will prompt the options menu.
The leftmost pushbuttons
5
are used to navigate through the
different screens.
The CH3
3
, CH4
4
buttons are sometimes used to cancel or conrm
actions.
The rightmost pushbuttons
6
are used to edit values. If held pressed
they will accelerate and speed up the process.
Navigating the menu
Through this page, it is possible to mute each channel independently.
In order to mute a channel (or a pair of bridged/joined channels)
simply press the channel button. The VU meter will be replaced by a
“MUTE” text and the channel pushbutton’s color will turn to amber.
Output Mute
A gain value appears on the screen and the amplier’s CH numbers
are replaced with the speaker’s letters.
By pressing the channel button the outputs that are part of the same
speaker are selected, the channel buttons will blink and a value text
is highlighted. Press the edit buttons
6
in order to edit the selected
values
Press and hold the cogwheel button
2
to activate the stepsize
selection screen, and use the edit buttons
6
to toggle between 0.1,
0.5, 1.0dB increments.
Speaker Level
Once properly powered (power cord inserted, sectioning breaker
closed), if it was ON when it lost power, then the amplier will turn ON
and pass audio within 10 s.
In order to toggle the amplier between ON and STANDBY keep
pressed button
1
for 2 seconds.
Switching the amplifier On
Two channel version
• 2 x XLR female (Analog input 1, and 2)
• 2 x XLR male (Analog 1 and 2 link output)
Four channel version
• 4 x XLR female (Analog input 1, 2, 3, and 4)
Input connections
Digital input is supported via AES3 (AES/EBU) and Dante™ standard
protocols.
The AES3 input is on a standard Neutrik XLR female. The AES3
connection carries a channel pair through a 110 Ω nominal
impedance wire in the form of a balanced (differential) digital signal:
in AES3 XLR connectors the identication of hot and cold pins is not
an issue; take care to never tie pin 2 or pin 3 (balanced signals) to
pin 1 (ground).
There is also a fault tolerant active repeater for the AES3 input
available on a Neutrik XLR male connector.
T Series ampliers accept 4 Dante/AES67 channels over two Neutrik
Ethercon connectors. There are three operating modes: 2in x 2out
@ 96kHz (default), 4in x 4out @ 48kHz, 4in x 0out @ 96kHz. Cabling
must comply to TIA/EIA-568-B and adopt the T568B scheme pinout.
A computer running Dante
TM
Controller can be used in order to
congure audio networking. Dante
TM
Controller is a software
application that manages devices on the network. T Series ampliers
are automatically discovered and displayed in Dante
TM
Controller
with the default identier:
MODELNAME-SERIAL
(e.g. T602-00042069).
Digital Audio Input connection
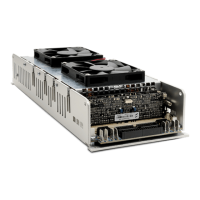
T Series ampliers implement a universal switching mode power
supply with power factor correction operating in the range from 100
V
AC
up to 240 V
AC
±10%.
AC mains connection is in the rear panel through the IEC C20 inlet,
the approved power cord is provided.
AC Mains Supply
Basic Operations
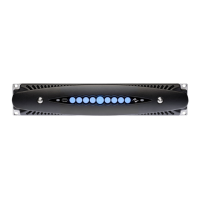
The T Series’ front panel features a high brightness 1.8” TFT Color
display, 8 RGB backlit pushbuttons, and a USB port.
Front Panel
 Loading...