EasyManua.ls Logo

powersoft X8 User Manual

powersoft X8
45 pages
To Next Page IconTo Next Page
Page #1 background imageLoading...
Page #1 background image
X8 Amplifier Platform
Service Manual
Keep this manual
for future reference
©2018 Powersoft
powersoft_X8_servman_en_v2.5
AES3 IN
7-8 5-6
AES3 IN
3-4 1-2
ANALOG INANALOG IN
8 7 6 5 4 3 2 1
3PH 1PH
L1
L2
L3
N
L
N
X SERIES
1=GND
2 = IN+
3 = IN-
POWER
OUTPUTS
CH 1/3/5/7
CH 2/4/6/8
MAINS
T
U
R
N
T
O
L
O
C
K
T
U
R
N
T
O
L
O
C
K
T
U
R
N
T
O
L
O
C
K
T
U
R
N
T
O
L
O
C
K
“WARNING: To reduce The Risk of
Fire or Electric Shock, do not Expose
this Apparatus to Rain or Moisture”
PATENTED

Table of Contents

Other manuals for powersoft X8

Question and Answer IconNeed help?

Do you have a question about the powersoft X8 and is the answer not in the manual?

powersoft X8 Specifications

General IconGeneral
Channels8
Signal to Noise Ratio> 112 dB
Damping Factor> 5000
Power SupplyUniversal switching power supply (100-240V, 50/60Hz)
NetworkingEthernet
DSPYes, with FIR filters
Load Impedance4Ω, 8Ω
Input Impedance20 kΩ balanced
Cooling SystemVariable speed fan
Frequency Response5 Hz - 30 kHz

Summary

LED Configurations and Further References

Normal LED Statuses

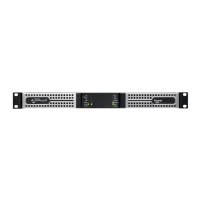
Details LED states for normal operation, including standby and phase connections.

Fault Conditions LED Configurations

Fault Condition Examples

Illustrates LED patterns indicating fault conditions like thermal protection, fan failure, or firmware issues.

Removing the Amplifier's Cover

AC Wiring Diagrams

Removing The Slot Ethernet Board

Dante Board FW Reset Procedure

Procedure to reset the Dante Board firmware using the Dante Firmware Update Manager.

Removing the Wi-Fi Module

Removing the X/Front

Extracting the Modules

Removing the DIGI and ADLINK Boards

Flat Cable Replacement

SD Card Removal

Front Panel Disassembly

Power Supply Verification Procedure

Replacing the Fuses

Internal Mains Connection

Amp Modules Verification

Replacing the Fans

Fan PWS and AMPS Replacement

Steps to replace Power Supply (PWS) and Amplifier (AMP) fans, involving component removal and unscrewing.

Updating the Software

Formatting a FAT32 USB Pen Drive

Procedure for formatting a USB pen drive to FAT32 for software updates.

Upgrading the Firmware via Pen Drive

Setting the Serial Number and MAC Address

Extracting the Log Files via Pen Drive

Extracting the Log Files via SD Card

Recovery SD Card Procedure

Soft Reset - Resetting the IP Address

Hard Reset - Restore Factory Settings

Testing the Unit via Armonía

Reworking Screws

Final Checklist

Restoring Amplifier to Factory Settings

Troubleshooting Diagrams

Power Supply Faults Troubleshooting

Diagrams for diagnosing power supply issues based on LED status and checks.

Thermal Limiter ON on Power Supply

AMP Fan Failure

PWS Fan Failure

Firmware Issue - Versions Prior to 1.7.6.30

Firmware Issue - Latest Version

Thermal Limiter / Limiter Issues on AMP Modules

Thermal Limiter ON on AMP Modules

Limiter ON on AMP Modules

Repair Kit List

Appendix A: X Series Front Panel

Webapp Overview and Controls

Describes the Webapp interface, including monitoring and configuration sections.

Network and Wi-Fi Configuration

Reset, Input, and Matrix Functions

Equalizers

Speakers

Output Channel Settings

Snapshots

Gang Functionality

Important Safety Addendum

Common Signs Description

Description of warning signs commonly implemented across products.

Safety Precautions

Recommendations for following safety precautions when handling electrical components.

Related product manuals