P/N 510985 - 112006
Installing Label Stock
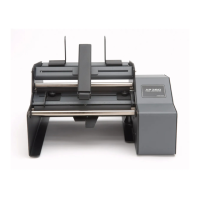
3. Place the label roll between the Stock
Guide Rollers and release the spring-
loaded stock guide to hold the label stock.
The Stock Guide Rollers allow the label
stock roll to move freely.
4. Place the leading edge of the label stock
between the throat guide and the side of
the printer.
5. Feed the label stock further into the printer
until it senses the label and automatically
feeds it through the printer.
Note: If you are using fan-fold label stock or label stock
other than standard square / rectangular die-cut
labels see sections 2F and 2G in the Users Manual
before continuing.
5
Quick Start
© 2006 All rights reserved
Stock Guide Rollers
Installing Ink Cartridges
6
(continued)
Throat Guide
If using a PC:
To install the cartridge for the first time, click
the Install Cartridge link in the installer and
follow the on screen prompts. Refer to section
2H for standard cartridge change instructions.
If using a Mac:
1. Open the Hard Drive \ Applications \
Utilities
2. Click on the Printer Setup Utility.
3. Select the Color Label Printer.
4. Click the Utility button on the menu bar.
5. Click the Change Cartridge button.
6. Open the Top Cover of the printer
7. The Cartridge Carrier will align itself to
the center of the print area.
8. Press the Cartridge Cover Release to open
the Cartridge Holder.
9. Replace/install the cartridge copper end first.
10. Remove the new Cartridge
from its packaging. Be sure to
remove the protective tape
covering the nozzles.
11. Push cartridge cover down-
ward until it snaps in place.
12. Click OK on your screen to indicate the
new cartridge is now installed. Once you
click OK you will be prompted to align the
cartridge. The printer will automatically
align the cartridge. You must use label
stock at least 4"X 3" such as the sample
stock that was shipped with the printer.
See section 2H in the manual for
additional information.