6
6. Identify the Left Handlebar (35), which is marked with
a sticker. Orient the Left Handlebar with the hexagonal
holes facing upward. Attach the Left Handlebar to the
Seat Carriage (3) with two M8 x 38mm Button Bolts
(45) and two M8 Nylon Locknuts (47). Make sure the
Nylon Locknuts are in the hexagonal holes.
Repeat this step for the Right Handlebar (36).
5. Slide the rear of the Frame (1) onto the Seat Rail (2).
Attach the Frame with four M10 x 25mm Button
Screws (50) and four M10 Split Washers (48).
5
6
50
35
45
47
Hexagonal
Holes
36
48
48
3
1
2
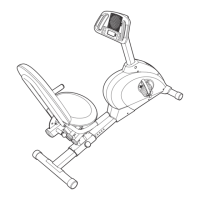
4. Orient the Seat Carriage (3) as shown. Slide the Seat
Carriage onto the Seat Rail (2), and then tighten the
Seat Carriage Knob (31) into the Seat Carriage and an
adjustment hole in the Seat Rail.
Make sure the Seat
Carriage Knob is engaged in one of the adjustment
holes.
4
2
3
31
Adjustment
Holes
 Loading...