• Be sure the trigger is not adjusted to the point where it is too
sensitive and may cause accidental discharge of the marker.
• Removing the trigger spring will cause premature wear on the
microswitch, resulting in failure.
ADJUSTING YOUR TRIGGER
The trigger’s forward and over travel, spring tension, and reach are
fully adjustable so that you can fi ne-tune the trigger to your exact
liking. You do not need to remove the frame or grip from the gun in
order to adjust the trigger pull.
There are two adjustment screws located on the right side of the
Ultralite™ frame and one adjustment screw behind the trigger.
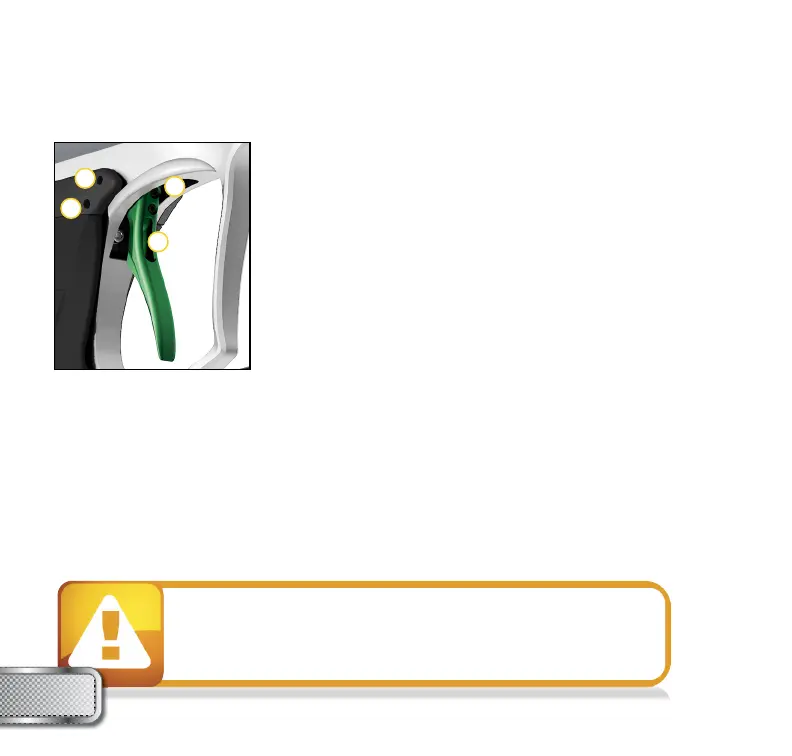
TO ADJUST TRIGGER TRAVEL (SEE FIGURE 1)
Use a
5
⁄64” Allen wrench to make the desired adjustments.
• The screw toward the front of the trigger (1) controls the forward
travel. Screwing it in will shorten the trigger’s length of pull.
NOTE: If this screw is adjusted too far, the switch will be held down at all times and the marker
will not fi re.
• The screw toward the rear of the trigger (2) controls the over travel. By turning this screw you can
adjust how far the trigger will travel after it reaches the fi ring point.
NOTE: If this screw is adjusted too far, the trigger will not be allowed to travel far enough to
depress the switch and fi re the marker.
TO ADJUST SPRING TENSION (SEE FIGURE 1)
• Use a
5
⁄64” Allen wrench to make the desired adjustment. The adjustment is made by pushing
the Allen wrench through a hole in the trigger (3).
TRIGGER
ADJUSTMENT
W W W . P R O T O P A I N T B A L L . C O M
12
FIGURE 1
4
3
2
1