џ Do not use the charger if it has been modified or damaged.
џ The battery should be charged at a temperature of between 0° C and +45° C, otherwise the battery life will be
significantly reduced.
џ The battery is equipped with a short circuit protection system. However, situations that may lead to short
circuiting should be avoided.
џ After being stored for a long time, the battery should be partially charged – it should not be fully charged or
completely discharged.
џ Do not charge the battery immediately after bringing it from the cold into a warm atmosphere. Wait 30–40
minutes for the battery to warm up.
џ Do not leave the battery unattended during charging.
Battery defective. Battery should not be used.
Battery charge from 20% to 60%.
Battery completely charged. Can be disconnected from the charger.
џ Do not leave a charger with a battery connected to the mains for more than 24 hours after full charge.
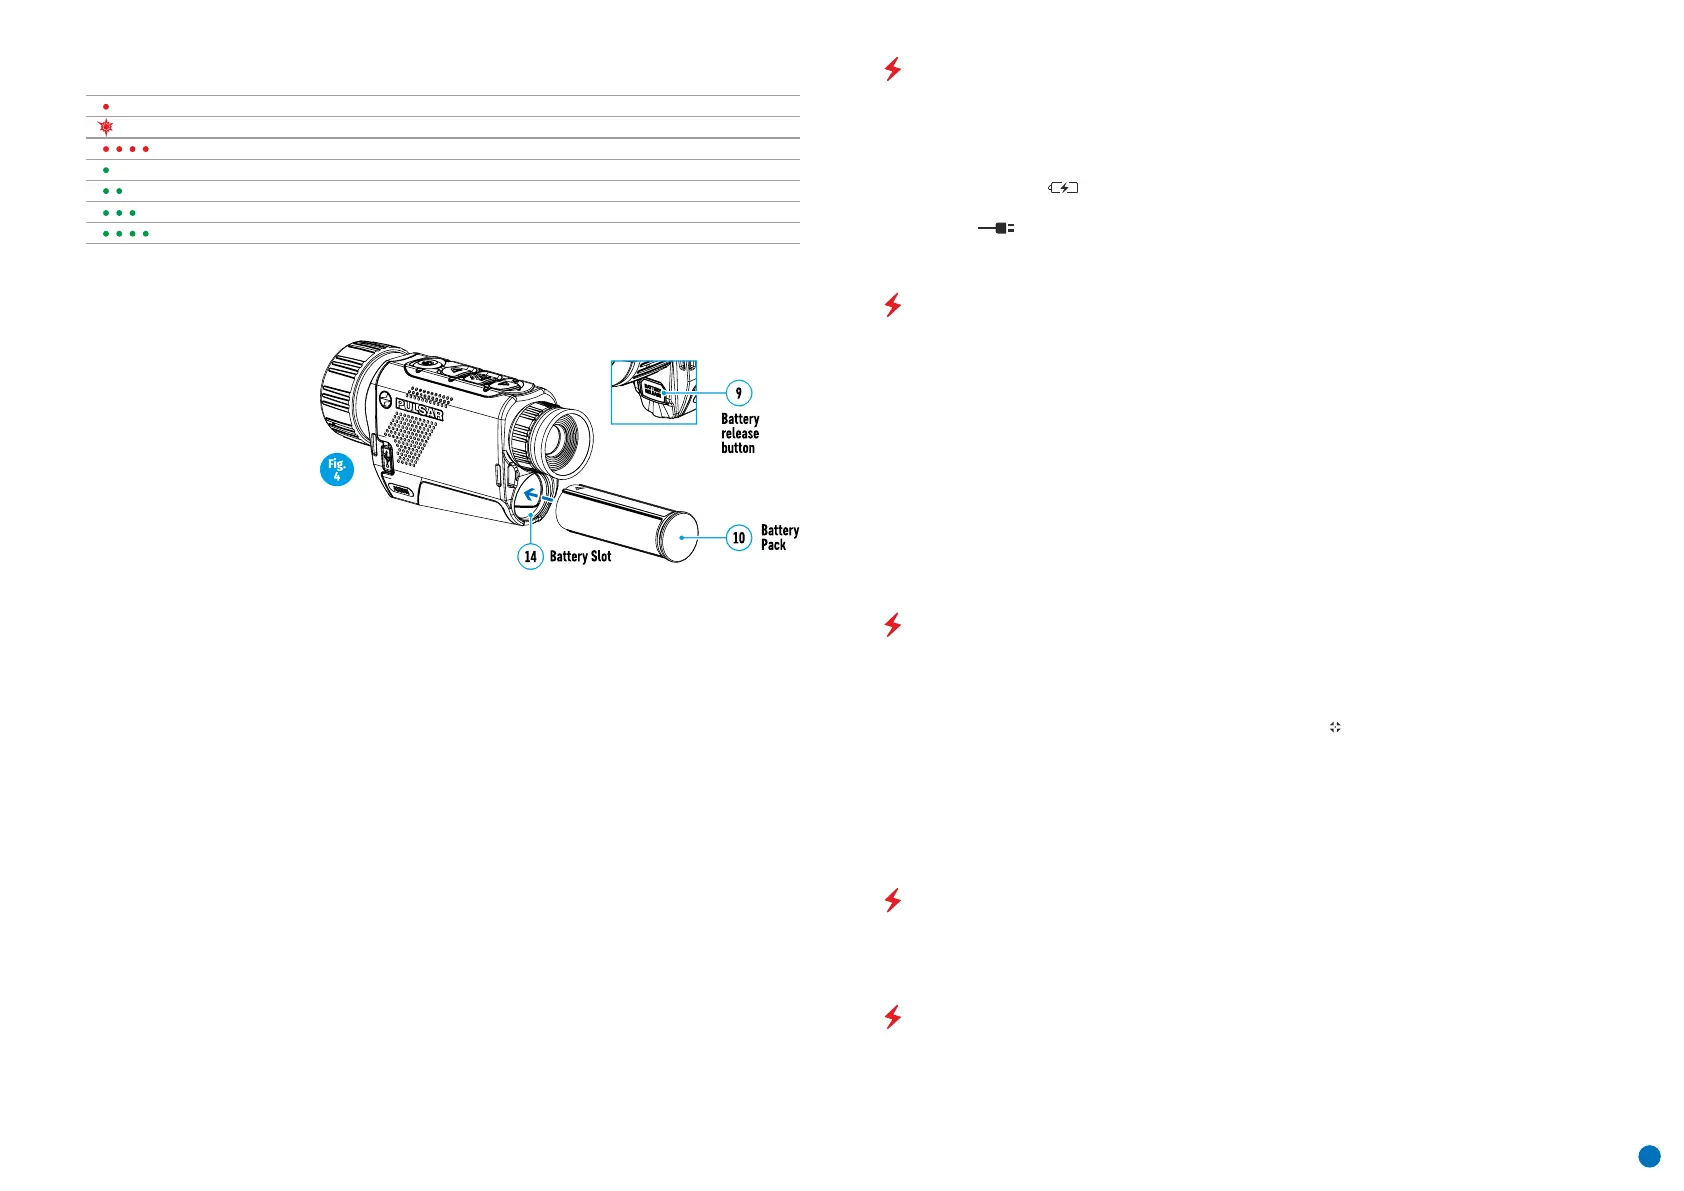
Installation:
Safety measures:
џ The connecting of third-party devices with an energy consumption greater than permissible is not
recommended.
џ Do not dismantle or deform the battery.
Battery charge from 0% to 10%. Charger not connected to the mains power supply.
џ Do not subject the battery to shocks or falls.
LED Indicator * Battery charge status
џ Insert the battery (10) into the
assigned slot on the device casing
(14), aligning the images on the
instrument and the battery.
џ To remove the battery, press the
Battery Release button (9).
џ When charging, always use the
charger supplied with your optical
device. The use of a different
charger may cause irreparable
damage to the battery or the charger and may cause the battery to ignite.
џ The battery is not intended to be immersed in water.
џ Where the battery is used in below-zero temperatures, capacity will decrease. This is normal and does not
indicate a defect.
Battery charge from 0% to 10%. Charger connected to the mains power supply.
Battery charge status (see table).
Battery charge from 10% to 20%.
Battery charge from 60% to 95%.
џ When properly installed, the
battery is locked into the slot with
a special clip.
* The LED indicator displays the current level of charge of the battery for 30 seconds when the APS charger is not
plugged in. When the power is connected, the display shows the current status of the battery constantly, the LEDs
additionally flickering to indicate the battery charging process.
џ Do not expose the battery to high temperatures or naked flame.
џ Do not use the battery in temperatures that exceed those shown in the table – this may shorten battery life.
Store the battery out of the reach of children.
EXTERNAL POWER SUPPLY
џ An icon of a battery will appear on the display showing its charge as a percentage.
џ When the external power supply is disconnected, the device switches to the internal power supply without the
device powering off.
џ If the device is operated from an external power source and the APS3 battery is not connected, an icon is
displayed .
External power is supplied from an external source, such as a 5V Power Bank.
џ The device will switch to operation from the external power source, while the APS3 battery will be gradually
recharged.
џ Attach the external power source to the device's USB connector (8).
OPERATION
џ Adjust the resolution of the icons on the display by rotating the dioptre adjustment ring on the eyepiece (1). In
future, it will not be necessary to rotate the eyepiece dioptre adjustment ring, regardless of distance and other
conditions.
џ Turn the device off after use with a long press of the ON button (5).
џ Adjustment of brightness and contract in the display, as well as turning on the smooth digital zoom, are
described in the QUICK ACCESS MENU FUNCTIONS section.
џ Power up the device by pressing the ON button (5).
џ To focus on the object being observed, rotate the lens focus ring (6).
ATTENTION! The lens of the device must not be pointed at any sources of intense energy, such as laser-emitting
devices or the sun. This may damage the electronic components in the device. Damage caused by failure to
comply with the operating guidelines is not covered under warranty.
Switching on and adjusting the image
џ Remove the lens cover (7). Secure the cover to the strap using the magnet built into the cover.
CALIBRATING THE SENSOR
џ M mode (manual). Secure the lens cap and briefly press the ON button (5). After completing the calibration
process, remove the lens cap.
Select the required mode in the CALIBRATION section of the menu .
Calibration enables the microbolometer temperature background to be equalised and defects in the image
(such as vertical lines, phantom images etc.) to be eliminated.
There are three calibration modes: manual (M), semi-automatic (SA) and automatic (A).
џ A mode (automatic). The device is calibrated autonomously, in accordance with the software algorithm. The
lens cap does not need to be secured (the sensor is closed by an internal shutter). In this mode, the device may
be calibrated by the user using the ON button (5).
џ SA mode (semi-automatic). Calibration is engaged by a brief press of the ON button (5). The lens cap does not
need to be secured (the sensor is closed by an internal shutter).
DISCRETE DIGITAL ZOOM
The device's functionality offers the possibility of quickly increasing its base multiplicity (see the table of
technical properties in the Digital Zoom line) by a factor of 2 or 4. Adjust the digital zoom accordingly by pressing
the DOWN button (2).
QUICK ACCESS MENU FUNCTIONS
џ Enter the menu with a short press of the Menu button (3).
The basic settings (brightness and contrast adjustment, use of the smooth digital zoom function and the
stadiametric rangefinder) are changed via the Quick Access Menu.
џ A short press of the Menu button (3) enables you to switch between functions.
3
 Loading...