8
USER MANUAL FOR KRYPTON XG50 THERMAL IMAGING MONOCULAR
Date
Date setup.
•
Select the Date option with the RIGHT (6) or LEFT (8) buttons.
•
Enter the submenu with a short press of MENU (7) button. The date appears in dd/mm/yyyy
format (12/08/2020).
•
Set the required year, month and day with the RIGHT (6) or LEFT (8) buttons. Press the MENU
(7) button to toggle the digits.
•
To save your chosen date and exit the submenu, press and hold the MENU (7) button.
Time
Time setup.
•
Select the Time option with the RIGHT (6) or LEFT (8) buttons.
•
Enter the submenu with a short press of the MENU (7) button.
•
Select the time format (24-hour clock or AM/PM) by pressing the RIGHT (6) or LEFT (8)
buttons.
•
Switch to hour setup with a short press of the MENU (7) button.
•
Select hour value with a short press of the RIGHT (6) or LEFT (8) buttons.
•
Switch to minute setup with a short press of the MENU (7) button.
•
Select minute value with a short press of RIGHT (6) or LEFT (8) buttons.
•
Save selected time value and exit the submenu with a long press of the MENU (7) button.
Default Settings
Restore default settings.
•
Select the Default Settings option with the RIGHT (6) or LEFT (8) buttons.
•
Enter the submenu with a short press of the MENU (7) button.
•
With a short press of RIGHT (6) or LEFT (8) buttons select Yes to restore default settings or
No to abort.
•
Conrm your selection with a short press of the MENU (7) button.
The following settings will be restored to their factory state before being set by the user:
Video recorder mode – video
Observation mode – Forest
Calibration mode – automatic
Language – English
Wi-Fi – off (default password)
Color palette – White Hot
Attention! When restoring the factory defaults the date, time and user pixel map are saved.
Format
This function enables you to format the Flash memory card. All les will be deleted.
•
Select the Format option with the RIGHT (6) or LEFT (8) buttons.
•
Enter the submenu with a short press of the MENU (7) button.
•
With a short press of RIGHT (6) / LEFT (8) buttons select Yes to format the memory card or
No to return to the submenu.
•
Press the MENU (7) button briey to conrm your selection.
•
If Yes is selected, the message "Do you want to format the memory card?" appears on the
display as well as Yes and No options. Select Yes to format the memory card.
•
Selecting the No option will cancel the formatting and exit the submenu.
Auto shutdown
This item allows you to activate the auto shutdown function for when the device is in a non-
operating position (tilted up or down at an angle of more than 70°, right or left at an angle of
more than 30°).
•
Press and hold the MENU (7) button to enter the main menu.
•
Use the RIGHT (6) or LEFT (8) buttons to select the Auto shutdown submenu.
•
Press the MENU (7) button briey to enter the submenu.
•
Use the RIGHT (6) or LEFT (8) buttons to select the time period (1 min, 3 min, 5 min) upon
expiry of which the device will automatically shut down, or select Off if you wish to
deactivate Auto shutdown.
•
Press the MENU (7) button briey to conrm the selection.
Note: If the Auto shutdown function is activated, the status bar shows an icon and shutdown
time period as
1 min.
Device
Information
This menu item allows the user to view the following information about the device:
SKU Number
Firmware Version
Device Name
Hardware Version
Device Serial Number
Service Information
To display information, do the following:
•
Press and hold the MENU (7) button to enter the main menu.
•
Use the RIGHT (6) or LEFT (8) buttons to select the Device Information icon .
•
Press the MENU (7) button briey to view / exit the information.
Defective Pixel
Repair
When using the device, defective (dead) pixels may appear on the sensor. These are bright or
dark points of a constant brightness that are visible on the image.
KRYPTON XG50 thermal imagers allow the user to remove any defective pixels on the sensor
using rmware as well as to cancel removing.
•
Press and hold the MENU (7) button to enter the main menu.
•
Use the RIGHT (6) or LEFT (8) buttons to select the Defective Pixel Repair icon .
•
Press the MENU (7) button to enter the submenu.
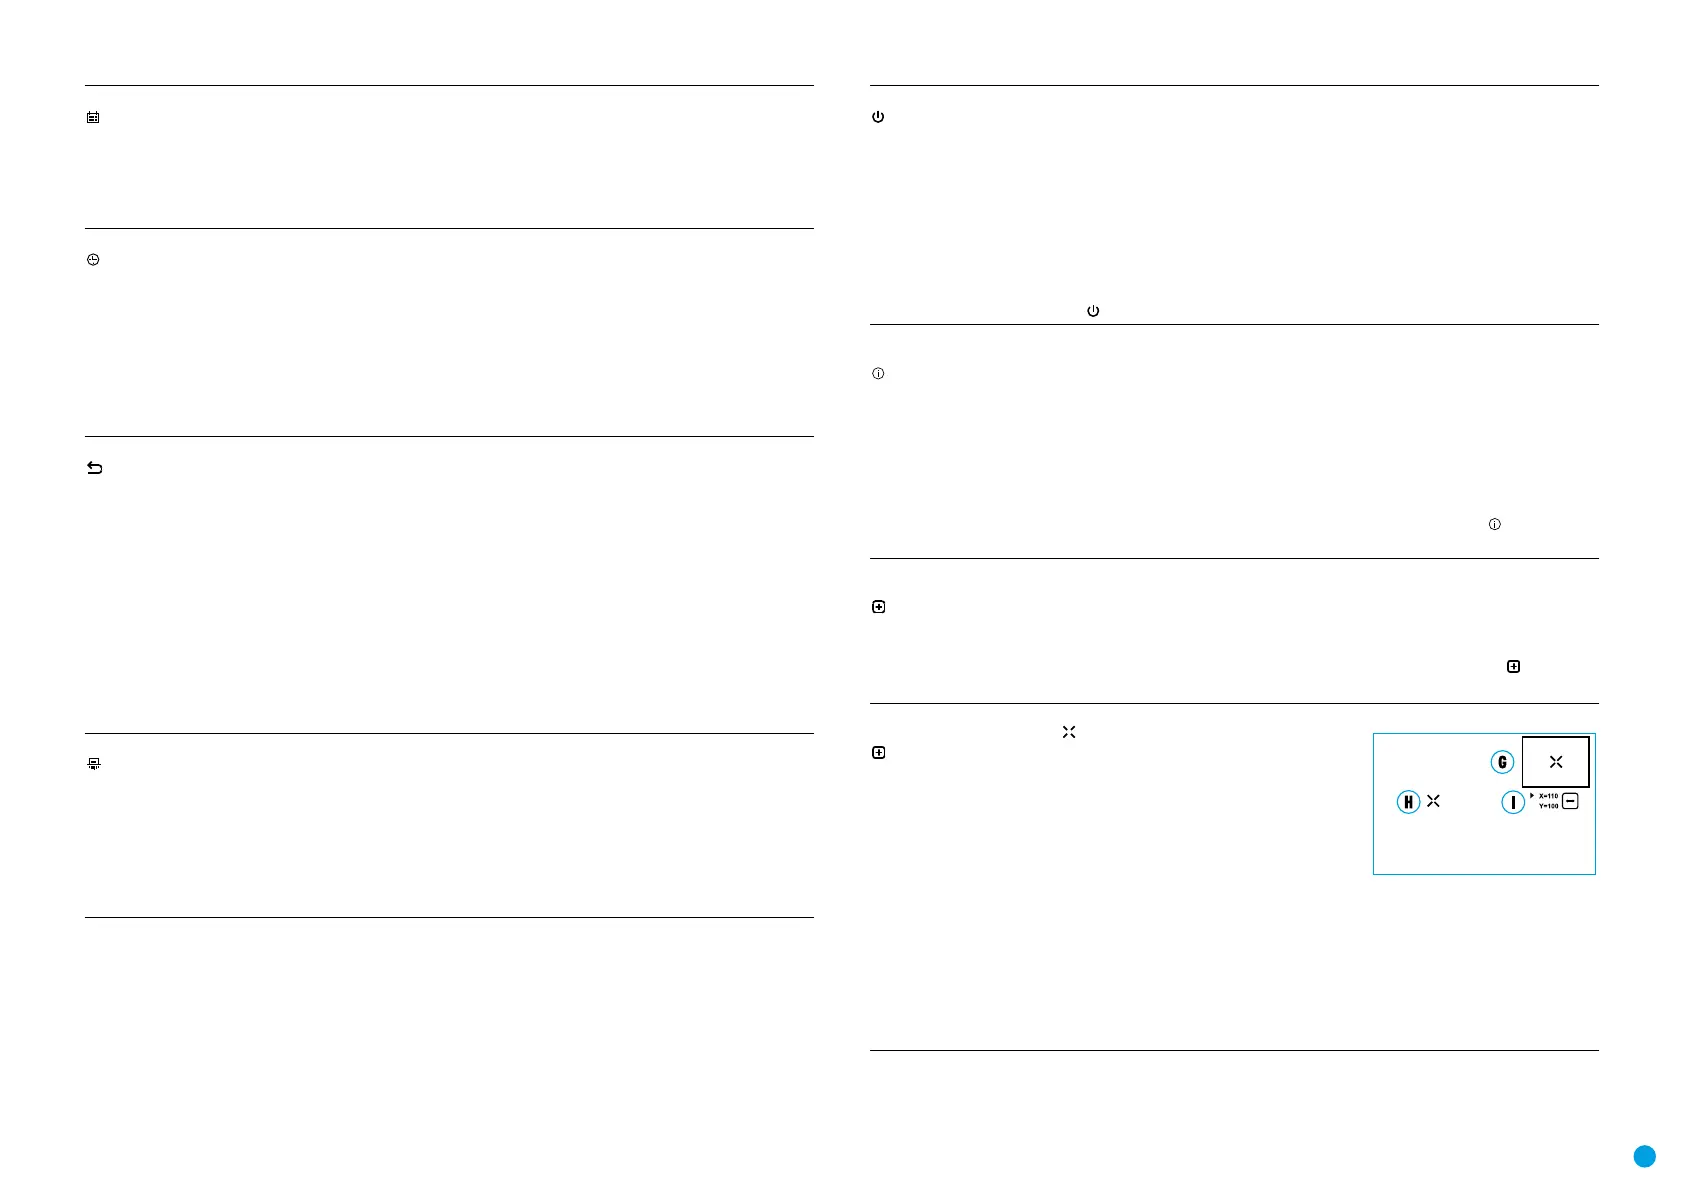
Defective Pixel
Repair
•
Select the Defective Pixel Repair option by briey pressing the MENU (7) button.
•
A marker (H) will appear on the left side of the
display.
•
A magnifying glass (G) will appear on the right side of
the display – a rectangle with an enlarged view of the
marker for precise pixel selection – and the coordinates
(I) of the marker under the magnifying glass.
•
Press the RIGHT (6) or LEFT (8) buttons briey to align a
defective pixel with the center of the enlarged marker
in the magnifying glass – the pixel should be removed.
Press the MENU (7) button briey to switch the marker direction between the horizontal to
the vertical.
•
Press the ON (9) button briey to delete the dead pixel.
•
Once the pixel has been successfully deleted, an OK message will briey appear on the
screen.
•
You can then delete the next defective pixel if required by moving the marker across the
display.
•
Press and hold the MENU (7) to exit the function.