14
Temperature & Pressure Gauge
The temperature and pressure gauge is shipped loose
for field installation.
Hydronic Heating
System Design
Hot water heating systems all have unique levels of
operating diversity. Raypak equipment design utilizes
as little water mass as possible to ensure maximum
operating efficiency. Primary / Secondary piping
arrangement is the method recommended and the
only method supported by Raypak for installation of
Raypak heating equipment. Proper system design
should always include system flow in excess of the
connected boiler flow for proper operation
(Boiler Flow + 15% = Min. System Flow). When
appropriate, a Buffer/De-coupler Tank can be used
where system flow may be reduced below the con-
nected boiler flow. Failure to design for adequate
system flow (i.e. bypasses, 3-way control valves, flow
limiting balance devices, buffer tanks, etc.) will result in
boiler short-cycling and poor system performance.
Always contact your local Raypak representative for
system design assistance to avoid these issues.
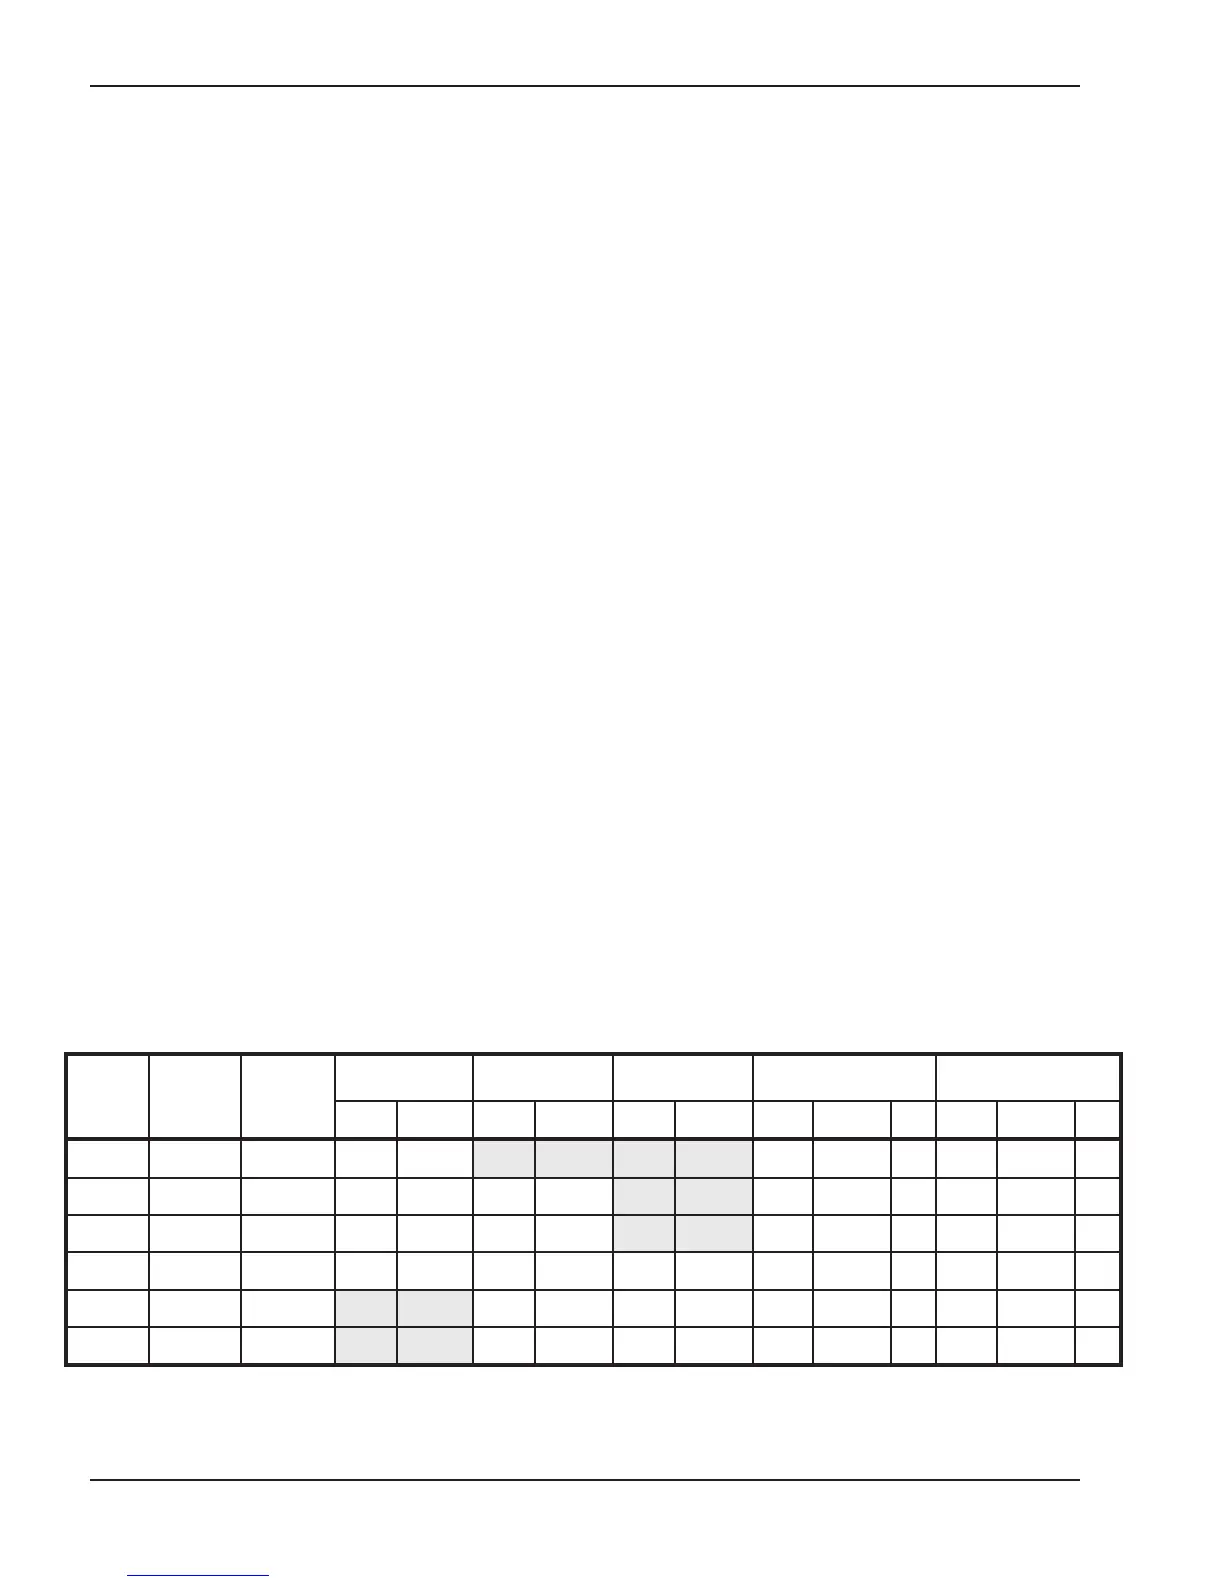
Pump Selection
In order to ensure proper performance of your boiler
system, you must install a properly-sized pump.
Raypak recommends using a 20°F ∆T as design ∆T.
(∆T is the temperature difference between the inlet
and outlet water when the heater is firing at full rate).
If a ∆T other than 20°F is necessary, see Table E for
flow rate requirements.
Model
No.
Input
MBTUH
Output
MBTUH
10°F T 20°F T 30°F T Min. Flow Max. Flow
gpm P (ft) gpm P (ft) gpm P (ft) gpm P (ft) T gpm P (ft) T
HD101 100 85 17 1.3 13 0.7 14 44 8.8 4
HD151 150 128 26 3.0 13 0.7 13 0.7 20 44 8.8 6
HD201 199 169 34 5.3 17 1.3 13 3.4 27 44 8.9 8
HD251 250 213 44 9.2 21 2.1 14 1.0 13 0.7 34 44 9.2 10
HD301 299 254 25 3.1 17 1.4 13 0.8 40 44 9.4 12
HD401 399 335 34 5.6 22 2.5 17 1.4 40 44 9.8 15
Table E: Heater Rates of Flow and Pressure Drops
*Flow switch will not activate at less than 12 gpm.
NOTE: Basis for minimum flow — 13 gpm or 40°F ∆T maximum flow — gpm, except for header.
Hydrostatic Test
Unlike many other types of heaters, Raypak heaters
do not require hydrostatic testing prior to being placed
in operation. The heat exchanger has already been
f
actory-tested and is rated for 160 PSI maximum oper-
ating pressure. However, Raypak does recommend
hydrostatically testing the piping connections to the
heater and the rest of the system prior to operation.
This is particularly true for hydronic systems using
expensive glycol-based antifreeze. Raypak recom-
mends conducting the hydrostatic test before
connecting gas piping or electrical supply.
Leaks must be repaired at once to prevent damage to
the heater. NEVER use petroleum-based stop-leak
compounds.
1. Connect fill water supply. Fill heater with water (be
sure bleed valve is open). When water flows from
bleed valve, shut off water. Close bleed valve.
Carefully fill the rest of the system, being sure to
eliminate any entrapped air by using high point
vents. Close feed valve. Test at standard operating
pressure for at least 24 hours.
2. Make sure constant gauge pressure has been
maintained throughout test.
3. Check for leaks. Repair if found.
Low Temperature System
Heater requires minimum inlet temperature of 105°F.
Consult the following sections for piping details.