18|NeoRIB2312installationguide:12148-D04-19
Inbuiltmockchimney(zeroclearanceinstallation)
1
2
Prepare the site
Ensure the enclosure meets the dimension requirements and check the gas and electrical
supplies have been prepared according to information in this guide.
Ensure there are no studs, noggins, ceiling joints, wiring or other obstructions within the
wall or ceiling cavity where the flue is to be located.
Assemble the zero clearance box
Refer separate assembly instructions included with the zero clearance box.
Fit the zero clearance box
Slide assembled box into the cavity, ensuring the gas and electrical supplies are accessible.
4
Install the flue
Install the flue kit and/or individual flue components.
5
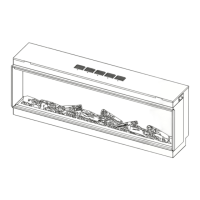
Unpack the engine
The Neo engine is supplied in one carton. Check for damage and ensure you have the
correct gas type before starting. Do not install if any damage is evident.
6
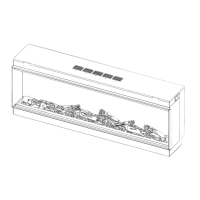
Prepare the engine
Attach the flue guide rails, supplied with the zero clearance box, to the top of the unit using
the four predrilled holes and screws supplied.
7
Install cladding
Before installing the Neo ensure the cladding for the front of the enclosure has been
fitted. The cladding MUST BE installed flush with the zero clearance box. Failure to do this
will cause alignment problems with the flue.
8
Connect the flue adaptor
Connect the flue adaptor* to the engine by aligning the guide rails with the guide plate*
of the flue adaptor. Slide the flue adaptor in until the guide plate is fully home against the
rear of the flange at the top of the heater.
* Supplied with the zero clearance box
9
Position the engine and connect the electrical supply
Place the Neo engine in front of the fireplace enclosure. Use a panel of cardboard packaging
underneath the engine to minimise damage to the floor. Connect the electrical supply.
10
Insert the unit into the enclosure
Move the engine into the zero clearance box ensuring the gas supply and pipe fittings
feed into the rear access hole. Align the guide rails with the guide plate and slide in the
engine until the guide plate is fully home against the rear frame mounting panel.
11
3
Connect and secure the flue
The weight of the flue should not be supported by the appliance, it should be self-
supporting. Supporting the flue is usually completed during the framing stage with flue
supports or straps within the cavity.
Replace the flue access plate and secure the guide plate of the flue adaptor to the flue
access plate with the two screws supplied. Secure access plate to the engine.
next
page
 Loading...