3. Assembly
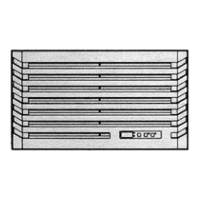
Make 2 cut-outs and screw holes in the top of the enclosure in accordance with fig. 3.1.
Prior to mounting, ensure that:
• the site for the enclosure, and hence the arrangement of the cooling unit, is selected so as to
ensure good ventilation;
• the location is free from excessive dirt and moisture;
• the mains connection ratings, as stated on the name plate, are available;
• the ambient temperature is no higher than +55ºC;
• the packaging shows no signs of damage. Traces of oil are an indication of coolant loss and
of leakage in the unit system. Any damage to the packaging can become the cause of a
subsequent function failure;
• the enclosure is sealed on all sides. Condensation will occur if the enclosure is leaky;
• the separation of the units from one another and from the wall should not be less than 200
mm;
• air inlet and outlet must not be obstructed on the inside;
• units should only be fitted vertically in the specified position. Max. deviation from true
vertical: 2º;
• condensate drainage is provided (see 6.3);
• electrical connection and repair must be carried out only by authorized specialist
personnel. Use only original replacement parts!
• To avoid an increase in condensation, a door operated switch (e.g. PS 4127) should be used
which will switch the cooling unit off when the enclosure door is opened (see 5.2.3.3).
Stick the enclosed sealing gasket onto the enclosure roof.
Important: To achieve a permanent seal between the cooling and the enclosure, the mounting
surface may have to be strengthened or supported (see example on PS 4206, fig. 3.2).
Accessories for roof plate stiffening on the PS:
Mounting rail
"U" nut
Fixing bracket
Threaded block
Screw 6 setscrews into the blind nuts on the underside of the unit and fix the unit with 6 washers
A6.4 and 6 nuts M6 underneath. For transportation of unit by crane: remove the blanking plug and
screw in an eyebolt M12.