5
15. Set “Brake Sensitivity” to number 2.
16. Set “Max Brake” pressure to number 2.
HELPFUL HINT! Setting the Brake Sensitivity to a higher number means you will need more force on the
RVs’ brake pedal to activate the braking system. Setting the Max Brake Pressure to a higher number
means the braking unit is exerting more pressure on the towed cars brakes.
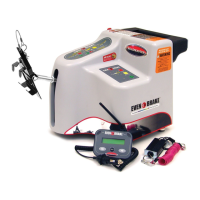
14. PROGRAMMING LEVEL
Make sure the car is NOT running and it is on a LEVEL SURFACE. Also, verify that the unit is roughly
level. Adjust feet as necessary to level. If the compressor is running, wait for compressor to stop.
Now press and hold the “Max Brake” and “Brake Sensitivity” buttons simultaneously to program level.
This calibrates level and gives the unit a starting point for sensing deceleration. Once you have pressed the
“Max Brake” and “Brake Sensitivity” simultaneously, the row of lights for the “Brake Sensitivity” will flash two
times to let you know that the unit’s level has been successfully programmed. Do not proceed until the
row of lights flashes or your braking system will NOT perform properly while towing.
IMPORTANT! You only have to program level one time during the original installation. The next time you tow,
you will not need to re-program level. The this unit remembers “level” even after being unplugged. The only
time you need to re-program level is if you change towed cars. If the system is not performing properly, it is
usually because “level” has not been programmed properly. In this case, re-program level as described above.
CAUTION:
!
Car must be roughly level. If the car is severely off level when you push
the Max Brake and Brake Sensitivity buttons simultaneously, it will make
the system too sensitive and cause it to brake at the slightest bump or
rough spot in the road. Always be sure the car is on flat ground and not on ramps, hoists or a hill
when setting level. This will help prevent unnecessary braking.
IMPORTANT:
!
Installation continued
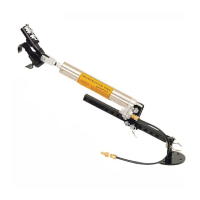
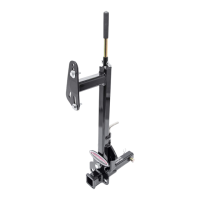
17. Check for secure placement of the unit and seat. Do this by depressing the test button and holding it until
the cylinder extends. If it moves excessively, or interferes with seat position controls, adjust
positioning and retest. Adjustable seat pad may need to be readjusted after pressing and holding the
test button until the cylinder extends. Verify that it is not unlocking the seat, affecting seat position
controls, or allowing the braking system to “climb”.
HELPFUL HINT! Some rubberized floor mats will cause “climbing”. Remove the floor mat if this happens.
If the unit is repositioned for any reason, be sure to reprogram level as described in step 14, before
continuing.
This next step fully activates the unit.
Don't let the unit "climb". If the braking system's adjustable seat pad is not
properly positioned on the front of the seat, the unit can "climb" up the seat
with repeated braking. This will cause the rear of the box to raise up off the
floor making the braking system more sensitive. If this occurs, you will experience excessive &
unnecessary braking. Always push the test button and hold it until the cylinder extends after the
installation to make sure the unit is secure and stable & will not "climb" up the seat. If it does,
reposition the adjustable seat pad so that the unit cannot "climb". Failure to follow these instructions
will result in non-warranty brake damage.
CAUTION:
!