43
Style Composer
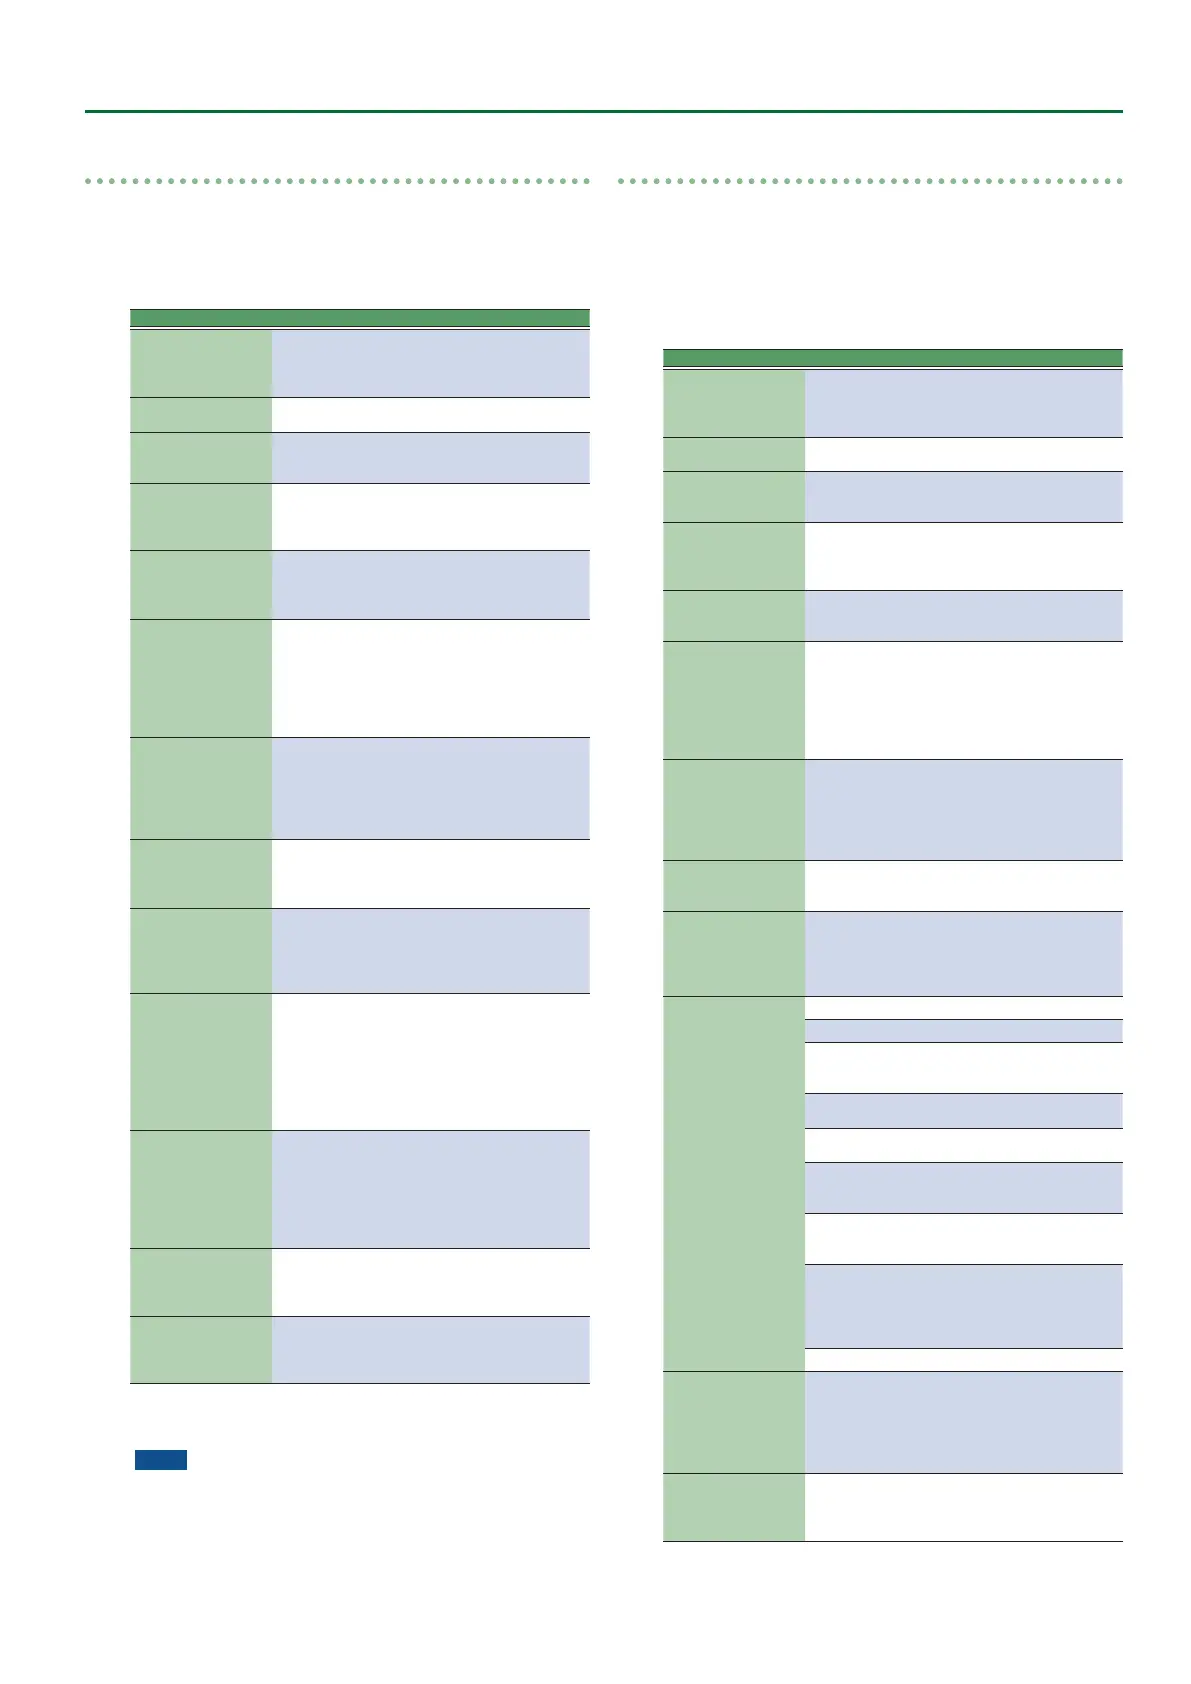
Quantize
Use this function if you chose not to quantize your music during
recording and now realize that the timing is not quite what you
expected it to be. If only certain notes in a given time range need
to be quantized, you should narrow down the edit range using the
“From”/“ To” parameters.
Parameter Value Explanation
Track
Adrm–Acc6,
ALL
Allows you to select the track you
wish to edit. You can also select
“ALL” here, in which case the opera-
tion applies to all tracks.
Mode
Major, Minor,
7th
Allows you to select the Mode to be
edited.
Division
Intro 1–4, Main
1–4, Fill 1–4,
End 1–4
Use this parameter to select the
Division you want to edit.
From Bar
1–[last
measure of
the track or
pattern]
Refers to the rst measure to be ed-
ited. By default, the “From” value is
set to the beginning of the selected
track(s).
From Beat
1–[number of
beats per bar]
Species the beat position.
The number of selectable beats
depends on the selected time
signature.
From CPT 0–119
Refers to the starting CPT position.
“CPT” is short for “Clock Pulse
Time,” the smallest unit used by
the E-A7. (There are 120 CPTs to
every beat of a 4/4 bar.) Change this
setting only if your edit operation
should start after the selected beat.
To Bar
1–[last
measure of
the track or
pattern]
This is where you specify the last
measure to be edited. By default, the
“To” position is set to the last event
of the selected track (or the last
event of the longest track when you
select “All”).
To Beat
1–[number of
beats per bar]
Species the beat position.
The number of selectable beats
depends on the selected time
signature.
To CPT 0–119
Refers to the last clock that should
be aected by the edit operation.
Change this setting only if your edit
operation should not end exactly on
the selected beat.
Resolution
1/4, 1/8, 1/8T,
1/16, 1/16T, 1/
32, 1/32T, 1/64
This parameter sets the resolution of
the Quantize function. Be sure to al-
ways select the value of the shortest
note you recorded.
Otherwise, your part no longer
sounds the way you played it,
because shorter notes are shifted to
the wrong positions.
Strength 0%–100%
Use this parameter to specify how
precise the timing correction should
be. “0%” means that the selected
“Resolution” value is not applied
(“0% correction”), while “100%”
means that all notes are shifted to
the mathematically correct positions.
From Note 0 C- –127 G9
This parameter allows you to set
the note (or lower limit of the note
range) to be modied within the
specied “From/To” time range.
To Note 0 C- –127 G9
This parameter allows you to set
the upper limit of the note range
to be modied within the specied
“From/To” time range.
Specify the parameters, and press the [Exec] (F5) button to execute
the operation.
NOTE
5 If you want to save the modied data, save the style (p. 42).
5 If you want to return to the state prior to editing, execute the
UNDO operation (p. 42).
Erase
“Erase” allows you to selectively delete data either within a specied
range of measures, beats or clocks or from the entire track(s).
When “Data Type” is set to “Al l ,” “Erase” substitutes the required
number of rests for the data you delete, so that you end up with the
equivalent number of blank measures. If you also want to eliminate
the measures themselves, use “Delete” (see below).
When you execute Erase, the performance data is erased.
Parameter Value Explanation
Track
Adrm–Acc6,
ALL
Allows you to select the track you
wish to edit. You can also select
“ALL” here, in which case the opera-
tion applies to all tracks.
Mode
Major, Minor,
7th
Allows you to select the Mode to be
edited.
Division
Intro 1–4, Main
1–4, Fill 1–4,
End 1–4
Use this parameter to select the
Division you want to edit.
From Bar
1–[last
measure of
the track or
pattern]
Refers to the rst measure to be ed-
ited. By default, the “From” value is
set to the beginning of the selected
track(s).
From Beat
1–[number of
beats per bar]
Species the beat position. The
number of selectable beats depends
on the selected time signature.
From CPT 0–119
Refers to the starting CPT position.
“CPT” is short for “Clock Pulse
Time,” the smallest unit used by
the E-A7. (There are 120 CPTs to
every beat of a 4/4 bar.) Change this
setting only if your edit operation
should start after the selected beat.
To Bar
1–[last
measure of
the track or
pattern]
This is where you specify the last
measure to be edited. By default, the
“To” position is set to the last event
of the selected track (or the last
event of the longest track when you
select “All”).
To Beat
1–[number of
beats per bar]
Species the beat position. The
number of selectable beats depends
on the selected time signature.
To CPT 0–119
Refers to the last clock that should
be aected by the edit operation.
Change this setting only if your edit
operation should not end exactly on
the selected beat.
Data Type (select the
data to be edited)
ALL All parameters listed below.
Note Only note messages.
Modulation
CC01 messages usually used for add-
ing vibrato (i.e. use of the BENDER/
MODULATION lever).
PanPot
CC10 messages that specify the
stereo position.
Expression
CC11 messages that are used for
temporary volume changes.
Reverb
Reverb Send messages (how strong-
ly the part should be processed by
the reverb eect).
Chorus
Chorus Send messages (how strong-
ly the part should be processed by
the chorus eect).
Program
Change
Program change messages, used to
select sounds or Drum Kits. Note: by
deleting program change messages
you also dispose of the related CC00
and CC32 bank select) messages.
P. Bender: Pitch Bend data (i.e. use of the lever).
From Note 0 C- –127 G9
This parameter is only displayed if
“Data Type” (see above) is set to
“Note.” It allows you to set the note
(or lower limit of the note range)
to be modied within the specied
“From/To” time range.
To Note 0 C- –127 G9
This parameter allows you to set
the upper limit of the note range
to be modied within the specied
“From/To” time range.
Specify the parameters, and press the [Exec] (F5) button to execute
the operation.
 Loading...