49
Riposizionare la spazzola e la sua protezione. Assicurarsi che la parte in gomma sull’estremità
della spazzola sia in posizione. Bloccare la protezione della spazzola con I 2 fermagli.
IT
Setzen Sie die Staubsaugerbürste und den Bürstenschutz wieder ein. Achten Sie darauf, dass
der Gummiabschnitt an der Spitze der Bürste an seinem Platz ist. Fixieren Sie den Bürstenschutz
mithilfe der beiden Befestigungselemente.
DE
Plaats de borstel en het omhulsel van de borstel terug. Zorg dat het rubberen deel aan het
uiteinde van de borstel op de juiste plaats is aangebracht. Zet het omhulsel van de borstel vast
met de 2klemmen.
NL
Volte a colocar a escova e a proteção da escova. Certifique-se de que a parte de borracha na
extremidade da escova está no respetivo lugar. Fixe a proteção da escova com os dois fechos.
PT
Repuneți la loc peria și apărătoarea acesteia. Asigurați-vă că porțiunea de cauciuc din capătul
periei este instalată corect. Blocați apărătoarea periei cu ajutorul celor 2dispozitive de blocare.
RO
Поставете четката и предпазителя на четката обратно. Уверете се, че гумената част във
върха на четката е на мястото си. Заключете предпазителя на четката като използвате 2-те
заключващи механизма.
BG
Vložte zpět kartáč a kryt kartáče. Ujistěte se, že je gumová část na špičce kartáče na svém místě.
Zajistěte kryt kartáče pomocí 2 pojistek.
CS
4.
month
EN
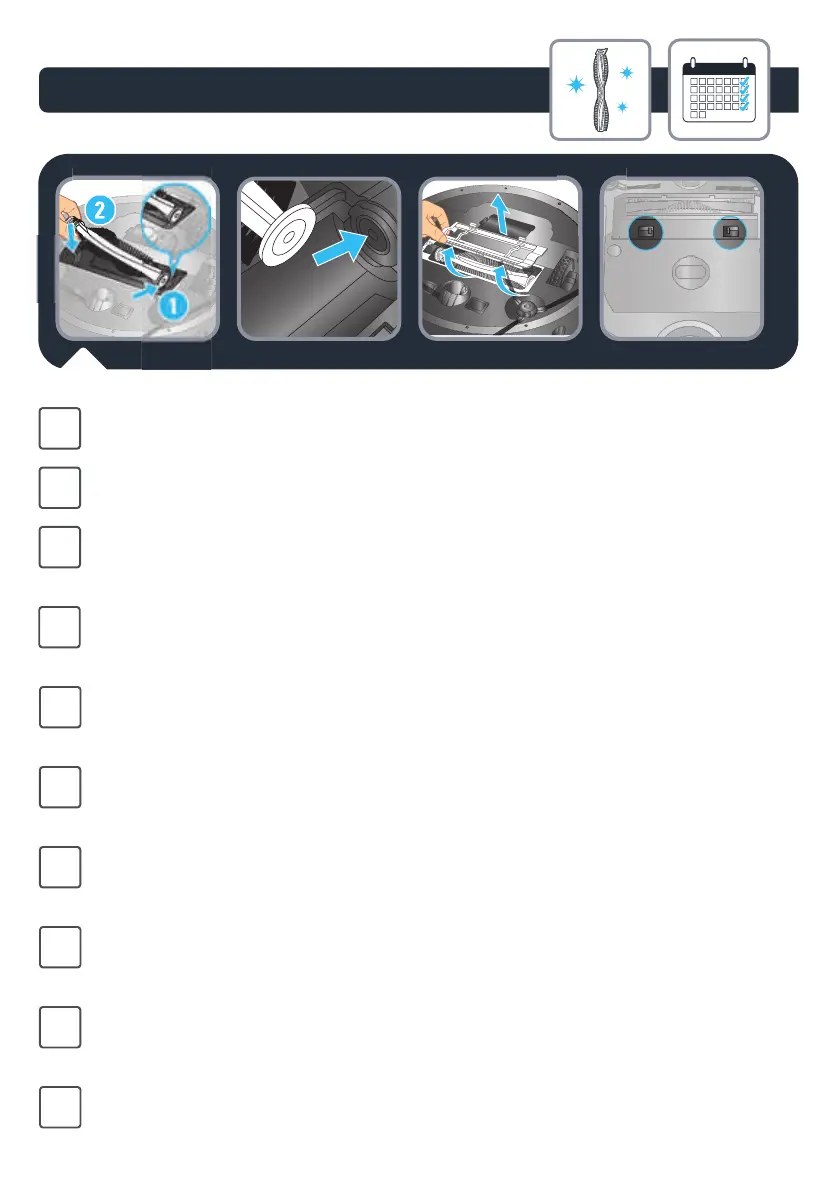
Put the brush and the brush guard back. Make sure that the rubber part at the tip of the brush
is in place. Lock the brush guard with the two lockers.
Replacez la brosse et le protège-brosse. Assurez-vous que la partie en caoutchouc à l’extrémité
de la brosse est bien installée. Verrouillez le protège-brosse avec les deux clips.
FR
Vuelva a colocar el cepillo y el protector del cepillo. Asegúrese de que la pieza de goma en el
punta del cepillo está en la posición correcta.
Bloquee el protector del cepillo con los 2 cierres.
ES
 Loading...