Page 39
ROYAL ENFIELD 350cc and 500cc O.H.V. WORKSHOP MANUAL
With the ignition switch in the "OFF"
position, start the engine.
Slowly increase the speed of the engine until
the voltmeter needle "flicks" and then steadies.
Note this value and stop the engine.
If this value lies outside the limits given in
paragraph 2(b), the regulator setting must be
adjusted.
If the value is within the limits, examine the
cut-out as described in paragraph 3(c).
(e) Adjusting the electrical setting of the regulator
Adjustment of the regulator requires removal
of the control box cover. This is facilitated by
removing the control box from the machine and
providing temporary connections. Loosen the
control box cover securing clips by slackening
the securing screws set in the base of the control
box, and lift off the cover.
It is important that regulator adjustments are
carried out with the control box supported in a
similar position to that on the machine.
Restart the engine.
Slacken the locknut of the regulator adjusting
screw (see Fig. 2) and turn the screw in a
clockwise direction to raise the setting or an
anti-clockwise direction to lower the setting.
Turn the screw only a fraction of a turn at a time
and then tighten the locknut. Repeat as above
until the correct setting is obtained.
Adjustment of regulator open-circuit voltage
should be completed within 30 seconds;
otherwise heating of the shunt winding will
cause false settings to be made.
Stop the engine.
Remake the original connections and replace
the cover. Ensure that the cover seats correctly
on the sealing washer.
N.B.-A dynamo run at high speed on open
circuit will build up a high voltage. Therefore,
when adjusting the regulator, do not run the
engine up to more than half throttle or a false
setting will be made.
(d) Checking the electrical setting of the
cutout
If the regulator is correctly set but the battery
is still not being charged, the cut-out may be out
of adjustment.
Replace the control box in the testing
position, remake the temporary connections and
remove the control box cover. Connect a
voltmeter between terminals "D" and "E."
Start the engine and slowly increase the
speed until the cut-out contacts close. Note the
voltage at which this occurs and stop the
engine. This should be 6.3-6.7 volts. If
operation of the cut-out takes place outside
these limits, it will be necessary to adjust.
(e) Adjusting the electrical setting of the
cutout
Restart the engine.
Slacken the locknut securing the cut-out
adjusting screw and turn the adjusting screw in a
clockwise direction to raise the voltage setting or
in an anti-clockwise direction to reduce the
setting.
Turn the screw only a fraction of a turn at a
time and then tighten the locknut. Test after each
adjustment by increasing the engine speed and
noting the voltmeter reading at the instant of
contact closure.
Stop the engine.
Electrical setting of the cut-out, like the
regulator, must be made as quickly as possible
because of temperature-rise effects. Tighten the
locknut after making the adjustment.
N.B.-if the cut-out does not operate, there
may be an open-circuit in the wiring of the
cut-out and regulator unit, in which case the unit
should be removed for examination or
replacement.
1. General
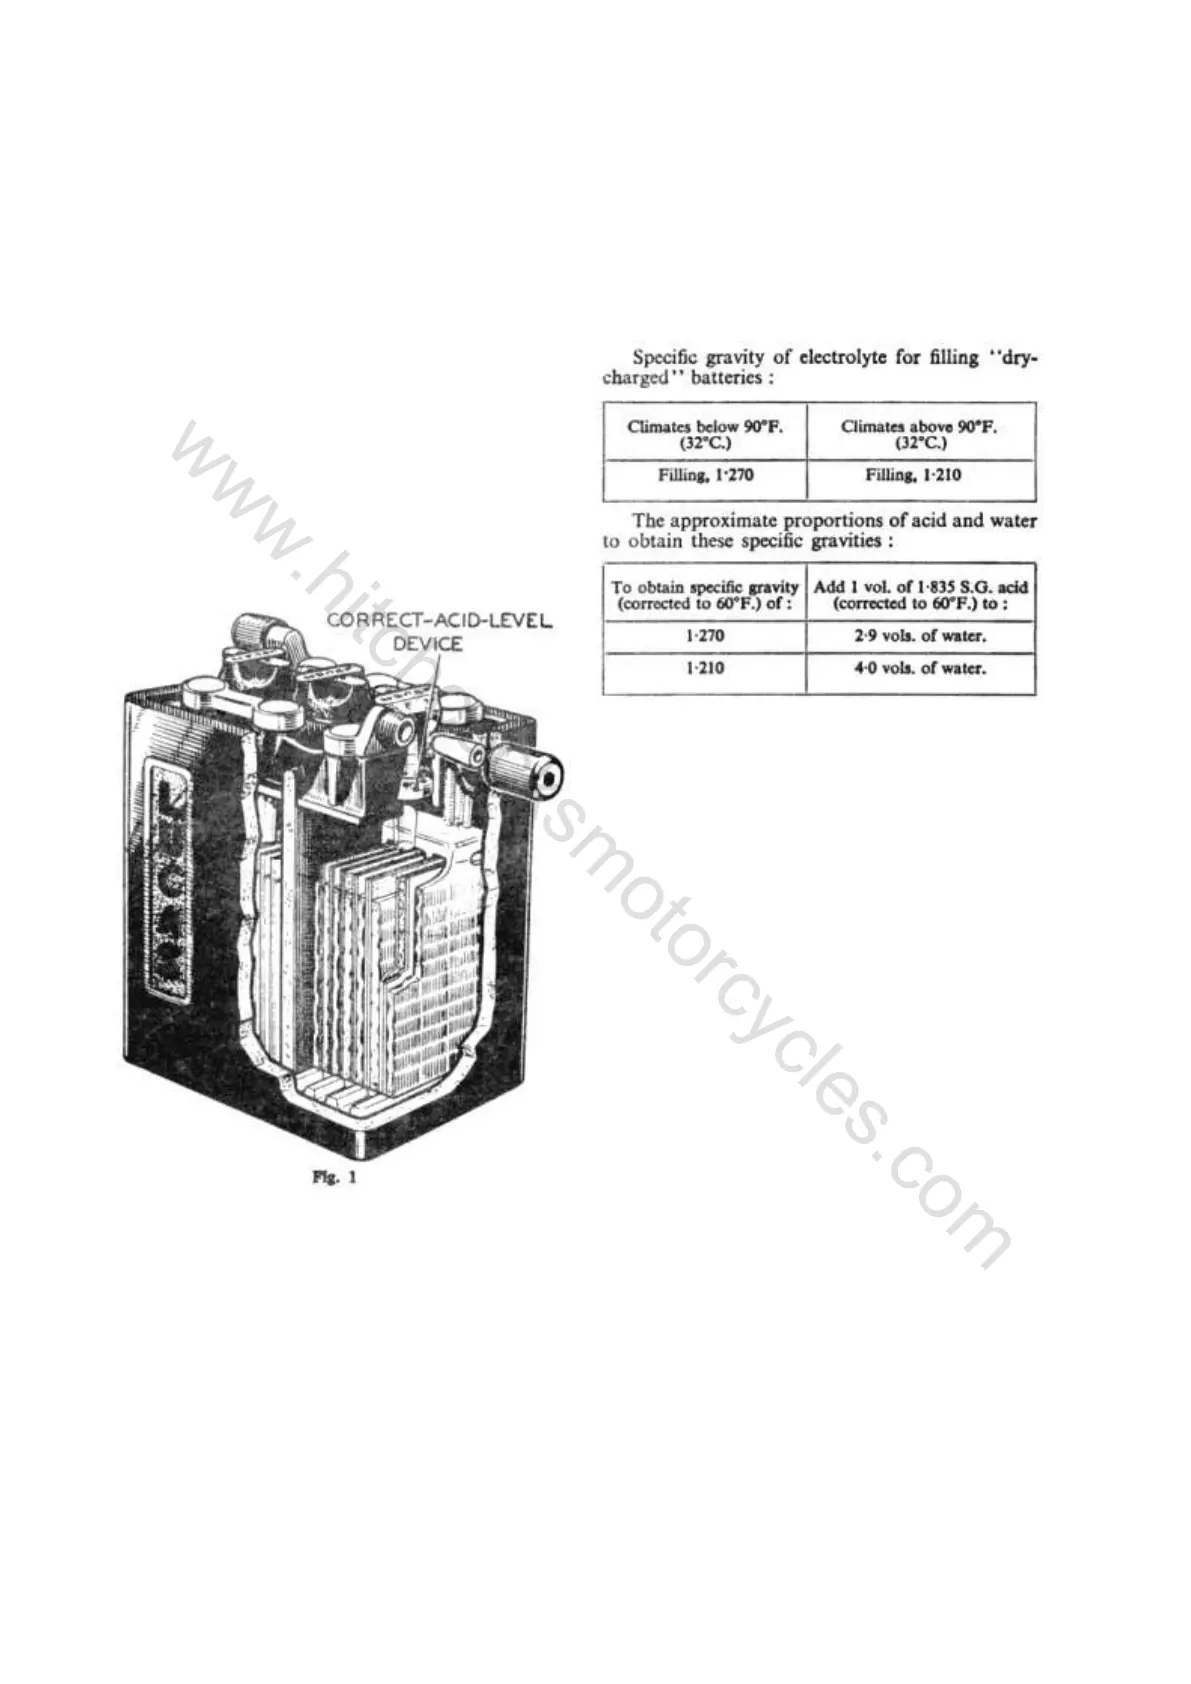
The model PUZ7E (see Fig. 1) is a
"drycharged" battery and is supplied without
electrolyte but with its plates in a charged
condition. When the battery is required for
service it is only necessary to fill each cell with
sulphuric acid of the correct specific gravity. No
initial charging is required, but the battery must
be left to stand at least one hour after filling
before putting the machine into service and then
adjusting the acid level if necessary.
2. Preparation for Service
The electrolyte is prepared by mixing together
distilled water and concentrated sulphuric acid,
using lead-lined tanks or suitable glass or
earthenware vessels. Slowly add the acid to the
water, stirring with a glass rod. Never add water
to the acid, as this causes dangerous spurting of
the concentrated acid. The specific gravity of the
filling electrolyte depends on the climate in
which the battery is to be used.
Heat is produced by the mixture of acid and
water, the electrolyte should be allowed to cool
before pouring it into the battery.
The specific gravity of the electrolyte varies
with the temperature. For convenience in
comparing specific gravities, they are always
corrected to 60° F., which is adopted as a
reference temperature.
The method of correction is as follows :
For every 5°F. below 60°F., deduct .002 from
the observed reading to obtain the true specific
gravity at 60°F. For every 5°F. above 60°F. add
.002 to the observed reading to obtain the true
specific gravity at 60°F.
The temperature must be that indicated by a
thermometer having its bulb actually immersed
in the electrolyte and not the ambient
temperature.
Fill the cells to the tops of the separators, in
one operation. The battery filled in this way is
90% charged. When time permits, a short
freshening charge for no more than four hours at
the normal recharge rate of 1.5 amp. should be
made.
3. Routine Maintenance
Fortnightly (or more frequently in hot
climates) examine the level of electrolyte in the
cells and if necessary add distilled water to bring
the level up to the tops of the separators. The use
of a Lucas Battery Filler will be found helpful,
as it ensures that the correct electrolyte level is
automatically maintained and also prevents
distilled water from being spilled on the top of
the battery (see Fig. 2).
Occasionally check the terminals, clean and
coat them with petroleum jelly. Wipe away all
www.hitchcocksmotorcycles.com
 Loading...