Some useful hints
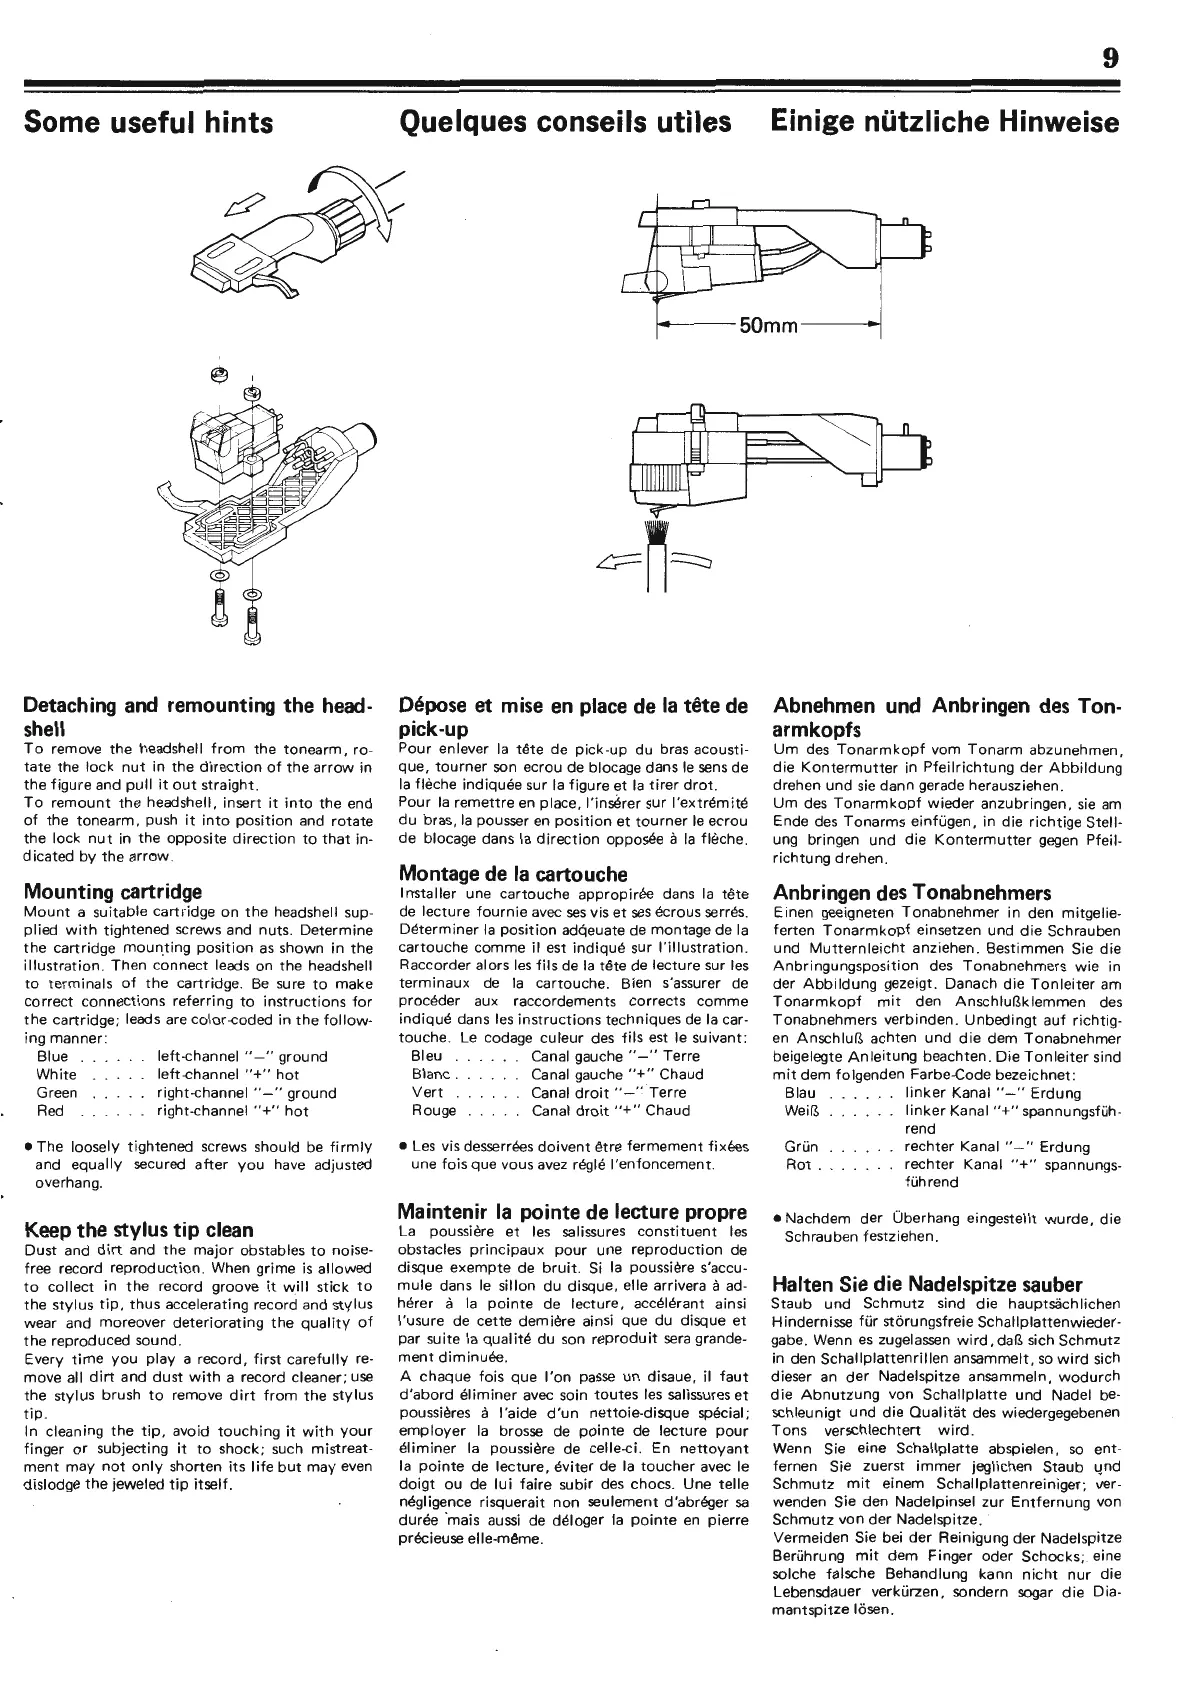
Detaching and remounting the head-
shell
To
remove
the
headshell
from
the
tonearm.
ro-
tate
the
lock
nut
in
the
direction
of
the
arrow
in
the
figure
and
pull
it
out
straight
.
To
remount
the
headshell. insert
it
into
the
end
of
the
tonearm
. push
it
into
position
and
rotate
the
lock
nut
in
the opposite
direction
to
that
in-
dicated
by
the
arrow.
Mounting cartridge
Mount
a suitable
cartridge
on
the
headshell sup-
plied
with
tightened
screws and
nuts
.
Determine
the
cartridge
moun.ting
position
as
shown in
the
illustration.
Then
connect
leads
on
the
headshell
to
terminals
of
the
cartridge.
Be
sure
to
make
correct
connections
referring
to
instructions
for
the
cartridge; leads are
color.coded
in
the
follow-
ing manner :
Blue
White
Green
Red
left-channel
"-"
ground
left-channel
"+"
hot
right-channel
"-"
ground
right-channel
"+"
hot
•The
loosely
tightened
screws should be
firmly
and
equally
secured
after
you
ha
ve adjusted
overhang.
Keep the stylus
tip
clean
Dust and
dirt
and
the
major
obstables
to
noise-
free record
reproduction.
When
grime
is
allowed
to
collect
in
the
record groove
it
will
stick
to
the
stylus
tip,
thus
accelerating record and
stylus
wear and
moreover
deteriorating
the
quality
of
the
reproduced sound.
Every
time
you
play
a record.
first
carefully
re-
move
all
dirt
and
dust
with
a record cleaner; use
the
stylus
brush
to
remove
dirt
from
the
stylus
tip.
In cleaning
the
tip,
avoid
touching
it
with
your
finger
or
subjecting
it
to
shock; such mistreat-
ment
may
not
only
shorten
its
life
but
may
even
dislodge
the
jeweled
tip
itself
.
9
Quelques conseils utiles
Einige nutzliche Hinweise
--
-
--50mm----1~
r;1J
'~
~n=
Depose et mise
en
place de
la
tete de
pick-up
Pour
enlever la
Mte
de
pick-up
du
bras acousti-
que,
tourner
son ecrou de blocage dans
le
sens
de
la fleche
indiquee
sur la
figure
et
la
tirer
drot
.
Pour
la
remettre
en
place.
l
'in~rer
sur
l'extrem
i
te
du
bras, la pousser
en
position
et
tourner
le ecrou
de
blocage dans la
direction
opposee a la fleche.
Montage de
la
cartouche
Installer
une
cartouche
appropiree
dans la
tete
de
lecture
fournie
avec
ses
vis
et
ses
ecrous serres.
Determiner
la
position
adqeuate de montage de la
cartouche
comme
ii est
indique
sur
!'illustration.
Raccorder alors
!es
fils
de la
tete
de
lecture
sur les
terminaux
de
la
cartouche. Bien s'assurer de
proceder aux raccordements
corrects
comme
indique
dans !es
instructions
techniques de la car-
touche.
Le codage
culeur
des
fils
est le suivant:
Bleu Canal gauche
"-"
Terre
Blanc . Canal gauche
"+"
Chaud
Vert
Canal
droit
"_
..
Terre
Rouge Canal
droit
"+"
Chaud
• Les vis desserrees
doivent
etre
fermement
fixees
une
fois
que vous avez regle
l'enfoncement
.
Maintenir la pointe de lecture propre
La poussiere
et
!es
salissures
constituent
!es
obstacles
principaux
pour
une
reproduction
de
disque
exempte
de
bruit
.
Si
la poussiere s'accu-
mule
dans le sillon
du
disque, elle arrivera a ad-
herer
a la
pointe
de
lecture.
accelerant ainsi
l'usure
de
cette
demiere
ainsi
que
du
disque
et
par
suite la qua!
ite
du
son
reprodu
it
sera
grande-
ment
diminuee.
A
chaque
fois
que
!'on
passe
un disaue, ii
faut
d'abord
eliminer
avec soin
toutes
les salissures
et
poussieres a !'aide
d'un
nettoie-disque
special;
employer
la brosse de
pointe
de
lecture
pour
eliminer
la poussiere de celle-ci. En
nettoyant
la
pointe
de
lecture,
eviter
de la
toucher
avec le
doigt
ou
de lu i
faire
subir des chocs.
Une
telle
negligence risquerait
non
seulement d'abreger
sa
duree 'mais aussi de deloger la
pointe
en
pierre
precieuse elle-meme.
Abnehmen und Anbringen
des
Ton-
armkopfs
Um
des
Tonarmkopf
vom
Tonarm
abzunehmen,
die
Kontermutter
in
Pfeilrichtung
der
Abbildung
drehen
und
sie dann gerade herausziehen.
Um
des
Tonarmkopf
wieder
anzubringen, sie
am
Ende des
Tonarms
einfugen,
in die
richtige
Stell-
ung bringen
und
die
Kontermutter
gegen Pfeil-
richtung
drehen.
Anbringen
des
Tonabnehmers
Einen geeigneten
Tonabnehmer
in den mitgelie-
ferten
Tonarmkopf
einsetzen und
die
Schrauben
und
Mutternleicht
anziehen.
Bestimmen
Sie
die
Anbringungsposition
des
Tonabnehmers
wie
in
der
Abbildung
gezeigt. Danach
die
Tonleiter
am
Tonarmkopf
mit
den
Anschlu~k
lemmen des
Tonabnehmers
verbinden.
Unbed
i
ngt
auf
richtig-
en
Anschlu~
achten
und
die
dem
Tonabnehmer
beigelegte
Anleitung
beachten.
Die
Tonleiter
sind
mit
dem
folgenden Farbe-Code bezeichnet:
Blau
linker
Kanai
"-"
Erdung
Wei~
linker
Kanai"+"
spannungsfUh-
rend
Grun
Rot
.
rechter
Kanai"-"
Erdung
rechter
Kanai
"+"
spannungs-
fUhrend
• Nachdem der Oberhang eingestellt
wurde,
die
Schrauben festziehen .
Halten Sie die Nadelspitze sauber
Staub
und
Schmutz
sind
die
hauptsiichlichen
H indernisse
fur
stiirungsfreie
Schallplattenwieder-
gabe. Wenn
es
zugelassen
wird.
da~
sich
Schmutz
in den
Schallplattenrillen
ansammelt,
so
wird
sich
dieser
an
der
Nadelspitze ansammeln,
wodurch
die
Abnutzung
von
Schallplatte
und
Nadel be-
schleunigt
und
die
Oualitiit
des wiedergegebenen
Tons
verschlechtert
wird.
Wenn Sie eine
Schallplatte
abspielen.
so
ent-
fernen Sie zuerst
immer
jeglichen Staub
4nd
Schmutz
mit
einem
Schallplattenreiniger;
ver-
wenden Sie den Nadelpinsel
zur
Entfernung
von
Schmutz
von
der
Nadelspitze.
Vermeiden
Sie bei
der
Reinigung
der
Nadelspitze
Beruhrung
mit
dem
Finger
oder
Schocks; eine
solche falsche Behandlung
kann
nicht
nur
die
Lebensdauer verkurzen. sondern sogar
die
Dia-
mantspitze
losen.
 Loading...