21GB
Noise
Total vibration values determined in accordance with
EN 62841-1
sound pressure level L
pA
82,2 dB(A)
uncertainty K
pA
3 dB
sound power level L
WA
89,4 dB(A)
uncertainty K
WA
3 dB
Wear hearing protection.
The effects of noise can cause a loss of hearing. To-
tal vibration values (vector sum - three directions) de-
termined in accordance with EN 62841-1.
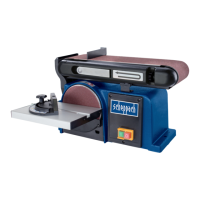
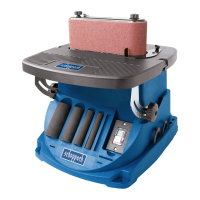
8. Attachment and operation
Before starting the equipment
Before you connect the equipment to the mains
supply make sure that the data on the rating plate
are identical to the mains data.
Warning!
Always pull the power plug before making
adjustments to the equipment.
• All covers and safety devices have to be properly
tted before the equipment is switched on.
• It must be possible for the grinding/sanding belt
and disk to run freely.
• When working with wood that has been processed
before, watch out for foreign bodies such as nails
or screws, etc.
• Before you actuate the On/Off switch, make sure
that the abrasive paper is correctly tted and that
the equipment‘s moving parts run smoothly.
8.1 Assembling the machine (Abb. 1 - 5)
• Mount the lower wheel guard (15) with the screws
(16). (Fig. 2)
• Mount the grinding/sanding table (14) and secure
with the screw (1). (Fig. 3+4) The grinding/ sanding
table (14) can be innitely adjusted from 0° to 45°
with the miter scale (2) and the thumb screw (1).
• The adjustable cross stop (13) ensures safe guid-
ance of the workpiece. Important. The grinding/
sanding disk (11) must be able to run freely, but the
distance between the grinding/sanding table (14)
and the grinding/sanding disk (11) is not allowed
to exceed 1.6 mm.
• Put on the stop rail (7) and secure with the screw
(17). (Fig. 5) Important. The grinding/sanding belt
(6) must be able to run freely.
8.2. Changing the grinding/sanding belt (6) (Fig.
6 - 9)
• Pull out the power plug
• Remove the screws (18).
• Remove the grinding/sanding belt guard (19).
• Turn the grinding/sanding tensioner (10) to the
right in order to reduce the tension on the grind-
ing/sanding belt (6).
• Remove the grinding/sanding belt (6) to the rear.
• Mount and the new grinding/sanding belt in re-
verse order. Important. Note the running direction:
On the housing and on the inside of the grinding/
sanding belt!
8.3. Adjusting the grinding/sanding belt (6)
• Pull out the power plug
• Push the grinding/sanding belt (6) by hand slowly
in the running direction.
• The grinding/sanding belt (6) must run centrally on
the grinding/sanding surface. If not, you can use
the knurled screw (8) to make adjustments.
8.4. Moving the grinding/sanding position of the
grinding/sanding belt (6)(Fig. 10-12)
• Loosen the Allen screw (5)
• Move the grinding/sanding belt (6) upwards into
the desired position.
• Tighten the Allen screw (5) again to x this posi-
tion.
• In this position you can use the grinding/ sanding
table to support the workpiece. To do this, rst
loosen the two Allen screws (17) and then remove
the stop rail (7). The grinding table can now be
pushed into the hole in the holder tube (20) and
xed with the screw (1)
8.5. Replacing the abrasive paper on the grind-
ing/sanding disk (11)
Dismantle the bottom wheel guard (15) by removing
the 2 screws (16) . Pull the sanding/ grinding paper
off the sanding/grinding disk (11) and attach the new
sanding/grinding paper (quick- t fastening system).
Mounting belt/disc sander to work bench
If your belt/disc sander is to be used in a permanent
location, it is recommended you secure it to a work-
bench or other stable surface.
• Mark holes on workbench where belt/disc sander
is to be mounted using holes in the base as a tem-
plate for hole pattern.
• Drill holes through workbench.
• Place belt/disc sander on workbench aligning
holes in the base with holes drilled in the work-
bench.
• Insert bolts (not included) and tighten securely with
lock washers and hex nuts (not included). Note: All
bolts should be inserted from the top. Install the
lock washers and hex nuts from the underside of
the workbench.
Clamping belt/disc sander to work bench
If your belt/disc sander is to be used as a portable
tool, it is recommended you fasten it permanently to
a mounting board that can easily be clamped to a
workbench or other stable surface.
The mounting board should be of sufcient size to
avoid tipping while belt/disc sander is in use. Any
good grade plywood or chipboard with a 3/4 in. (19
mm) thickness is recommended.
 Loading...