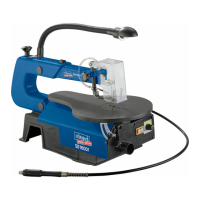
19
Changing the saw blades
Warning: Switch off the saw and remove the mains supply
plug before installing saw b!ades in order to avoid injuries
caused by unintentiona! activation of the saw.
A. Flat saw blades
A. Flat saw-blades
Usetheadapter(g6)withatsawblades.
The saw-blade is fixed with Allen screws.
A 1 Saw-blade removal, fig. 7+8
• Extract thesawbladeby sliding the table´sinlayup,
thenunscrewthetighteningscrew(1).
• Slightlypresstheupperarm(5)downg.(10).
• Thenremovethesawbladebypullingitforwardoutof
the supports and through the access perforation in the
table.
A 2 Inserting the saw-blade:
• Putthesawbladewiththetwoadaptersintothelower
support, the other end into the upper support.
• Slightlypresstheupperarm(5)down(g10)before
hooking it in.
• Tighten the blade with the tightening screw (1) (g.
11)byrotatingitclockwise.Checkthetightnessofthe
blade. Keep on rotating clockwise in order to tighten the
blade even more.
Saw blade with pins
B. Saw-blade with pins
B 1 Saw blade removal, fig. 7
• Extractthesawbladebyrstunscrewingthetightening
screw(1).
• Removethesawbladefromtheupperandlowersup-
portbyslightlypressingthesaw´supperarmdown(g.
10).
B 2 Inserting the saw-blade fig 9-12
• Lead one end of the sawblade through the perfora-
tion in the table and insert the saw-blade pins into the
notch.Repeatthisprocedureattheupperbladesup-
port.
• Beforehookingitin,slightlypressthesaw´supperarm
down. Fig 10; Nr. 5
• Checkthepositionofthebladepinsatthesupports(g
12).
• Tighten the blade by means of the tightening screw.
Check the blade´s tightness. Keep on rotating clockwise
inordertotightenthebladeevenmore.(Fig.11).
Remplacement des lames de scie
AVERTISSEMENT: Pour éviter des blessures dues à la mise
en marche non intentionnelle de la scie. débranchez la scie
et retirez la fiche de contact avant de commencerle montage
de la scie.
A. Lames de scie plates
Utilisezl’adaptateur(g6)avecleslamesdesciespla-
tes.
La lame de scie est fixée avec des vis creuses.
A 1 Enlevage de la lame de scie, fig. 7+8
• Retirezlalamedescieenglissantenhautl’incrusta-
tiondelatable,alorsdévissezletendeur(1).
• Appuyezlebrassupérieurenbaslégèrementg.(10).
• Alorsenlevezlalamedescieenlaretirantdessupports
et à travers la perforation d’accès dans la table.
A 2 Insérer la lame de scie :
• Placezlalamedescieaveclesdeuxadaptateursdans
le support inférieur, l’autre bout en el support supé-
rieur.
• Appuyezlebrassupérieurenbaslégèrementg.(10)
avant de l’accrocher.
• Serrezlalameavecletendeur(1)(g.11)enlatour-
nant dans le sens des aiguilles d’une montre. Contrôlez
le serrement de la lame. Continuez à faire la tourner
dans le sens des aiguilles afin de serrer la lame de
plus.
REMARQUE: Si la lame est trap tendue, le rabinet est difficile
à auvrir de nouveau.
B. Lame de scie avec des épingles
B 1 Enlevage de la lame de scie, fig. 7
• Retirezlalamedescied’abordendévissantletendeur
(1).
• Enlevezlalamedesciedusupportsupérieuretdel’in-
férieur en appuyant en bas légèrement sur le bras supé-
rieurdelascie(g.10).
B 2 Insérer la lame de scie fig. 9–12
• Conduisezuneextrémitédelalamedescieàtraversla
perforation dans la table et insérez les épingles de la
lamedesciedansl’entaille.Répétezcetteprocédureci
au support supérieur de la lame.
• Avantdel’accrocher,appuyezlebrassupérieur dela
scie légèrement en bas. Fig. 10; No. 5
• Contrôlezlapositiondesépinglesdelalameauxsup-
ports(g.12).
• Serrezlalameaumoyendutendeur.Contrôlezleser-
rement de la scie. Continuez à faire la tourner dans le
sensdesaiguillesandeserrerlalamedeplus.(Fig.
11).