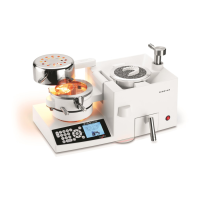
The BIOSTAR® SCAN WITH LCD DISPLAY is an advanced positive pressure thermal-forming device designed for fabricating hard and soft dental appliances. It utilizes a bar code scanner to automatically input correct processing information for various materials, ensuring flawless adaptation. The device heats the material directly over the model using 80psi, significantly reducing fabrication time compared to conventional methods.
Function Description:
The Biostar Scan operates by heating thermal plastic material and then forming it over a dental model under positive pressure. The integrated barcode scanner simplifies the process by automatically setting the appropriate heating and cooling times for specific materials. Users can also manually program these times. The device is designed to prevent material overstretching and thinning, ensuring high-quality appliance fabrication. It supports both platform and pellet use for model preparation, depending on the material thickness and flexibility.
Important Technical Specifications:
- Voltage: 110/120V (AC) - 50/60Hz
- Power: 750W
- Pressure: 80psi
- Dimensions (L x W x H): 18" x 9.75" x 10.25"
- Weight: 42lbs / 19.05kg
- Fuses: 2 Fuses: 5x20mm 10amp
- Pellets: Zinc pellets (010-125) are supplied; stainless steel pellets (010-099) are also available.
- Material Thickness: Do not use material thicker than 5mm within the clamping mechanism.
Usage Features:
The device features a user-friendly control panel with an LCD display, keypad, and navigation buttons.
Control Panel Components:
- Digital Panel With LCD Display: Shows operating information, including code, heating time (t), temperature (TEMP), and pressure (P).
- OK/Menu Navigation Button: Used to navigate through menus and select items.
- Info Button: Provides access to safety information, hints, materials, appliance designs, troubleshooting, foil assortments, and fabrication videos.
- Time/Clock Button: Allows manual programming of heating times via the numeric keypad.
- Air Pressure Evacuation Button: Used to release air pressure from the chamber.
- Code/Scan Button: Activates the barcode scanner or allows manual entry of 3-digit operation codes for programming heating and cooling times.
- CE+ Home Button: Erases information from memory and returns the display to the main menu.
Operational Steps:
- Initial Setup:
- Plug the electrical cord into the Biostar and a 110V outlet.
- Connect the high-pressure hose to the air valve on the Biostar and the air pressure line, securing with hose clamps. Ensure the air source can supply a minimum of 80psi.
- Turn on the power using the red switch on the lower right front corner.
- Secure the clamping frame to the pressure chamber.
- Model Preparation:
- Platform Use: For soft or thin plastics, place the circular platform on the inner lip of the pellet cup. Ensure the inner lip is clear of pellets. The platform exposes the entire dental mold to the thermal plastic, eliminating the need for pellets and reducing air leaks with thinner materials.
- Pellet Use: For thick, less flexible materials, fill the pellet cup halfway with zinc pellets (010-125) to support the model. Pellets prevent material from forming to unwanted areas, reducing thinning, and supporting appliance wires. Ensure the pellet level is to the top of the cup, and the top rim of the cup remains pellet-free for proper chamber closure.
- Prepare models by removing bubbles, filling voids, and ensuring the base is flat and parallel to the occlusal surface. Apply a liquid model-separating medium if needed.
- Heating Cycle:
- Manual Entry: Press the Power Switch, then the Time button to manually input heating time using the keypad. Press Time again to enter.
- Code Entry: Press the Code/Scan button, input the 3-digit code, and press Code/Scan again.
- Barcode Scan: Press the Code/Scan button to activate the scanner. Hold the barcode strip (for Great Lakes material) or the material itself (for Scheu material) under the scanner until a 'beep' is heard. The heating time will automatically display.
- Position a 125mm diameter round disc on the spring-loaded adjusting ring of the pressure chamber.
- Align the clamping frame over the material, ensuring the clips slip under the bevel of the locking device.
- Tighten the handle clockwise until the chamber and clamping handles are parallel.
- Swing the infrared heater over the material. The heater illuminates, and the set heating time begins. Warning beeps sound with 5 seconds remaining, becoming continuous when the time elapses.
- Pressure Molding Process:
- Once heating is complete, swing the heating element back to its rest position.
- Gently flip the pressure chamber onto the cup.
- Turn the locking handle 180° toward the front of the machine until it locks. This secures the chamber and allows air pressure to enter.
- The LCD display initiates a cool-down time.
- At the end of the cooling time, short beeps sound. Press the Air button to release air pressure. If a shorter cooling cycle is needed, the programmed time can be erased by turning off the power switch.
- To unlock, swing the locking handle 180° back. Slide the clamping frame arm to the left and lift the pressure chamber off the cup. Remove the model with the formed plastic.
- If pellets were used, remove any stuck pellets with a lab knife.
Important Troubleshooting Advice:
- Cold Test: Perform a cold test to check for air leaks. Clamp a 2mm (or thicker) hard material onto the pressure chamber, set 5 seconds heating time, activate heat briefly, then swing the chamber over the model platform and activate air pressure. A constant rush of air indicates a leak, requiring contact with customer support.
- Heating Time Adjustment: If proper adaptation is not achieved, adjust recommended heating times by 5-15 seconds.
Maintenance Features:
Regular maintenance is crucial for consistent fabrication results and to prevent malfunction.
- Water Usage: Refrain from using water in the Biostar machine to prevent rust or corrosion.
- Clamping Frame: When not in use, engage the clamping frame to the chamber and position the chamber on the pellet cup to prevent dust entry.
- Pellet Cleaning: Pellets become dirty with regular use. Clean them monthly by rinsing with hot water in a strainer, spreading on a towel to air dry, and then returning them to the Biostar. Discard and replace dirty pellets in the bottom third of the cup if necessary.
- Air Escape Holes: Check air escape holes in the base of the pellet cup monthly to ensure they remain open. Use a 0.036" diameter or smaller wire to clear plugged holes.
- Adjusting Ring: The Adjusting Ring is composed of a Chamber Sealing Gasket, Aluminum Ring, Side Gasket, and Spring-loaded Adjusting Pins. Clean and inspect the top and side of the Adjusting Ring every 4-6 months. Clean the Side Gasket with a soft cloth and check for cuts or irregularities. If the Adjusting Ring does not move freely after cleaning, apply a thin coat of Silicone Grease (016-021) to the inner wall of the Chamber, the Spring-loaded Adjusting Pins, and the outside edge of the Adjusting Ring Side Gasket. Depress the Adjusting Ring several times to ensure free movement.
- Air Filter: Check the air filter clamped to the air line monthly for discoloration or moisture. If replacing, turn off the air source, bleed the hose, loosen clamps, and slide off the old filter. Position the new filter with the arrow on the case pointing toward the back of the Biostar.
- Heating Surface Alignment: The heating surface should be parallel to the heating element. Adjust the chamber position by turning the screw located under the chamber support frame with a small screwdriver. Clockwise adjustment lowers the chamber, counterclockwise raises it. Always check chamber position when heating materials.
Safety Precautions:
- Keep any flammable material away from the heating element.
- Always wear safety glasses when using the machine and during all fabrication procedures.
- During long heating cycles or continual use, the lamp can become extremely hot; caution is advised to prevent skin burns.
- Using pellets other than those recommended by the manufacturer may result in machine malfunction and could void the warranty.