9
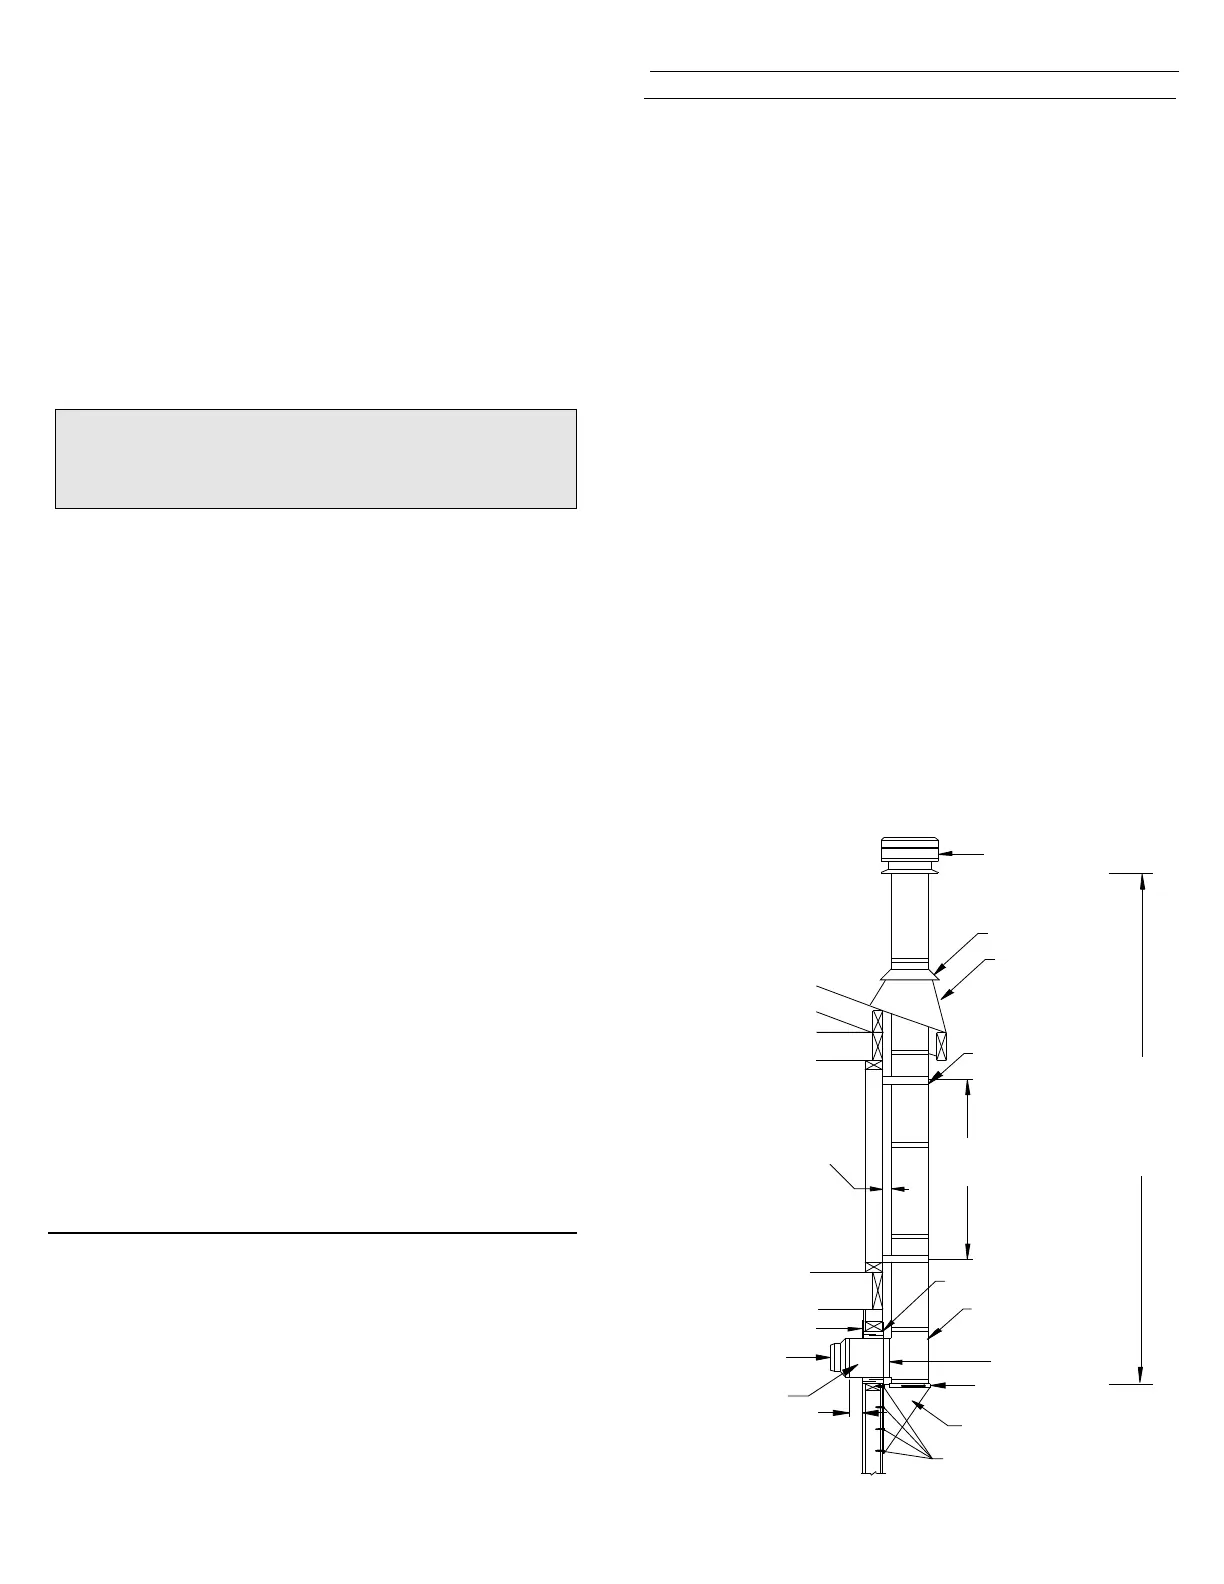
FIGURE 11
WALL SUPPORT (WS) - Adjustable up to 6"
from a vertical wall (sold separately)
As previously mentioned, the ideal location for your chimney system
is within the building envelope. A Wall Support installation is
required when the above mentioned location is not possible.
To complete a proper Wall Support installation, the following parts
will or may be required:
- Wall Support (WS): Intended for a through-the-wall installation
where the chimney has a horizontal connection. The WS is adjust-
able from 2" to 6" from the vertical wall. NOTE: The WS is NOT
supplied in the Wall Support Kit. Must be ordered separately.
- Stove Pipe Adaptor (ASE): Transition from chimney to flue pipe.
- Insulated Tee (IT) with Insulated Tee Cap (TPI): Allowing a horizon-
tal connection to the chimney.
- Roof Flashing Assembly: Required when the chimney penetrates
a roof or a roof overhang.
- Rafter Radiation Shield (RRS): Required when the chimney is
enclosed immediately below the roof.
- Wall Band (WB): Required to provide lateral support to chimney.
- Suitable Lengths of Chimney: The chimney diameter should be sized
to suit the appliance.
- Chimney Length: Appropriate length for connection to Tee branch.
- Wall Thimble (WT): Required to pass though a combustible wall.
- Rain Cap: Standard or Deluxe model
The maximum chimney height above a Wall Support is indicated in
Table 2 and illustrated in Figure 11, all of which must be above the
support.
The Wall Support will allow for an adjustment of 2" to 6" from a
vertical wall. Threaded studs are factory installed on both side
brackets and the support plate for fast and easy assembly (see
Figure 14).
Ensure the Wall Support Brackets are bolted securely to the wall.
Rain Cap
Storm Collar
Wall Band
Locking Band
Insulated Tee
8 Feet
(Max)
3" Minimum
Chimney Section
Stove Pipe Adaptor
Wall Thimble Inner Half
Wall Thimble Outer Half
Ventilated Flashing
Support Bracket
Support Plate
Lag Screws into Structure
"D"
Distance
from Wall to
Chimney
(2" minimum
or as per
Table 4)
"H"
Max.
Chimney
Height
(See Table 2
See Table 2 for maximum Chimney Heights based on
Chimney Diameter and Distance from Wall
Install a Wall Band midway up the first chimney length above the
Insulated Tee. Wall bands must then be installed at 8 ft. (2.4 m)
intervals above this point (see fig. 8). Secure the wall band bracket
to the wall using two 6d (2”) spiral nails or wood screws. For concrete
walls use suitable masonry fasteners.The nut and bolt supplied will
fasten the band around the chimney.
If the chimney penetrates an overhang (soffit) cut an opening with 2"
(50 mm) clearance all around and install an Attic Insulation Shield if
space permits on the under side of the overhang. If it is not possible
the overhang area can be enclosed and a Rafter Radiation Shield
installed at the roof level and a Finishing Plate installed from below.
If the attic is open to the overhang, close off the access with suitable
building materials ensuring that a 2" (50 mm) air space is maintained.
From above install a Roof Flashing and Storm Collar by following the
Roof Flashing section in these instructions. If the overhang is not
deep enough to allow the chimney to be fully installed within the
overhang, it will be necessary to cut into it. Ensure that a 2" (50 mm)
clearance all around the chimney is respected. Framing and flashing
the sides of the opening will be required. Install a Wall Band at this
level.
NOTE: Interior chimneys installed with a Wall Support must use an
Attic Insulation Shield (AIS) when extending through floor/ceiling
joist and into attic space.
Slide the assembled AIWS over the protruding length of chimney.
Fasten the AIWS to the wall using four 1/4” by 2” wood screws
through the pre-punched slots in each bracket. Install the draw band
around the protruding chimney length securely against the support
plate with the supplied nut and bolt. Install four stainless steel sheet
metal screws through the pre-punched holes in the draw band. Cover
the heads of the screws with a non-hardening waterproof caulking.
If the total chimney height exceeds the wall support limitations, an
Adjustable Intermediate Wall Support (AIWS) must be installed. Use
of an AIWS will support another 33 ft. (10 m) of chimney. The AIWS
is adjustable only from 2" to 2-1/2" from the vertical wall.
ADJUSTABLE INTERMEDIATE WALL
SUPPORT (AIWS)
From outside the building, slide the chimney length (previously
installed on the tee branch) through the Wall Thimble ensuring the
male coupler of the tee is facing upward. Place the adapter ring
(Figure 10) on the wall support so that the sleeve on the adapter drops
through the hole in the support plate. Place the assembled wall
support against the wall (plate up) directly below the tee. Slide the
assembled wall support up to the tee ensuring that the adapter on the
wall support engages with the female coupler of the tee. Ensure the
wall support is level, and secure to the wall with four 1/4” by 2” lag
bolts through the pre-punched slots in each bracket or suitable
masonry fasteners for a concrete block or poured foundation wall. If
the support is properly positioned, these lag bolts will also go into
wall studs placed on 16” (405 mm) centers.
NOTE: THE CHIMNEY MUST EXTEND AT LEAST
3” (75 MM) INTO THE LIVING SPACE WHERE THE
STOVE PIPE ADAPTER WILL BE ATTACHED TO THE
CHIMNEY BRANCH.
Use a non-hardening high-temperature silicone caulking to seal
around the horizontal chimney length where it enters on the exterior
of the Wall Thimble or a concrete wall.
NOTE: Ensure that you have set aside the Tee Plug, if not, do so now
as you will require it later.
NOTE: If a greater adjustment is required, such as to clear an
overhang, the WS Wall Support must be installed-ordered separately.
 Loading...