7
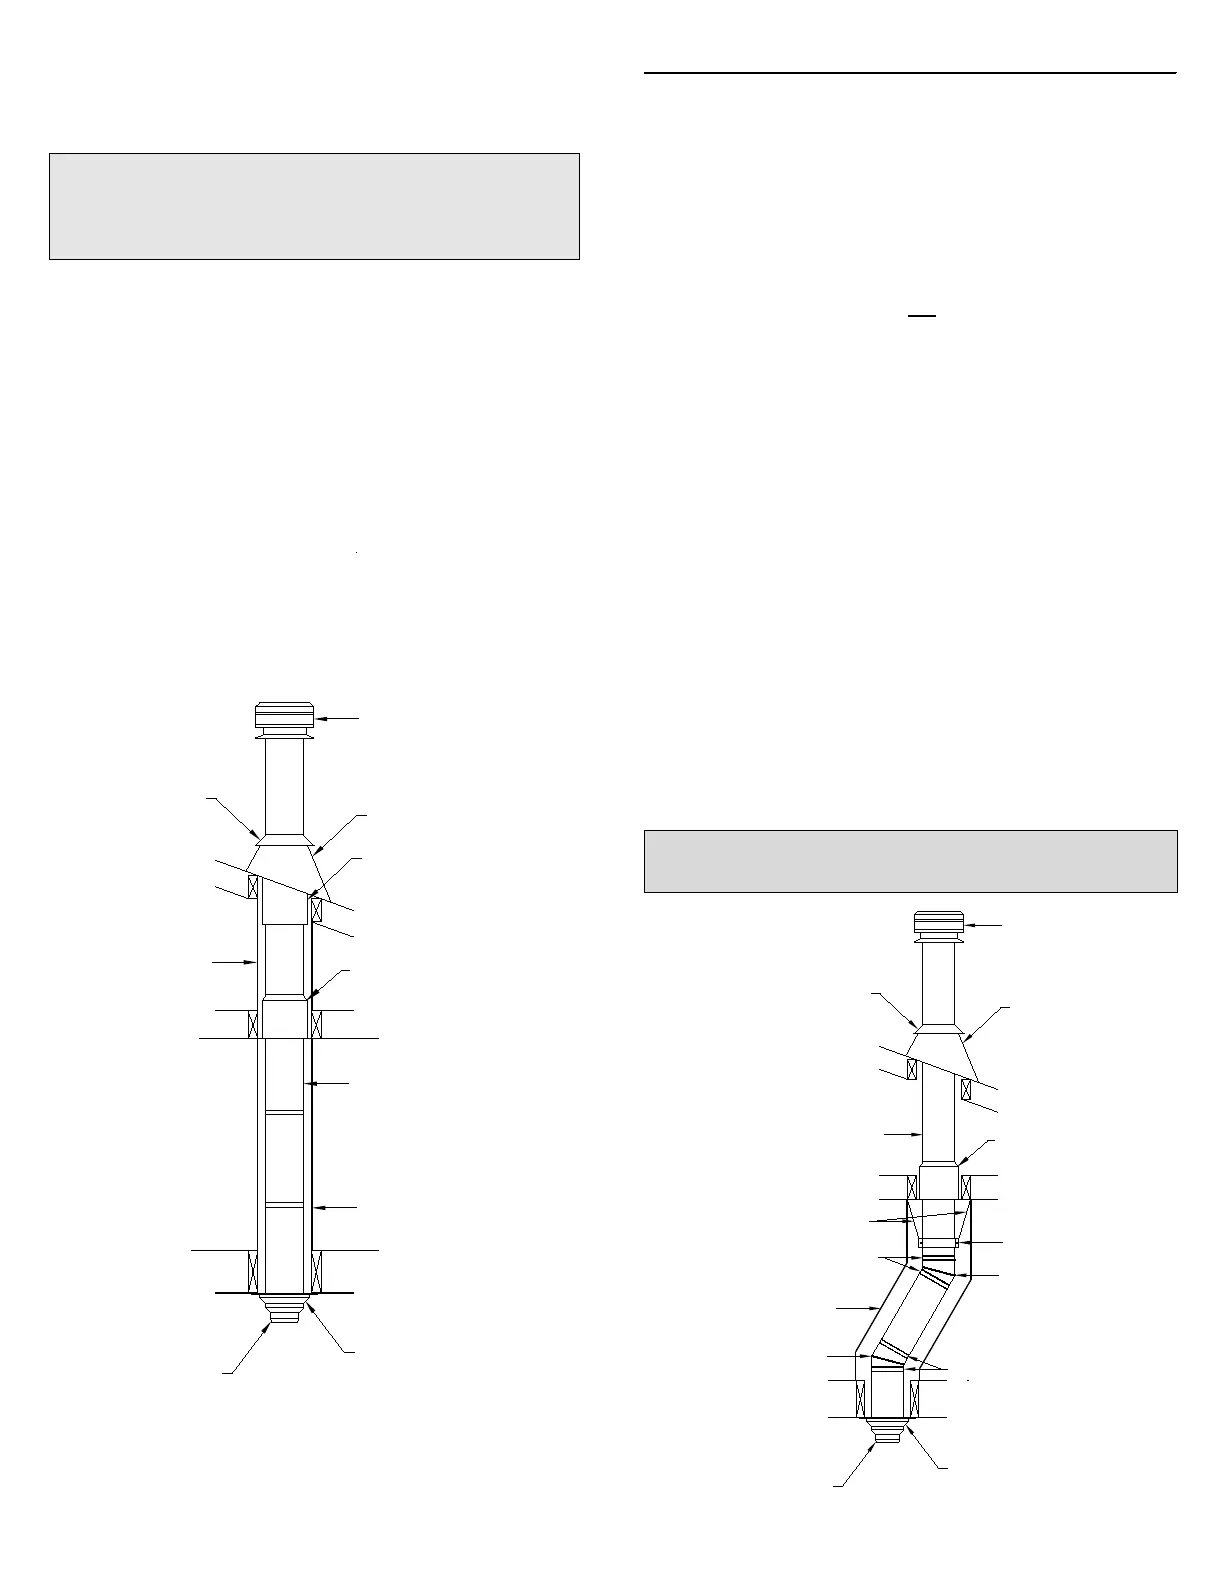
When installing the Attic Insulation Shield above the Decorator
Ceiling Support as shown in Figure 5, be certain that the base of the
shield is flush with the top of the joist framing and nail in place using
1” spiral nails or #8 x 1" wood screws.
Two Story Installation
(Enclosed Attic)
FIGURE 6
Enclosure
Enclosed
Attic Space
Living Space
Rafter Radiation Shiield
Ventilated Flashing
Decorator Ceiling Support
Stove Pipe Adapter
Enclosure
Chimney Section
Rain Cap
Roof Joist
Storm Collar
Attic Insulation Shield
Floor, Ceiling Joist
(Framed all 4 sides)
Ceiling Joist
(Framed all 4 sides)
NOTE: To reduce cold air infiltration into the dwelling you
can install the optional Universal Shielding Insulation (JUSI)
into the Attic Insulation Shield. See separate installation
instructions packaged with the JUSI.
When installing the Attic Insulation Shield where the chimney passes
from a living space to an enclosed attic space, as shown in figure 6,
or between floors, install the shield from below and nail in place using
1” spiral nails or #8 x 1" wood screws. A Rafter Radiation Shield is
required at the roof level when the chimney is enclosed below the roof
line.
At the level where the chimney penetrates the air/vapour barrier,
special attention is required. Seal the vapour barrier to the Support
or Attic Insulation Shield or Wall Thimble using an appropriate
caulking compound as per the requirement of local authorities.
If insulation is blown in the attic and adheres to the chimney pipe, it
must be brushed off to eliminate any possible contact of this material
with the chimney surface.
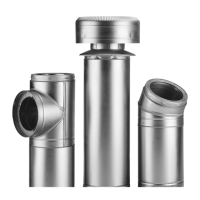
One pair of (two) 15
o
or 30
o
elbows may be used in an interior
installation to provide an offset in order to avoid cutting of joists and
to clear other obstructions. The maximum permissible angle with solid
fuel installation is 30 degrees. The vertical run of chimney above an
offset must be supported with an elbow support. Each elbow support
will support 15 ft. (4.5 m) of chimney and the maximum length of
chimney allowed between the elbows is 6' (2m). Refer to the Offset
Chart 1 on page 19 in these instructions for more details. Elbow kits
contains 2 Elbows, 4 Locking Bands and an Elbow Support.
The female end of the Elbows are
not embossed, this ensures proper
alignment of the chimney system is maintained. Locking Bands must
be installed at all chimney joints forming an offset.
Install the insulated offset Elbow on the vertical chimney length and
position the Elbow in the required direction. Fasten the Elbow to the
chimney Length with the supplied Locking Band.
Place the required offset chimney Length(s) as per the Offset Chart
1 (page 19) for appropriate length(s). Turn it clockwise to lock it in
place and secure with the supplied Locking Band.
Install the remaining offset Elbow to turn the chimney back to the
vertical position and fasten in place with the supplied Locking Band.
Never install an elbow in a joist area. Chimney lengths must
pass vertically through framed joist areas.
During installation provide supplementary support for the offset
section to avoid undue stress on connected elbows.
Install an Elbow Support on the Length just above the highest Elbow.
Attach the Support Band to the chimney with 4 nuts and bolts, and
then install four stainless steel sheet metal screws through the pre-
punched holes. Attach the Support Straps to the Support Band
assembly and nail the Support Straps to the framing using 6d (2”)
nails or #8 x 1-1/2" wood screws (see Figure 7).
ELBOW INSTALLATION
FIGURE 7
Storm Collar
Roof Joist
Attic space
Rain Cap
Attic Insulation Shiled
Elbow Support Bands
Ventilated Flashing
Elbow
Locking Bands
Decorator Ceiling Support
Offset (Elbow) Installation
Elbow
Floor, Ceiling Joist
(Framed all 4 sides)
Enclosure
Stove Pipe
Adapter
Locking Bands
Ceiling Joist
(Framed all 4 sides)
Elbow Support Straps
Chimney Section