Do you have a question about the SemaConnect 6 Series and is the answer not in the manual?
Details safety guidelines and compliance requirements for installation.
Outlines essential technical requirements and provides wiring diagrams.
Lists all necessary components and tools for installation.
Provides physical dimensions for different mounting configurations of the charging station.
Details electrical requirements for dedicated power supply configurations.
Details electrical requirements for shared power supply configurations.
The SemaConnect Series 6 EV Charging Station is a robust and versatile electric vehicle charging solution designed for both commercial and residential applications. This manual provides comprehensive instructions for its installation, ensuring safe and compliant operation. The device is engineered to deliver efficient and reliable charging, catering to the growing demand for EV infrastructure.
The SemaConnect Series 6 EV Charging Station serves as a power delivery system for electric vehicles, converting grid electricity into a format suitable for EV batteries. It is designed to be a dedicated electrical circuit, ensuring stable and consistent power delivery to the connected vehicle. The station is equipped to handle either 240V or 208V circuits, making it adaptable to various electrical setups. Each station is designed to draw a maximum of 30 Amps, protected by a 40 Amp 2-pole common trip circuit breaker (non-GFCI type) for safety and compliance with electrical codes.
A key feature of the Series 6 is its wireless data communication capability. This eliminates the need for data cabling during installation, simplifying the setup process. However, cellular communication is required for the station to operate effectively, enabling remote monitoring, management, and billing functionalities. The station requires three electrical supply wires: two hot wires and one ground wire, with no neutral wire needed. This streamlined wiring requirement further simplifies installation.
The Series 6 EV Charging Station can be connected to various power sources, including 208 VAC three-phase Delta systems (center tap grounded, using only two phases), 208 VAC three-phase Wye systems (using only two phases), and 240 VAC single-phase systems. For Delta systems, it is crucial to connect the station only to a center-tapped grounded transformer, specifically to the side where the ground is bonded (e.g., lines A and C in a typical diagram). This ensures voltage stability regardless of other loads on the lines. Connecting to other types of power sources in a Delta system is not recommended.
The station's core function is to provide a safe and controlled electrical connection for charging electric vehicles. It manages the power flow to prevent overcharging and ensure the longevity of the vehicle's battery. The J1772 cable, typically 20ft long, is integrated into the station, providing a standard connection interface compatible with most electric vehicles.
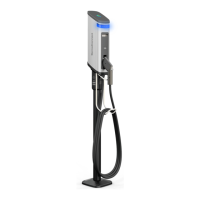
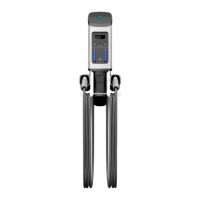
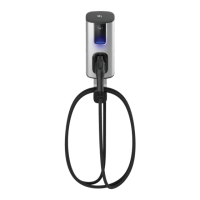
The SemaConnect Series 6 EV Charging Station is designed for ease of use and flexibility in deployment. It offers two primary mounting options: pedestal mount and wall/pole mount, each catering to different installation environments and aesthetic preferences.
For pedestal installations, the station can be configured as a single or dual pedestal unit. The dual pedestal mount allows for two charging points from a single installation, maximizing space efficiency and serving multiple vehicles simultaneously. The anchor plate installation procedure is critical for both single and dual pedestal mounts, ensuring a secure and level foundation. When pouring new concrete, a SemaConnect Anchor Kit is used, which includes J-bolts, pedestal disposable bolts, and CMS disposable bolts. The anchor plate, with its pre-welded nuts, faces downwards, and the disposable bolts remain in place until the pedestal is ready for installation. Proper leveling of the anchor plate with the ground is essential, and at least 40 inches of wire must extend out of the conduit. For existing concrete installations, anchor points are marked using a template, holes are drilled, and anchor bolts are inserted before placing the anchor plate.
Once the concrete has set, the sacrificial bolts are removed, and the pedestal is placed on the anchor plate, secured with four mounting screws. It's important not to fully tighten these screws initially. The electrical wire is then passed through the pedestal. A key step is to ensure the access panel is on the right side when viewed from the front. The pedestal is aligned for plumb using a set screw, and only then are the mounting screws fully tightened.
The head unit of the Series 6 is prepared by loosening set screws, attaching the cable rack, and removing the access panel. The J1772 cable is placed in its holder, and the cable is hung in the rack. The head unit then slides onto the pedestal and is secured with four mounting screws, taking care to avoid pinching any wires between the pedestal and the charging station.
For wall/pole mount installations, the procedure is similar in principle but adapted for vertical surfaces. The wall/pole mount bracket is attached to the wall with four bolts or to a pole with three straps. Electrical conduit can run from either the back or the side of the bracket. Maintaining a level wall mount is crucial. The head unit preparation involves the same steps as for pedestal mounts: loosening set screws, attaching the cable rack, removing the access panel, and placing the J1772 cable. The head unit then slides onto the bracket and is secured with four mounting screws, again ensuring no wires are pinched.
The station's design emphasizes clear and intuitive wiring. Three electrical supply wires are connected, with strict adherence to color codes (e.g., Green-Green for ground) to ensure proper and safe installation. Wire nuts and insulation tape are used for secure connections. After wiring, the wires are carefully pushed into the unit, and the access plate is attached.
Maintaining the SemaConnect Series 6 EV Charging Station is straightforward, focusing on cleanliness and operational checks to ensure longevity and consistent performance.
Regular cleaning is recommended to keep the device in optimal condition. This involves using a clean, soft cloth along with a mild detergent to wipe away dirt and grime. It is crucial to avoid using high-pressure water directly on the device. Instead, water should be poured gently from the top, and a wet/dry cloth used to clean all sides. This prevents water ingress into sensitive electrical components.
Users should never use strong detergents or any harsh chemicals such as acids, petrol, thinner, or other solvents, as these can damage the station's exterior finish and internal components. Similarly, excessive pressure should not be exerted on the device during cleaning.
For safety and to prevent damage, users are explicitly instructed not to open the device. Any internal issues or repairs should be handled by qualified service personnel. Furthermore, a vacuum cleaner should not be used on the device, as it could potentially damage seals or draw in small components.
Operational maintenance primarily involves ensuring the electrical supply is functioning correctly. To power up the station, the circuit breakers must be flipped. After installation, a critical step is to call SemaConnect's support line (800-663-5633) to complete the installation process. Users should have the station's serial number ready, which can be found on the left-hand side of the station. This call ensures that the station is properly registered, configured, and ready for use, and allows SemaConnect to perform any necessary remote diagnostics or initial setup.
The design of the Series 6, with its robust construction and adherence to electrical codes, minimizes the need for frequent hands-on maintenance. The emphasis on proper installation, including secure anchoring and correct wiring, contributes significantly to its long-term reliability. The wireless communication feature also aids in remote diagnostics and software updates, potentially reducing the need for on-site service calls for software-related issues.
| Charging Standard | SAE J1772 |
|---|---|
| Operating Temperature | -22°F to 122°F (-30°C to 50°C) |
| Enclosure Rating | NEMA 4 |
| Input Voltage | 208-240V AC |
| Output Connector | J1772 connector |
| Network Connectivity | Ethernet, Wi-Fi |
| Mounting Type | Wall or Pedestal |
| Authentication | RFID card, mobile app |