Do you have a question about the Sharp RP-7700H and is the answer not in the manual?
The last letter of the model name indicates the product's color. Operations and specifications are the same for all units.
Audio-visual material may be copyrighted. Recording requires owner's permission. Refer to national laws.
This apparatus complies with BS 800 and EEC directive 82/499/EEC requirements.
Lists accessories like aerials, batteries, and cables not supplied with the unit.
Avoid oil, solvents, petrol, paint thinners, insecticides. Use on firm surface, avoid direct sunlight, extreme temperatures, magnetic fields, dust, humidity.
Disconnect power when not in use or for service. Unit contains dangerous voltages; do not remove covers. Keep vents clear.
Sudden temperature changes can cause dew on the pickup. Leave power on without disc to dry (approx. 1 hour).
CD players use a laser pickup. Avoid direct viewing as it can damage eyes. Do not touch the pickup.
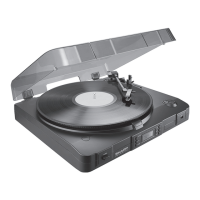
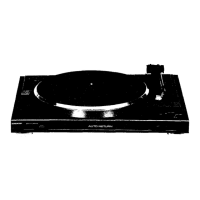
Identifies key components of the turntable: platter, spindle, tonearm, cartridge, and speed selector.
Describes buttons like Cue Lever and Cut Button for turntable operation.
Details the Sound Level Meter, Sharp Scan Peak Level Display Meter, and various indicators.
Covers Power Switch, Volume Control, Balance Control, and Graphic Equalizer Controls.
Explains Function Switches, Muting Switch, and Extra Bass Switch (X-BASS).
Explains indicators for Pause, Play, Track Number, Programme, Memory, and Repeat status.
Details the CD Compartment, Eject, Play, Pause, Stop/Clear, Call, and Memory buttons.
Describes buttons for Track Up/Cue/APSS and Track Down/Review/APSS.
Identifies the Remote Control Transmitter Window and Function Selector Buttons.
Details buttons for Preset tuning, Track Input, Repeat, APSS, Memory, Pause, Play, and Stop.
Covers the Power Switch and Volume Up/Down Buttons on the remote.
Instructions for opening the compartment, inserting 2 UM-4 or R03 batteries, and replacing the cover.
Aim at sensor within 60°, clean window/sensor, avoid strong light, moisture, heat, shock, vibration. Usable range is 0.2-6m.
Guide to placing the platter, looping the belt over the motor pulley, and securing the tonearm.
Instructions for connecting supplied FM and MW/LW aerials, plus external aerials.
Details how to install batteries for microprocessor preset memory backup.
Connect turntable lead to PHONO sockets and DC input cable to POWER SUPPLY socket.
Connect amplifier to PRE OUT sockets and control lead to POWER SUPPLY. Wire speakers to terminals, minding polarity/impedance.
Plug AC supply leads into outlets after connecting speakers. Unplug if unit is unused long-term.
Steps for opening CD compartment, placing 12cm/8cm discs correctly, and closing the compartment.
Press PLAY button after loading. Track number '01' appears. MINUTE/SECOND indicator blinks if disc is scratched.
Avoid forcing compartment, opening during rotation, or loading damaged discs. Subjecting unit to shock causes mistracking.
Automatically locates track beginnings. Use UP/DOWN buttons to search or select tracks via remote.
Press UP button to skip forward, DOWN button to skip backward during playback. PLAY indicator flashes.
Program desired tracks forward or backward using UP/DOWN and MEMORY buttons. Up to 20 tracks can be programmed.
Use CALL button to review programmed sequence. Use STOP/CLEAR to clear programs, one by one or all.
Interrupt playback with PAUSE. Use CUE/REVIEW for audible fast forward/reverse in pause mode.
Repeat an entire disc, a single track, or a programmed sequence by pressing the REPEAT button.
Set POWER to ON, press TUNER, select band, use TUNING buttons to find stations. Memory recalls last station.
Press AUTO SCAN after manual tuning steps. Use TUNING buttons to find stations; tuning stops automatically.
Store up to 14 stations with FM mode using MEMORY and PRESET buttons. Auto-storage or manual confirmation available.
Select preset stations from the remote control by pressing TUNER and PRESET buttons.
Load cassette, select tape, set Dolby NR if needed, press PLAY. Use STOP/EJECT for FF/REW. Full auto stop at tape end.
Set CONT PLAY switch to ON. Press PLAY for both tapes. TAPE 1 auto-releases, starting TAPE 2.
Record from radio, CD, or record. Tune station, load cassette, set selectors, press PAUSE then RECORD. Adjust REC LEVEL.
Use BEAT CANCEL switch (A, B, or C) to reduce beating noise with MW or LW reception.
Load source tape in TAPE 1, blank in TAPE 2. Set speed (NORMAL/HIGH). Press PAUSE/PLAY for TAPE 1, then PAUSE/RECORD for TAPE 2.
Set TAPE COUNTER to '000' by reset button for tape indexing. Functions only for TAPE 2.
Ensure TAPE 1 is stopped. Set POWER ON, press TAPE button, load tape in TAPE 2, set REC LEVEL to MIN, press RECORD.
Connect external units like DAT or TV via RCA cables to AUX-1/AUX-2. Set STEREO/MONO switch as needed.
Ensure headphones have a 6.3 mm (1/4") plug and 8 to 25 ohms impedance.
Clean stylus with kit, brush in one direction. Replace when sound quality drops, pulling old one down gently.
Clean heads/capstans with swab/alcohol. Demagnetize parts every 30 hours using a tape head demagnetiser.
Wipe cabinet with soft cloth and dilute soap solution, then dry. Avoid chemically treated cloths.
Details power source, consumption, dimensions, weight, tuner range, sensitivity, pre-amp inputs, and cassette/CD player specs.
Details power source, consumption, dimensions, weight, music/continuous power output, and input impedance.
Details power source, dimensions, weight, type, speed, motor, and arm/cartridge specifications.