Do you have a question about the Sharp OPTONICA RP-9100H and is the answer not in the manual?
Important safety instructions for operation, installation, and environmental conditions.
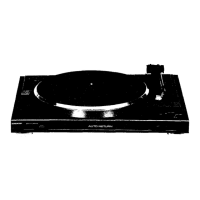
All controls are logically arranged on the front panel with a protective cover.
Allows selection and programming of up to 15 musical items from a record.
Ensures constant rotational torque with PLL quartz crystal oscillator.
Corrects centrifugal forces and operates control mechanisms for light button pressure.
A highly sensitive, statically balanced universal type tonearm.
Connection and voltage selection for AC power supply.
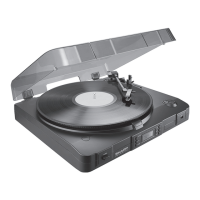
Key parts of the turntable like the platter and center spindle.
Parts of the tonearm including headshell, rest, and tracking adjusters.
Protective dust cover and stabilizing insulated legs for the unit.
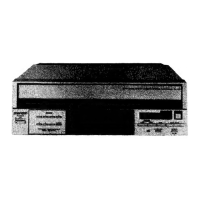
Components for remote control reception and indication.
Adjusting the unit to the local AC supply voltage for proper operation.
Instructions for installing a compatible audio cartridge into the headshell.
Initial steps to free the tonearm for assembly.
Positioning the tonearm and attaching the counterweight.
Securing the tonearm in its resting position.
Connecting the headshell to the tonearm and securing it.
Placing the turntable platter onto the center spindle.
Ensuring smooth movement of the tonearm lifter mechanism.
Instructions for attaching the protective dust cover to the unit.
Initial setting of the anti-skating control to zero.
Adjusting tracking force until the tonearm is horizontally balanced.
Returning the tonearm to its designated rest position.
Setting the tracking force dial to the zero reading after balancing.
Guidance on selecting an optimal location to avoid feedback and vibrations.
Procedures for safely moving the turntable to a new location.
Ensure the amplifier is switched off before connecting.
Connecting the turntable output leads to the amplifier's PHONO input.
Connecting the turntable's earth wire to the amplifier's GND terminal.
Connecting the turntable's power cord to a wall outlet.
Selecting the PHONO input on the amplifier and adjusting volume.
Indicators for speed, operation mode, and program item numbers.
Controls for selecting speed and fine-tuning pitch.
Controls for APMS sensor sensitivity and channel selection.
Buttons for repeat play, skipping, cutting, and clearing memory.
Main power switch and quartz crystal circuit control.
Turns power on/off and clears microprocessor memory when turned off.
Adjusts APMS sensor sensitivity for accurate item detection.
Fine-tunes platter speed, active only when Quartz Switch is OFF.
Selects playback speed for standard records (33-1/3 or 45 rpm).
Controls PLL circuit; ON illuminates speed discrepancy indicator.
Shows operation mode, APMS item number, and play status.
Buttons for entering program items and setting repetitions.
Confirm inputs and program continuous or pre-set repetitions.
Clears APMS program items or enters new programs in combination with Channel Button.
Confirms micro-processor inputs with an audible tone.
Moves to the next program item during play or reviews played items.
Manually lifts or lowers the tonearm for play interruption or resuming.
Stops playback and clears APMS program data.
Initiates APMS or automatic lead-in playback.
Warning about potential abnormal microprocessor function due to static interference.
Automatic speed selection and manual adjustment using Pitch Control.
Verifying the Quartz Crystal Button is OFF for manual speed adjustment.
Using Speed Selection buttons for 33-1/3 or 45 rpm.
Using the Cueing Button to manually lift the tonearm.
Monitoring speed deviations via the Pitch Indicator.
Warnings against touching the tonearm or pressing PLAY during automatic operation.
Steps for initiating automatic play, including power on and mode display.
How to set up continuous or pre-set number of repetitions for playback.
How to set up entire record or APMS program for continuous or pre-set repetitions.
Instructions for interrupting and resuming playback using the Cueing Button.
How to skip tracks using the SKIP button when APMS is functioning.
Steps for setting up continuous playback using REPEAT and PLAY buttons.
How to program a specific number of repetitions using input buttons.
Using Cueing Button for play interruption and resumption.
Using the SKIP button to move to the next program item.
Using the CUT button to stop playback and return tonearm to rest.
The APMS allows selection of record items in any order.
Initial steps to power on the unit and place a record.
How to select program items and their order using input buttons.
Using the CUT button to erase program items.
Using CLEAR button to change or erase program items.
Initiating playback of the first programmed item.
How the tonearm moves between program items.
The Mode Indicator shows 'IN' upon program completion.
How APMS repetition, pausing, and skipping operations work.
Conditions where the APMS sensor may not function correctly.
Adjusting sensor sensitivity for accurate item selection based on record surface.
Adjusting the automatic lead-in mechanism for proper stylus and sensor alignment.
When to use manual play for non-standard records or mid-record starts.
Steps for initiating manual play, including CUE button use.
How to stop playback and return the tonearm manually.
Description of the AD-700 remote control unit and its duplicate functions.
Safety warnings regarding the handling and placement of the remote control.
Instructions for installing, replacing, and removing batteries.
How to operate the unit using the remote control.
Method for cleaning the stylus using a soft brush.
How to clean the unit's cabinet with a soft, detergent-moistened cloth.
Troubleshooting steps for distorted sound, snapping, and howling noises.
Solutions for humming, no sound, and channel definition problems.
Addressing stylus skipping, tracking force, and anti-skating problems.
Overall type, power source, rating, and semiconductor details.
Specifications for the turntable motor, stabilization, and drive system.
Details on speeds, control range, wow/flutter, rumble, and platter.
Details on tonearm type, length, overhang, and cartridge weight compatibility.
Specifications for the remote control unit, including type and power source.
Identifies model, serial number, and manufacturer details for various regions.
Indicates the country of manufacture for the turntable and remote control.
Lists model number and battery requirements for the remote control.
Specifies the country of origin for the remote control unit.