L-PD3U
Accordingly, the repair engineer must obtain the new ID number.
If you have any question, please contact bolow.
F7l ma_waki @ toh.sharp.co.jp
c
3. Enter model number, serial number, company name and FAX, as well as your own name.
After confirmation, click m].
For errors, click -1 and enter correction.
Click ISearch-] and confirm your ID number (can be reactivated if number is forgotten).
<Enter> One character (English letter) per byte.
Model: Model name (leave cut hyphens, brackets)
Serial No: Manufaoturing number
Company/Fax. No.: Company name/Fax No. (multi fax or public line fax).
Name: Your name.
l A new ID number.
Please enter Model, Serial No., Company/Fax. No. and Name.
Model
Serial No.
Company/Fax. No.
Name
l Search ID number allocated to you.
4. For item 3 above, when you click IOK I. the ID number matching any address will appear.
Press that number and follow “Entering Procedures for IEEE1394 ID Numbers” as you enter the data for Viewcan.
Please use below Number.
182 181 180 17F 17E
5. If you need the ID number again, click mi and use the same procedure.
Click wi when you are finished.
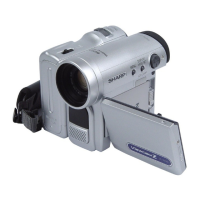
H Procedures for Entering IEEE1394 Numbers
1. Set the power switch to the “VCR” position.
2. Press “CONTINUE” on the adjustment remote control,
then press “VCR ADJ” and the address you chose will
appear on the LCD monitor.
LAddress: flashing
3. With “FF” or “REW” the desired address will
Set with “PLAY” and data entry will show.
appear.
- [PLAY] key
r [FF] key
- [STOP] key
- [REW] key
- [VCR ADJ] key
- [CONTINUE] key
/
ADJ. REMOTE CONTROL
RRMCG 0033 TASA
4. With “FF” or “REW” the ID number (obtained through the Intranet) for any address wil appear. Set with “PLAY”.
5. Press “STOP” and the address selection will appear. Then you can enter your ID number in order under the given
address digits (182, 181, 180, 17F, 17E).
6. Set the power switch to the “OFF” position. Now the writing is complete.
1 o-2