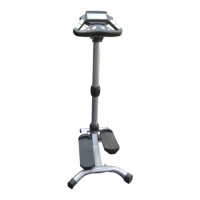
The Sharper Image Foldaway Elliptical Strider with Heart Rate Monitor (SR409) is a fitness device designed for cardiovascular exercise and calorie burning, offering a compact, foldable design for easy storage. It incorporates a heart rate monitor to help users track their workout intensity.
Safety Instructions:
Before using the Strider, it is crucial to read and follow all safety instructions to prevent bodily injury. The manual should be kept in a convenient place and read by all users.
- Assembly: Ensure the Strider is properly assembled and tightened according to the instructions before use.
- Health Precautions: Stop exercising immediately if you feel faint, lightheaded, dizzy, or experience any pain or pressure. Consult a physician before starting any exercise program.
- Pre-Use Inspection: Inspect all nuts and bolts to ensure they are fully tightened before each exercise session.
- Surface: Use the machine on a flat, level surface.
- Children and Pets: Keep children and pets away from the equipment, whether it is in use or not, due to moving parts.
- Training Program: Follow recommendations from your doctor and fitness professional when developing a training program, respecting your strength and flexibility levels.
- Warm-up and Cool-down: Begin and end each workout slowly, with a five-minute warm-up before and a five-minute cool-down after.
- Stability: Hold onto the main frame when stepping on and off the Strider.
- Attire: Wear appropriate clothing and footwear that allows free movement, such as jogging suits or shorts.
- Moving Parts: Avoid placing any part of your body between or near moving parts to prevent serious injury.
- Damage: Do not operate the equipment if it is damaged.
- Lubrication: Periodically lubricate all moving parts for optimum operation.
Parts List Highlights:
The device includes a comprehensive set of parts for assembly and function:
- Main Frame (01): The primary structural component.
- Base Frame (02): Provides stability.
- Stabilizers (03): Two units for additional stability.
- Legs (04, 05, 06, 07): Front and rear legs for support.
- Pad Post (08): Supports the abdominal pad.
- Pedal Arms (09, 10): Components for the elliptical motion.
- Handlebars (11, 12): Left and right handlebars for grip and support.
- Electronic Meter (15): Displays workout data.
- Safety Pin (16): Used for securing the frame in folded and unfolded positions.
- Sensor Wire (19) and Magnet (20): For speed sensing.
- Abdominal Pad (22): For user comfort.
- Hand Pulse Sensor with Wire (44) and Location (45): For heart rate monitoring.
- Various Bolts, Nuts, Washers, Plugs, and Caps: For assembly and securing components.
Assembly Guide:
The assembly process involves several steps, ensuring all parts are correctly attached.
- Step 1: Attach Stabilizer (3) with Endcaps (14) to the Base Frame (2) using Carriage Bolts (31), Acorn Nuts (32), and Arc Washers (27).
- Step 2: Attach the Base Frame (2) to the Main Frame (1) using Bolt (33), Nylock Nut (34), and Washers (28). Lock the Base Frame (2) into position with Locking Pin (30).
- Step 3: Attach the Stabilizer (3) with Wheel Caps (13) to the Main Frame (1) using Carriage Bolts (31), Acorn Nuts (32), and Arc Washers (27).
- Step 4: Attach the Front Pedal Arm (9) to the Left Front Leg (4) with Bolt (40) and Nylock Nut (34). Insert Pedal Arm (10) into Front Pedal Arm (9) and bolt them to the Left Rear Leg (5) with Bolt (40) and Nylock Nut (34). Repeat for the right side (Legs 6 and 7).
- Step 5: Feed the Hand Pulse Wire (44) from the Left Handlebar (11) through the hole on the Left Front Leg (4). Attach the Left Handlebar (11) to the Left Front Leg (4) with Carriage Bolts (39), Nylock Nuts (41), and Washers (37). Repeat for the Right Handlebar (12) and Right Front Leg (6).
- Step 6: Attach the Abdominal Pad (22) to the Pad Post (8) with Bolts (36).
- Step 7: Plug the Sensor Wire (19) into the Electronic Meter (15). Slide the Electronic Meter (15) onto the Bracket of the Main Frame (1). Connect the two Hand Pulse Wires (44) to the electronic meter. Ensure the Sensor Wire (19) and Hand Pulse Wires (44) are not damaged, properly connected, and tightened.
- Step 8 (Storage Pin): To store the Safety Pin (16), insert it into the Oval Plug with Hole (18) on top of the Main Frame (1).
Battery Replacement for the LCD Screen:
- Remove the battery cover from the back of the monitor.
- Insert two AAA (or UM-4) batteries into the compartment, ensuring correct polarity and contact with the battery spring.
- Batteries typically last about one year with normal use.
- If the screen is illegible or partially legible, remove batteries, wait 15 seconds, and reinstall.
- To reset all values to 0, remove all batteries.
Functions:
The Electronic Meter provides various workout data:
- Auto on/off & Auto: The LCD screen is on when the machine is in motion. It turns off automatically after four minutes of no movement.
- Auto Scan: Press the button until the arrow points to 'S'. The display will cycle through Time, Total Count, Calories Burned, Steps/Min, and Count every 30 seconds, with each appearing for six seconds. Note: Auto scan does not show pulse rate.
- Elapsed Time (T): Press the button until the arrow points to 'T' to count the elapsed time.
- Count (C): Displays the total steps taken since the last reset.
- Calorie (CA): Displays the number of calories burned.
- Steps/Minute (R): Displays steps per minute.
- Total Count (TC): Displays the total count since batteries were installed. To reset, remove batteries.
- Heart Rate (❤): Displays heart rate in beats per minute (BPM).
- Pulse Rate (Hand Pulse System): To measure pulse rate, stop exercising, place palms on contact pads, and do not move handlebars. The monitor will show current heart rate in BPM.
- Reset: Press and hold the button for more than two seconds to reset all functional values to 0.
Storage:
The Strider is designed to fold for easy storage.
- Step 1: Remove Safety Pin (16) from the top of the Main Frame (1). Swing Legs (5 and 7) forward to align holes with the Main Frame (1). Lock them together by inserting Safety Pin (16) through the holes.
- Step 2: Fold both Pedal Arms (10). Pull out Locking Pin (30) from the Main Frame (1), then fold the Base Frame (2).
- Step 3: Lock the Base Frame (2) into the folded position by inserting Locking Pin (30) into the Main Frame (1).
Specifications:
- Auto Scan: Every six seconds.
- Riding Time: 00:00 - 99:59
- Count: 0 - 9999
- Calorie: 0.1 - 999.9 k cal
- Step/Min: Maximum up to 999
- Total Count: 0-9999
- Pulse Rate: 30-240 beats per minute
- Controller: 4-bit single chip microprocessor
- Sensor: No-contact magnetic type
- Battery: 2 AAA (or UM-4)
- Operating Temperature: 32°F - 104°F (0°C - +40°C)
- Storage Temperature: 14°F - 140°F (-10°C - +60°C)
Warranty:
The Sharper Image provides a 90-day warranty from the date of original purchase, covering defects in materials or workmanship. It does not cover damage from misuse, unintended use, or loss/damage to batteries or removable parts. The company will repair, replace with a similar product, or refund the purchase price if repair is not possible. For service, return the product with a receipt and problem explanation to T.S.I. - Returns Department, 2901-A West 60th Street, Little Rock, AR 72209. Customer service can be reached at 1-800-344-5555 or care@sharperimage.com.