EasyManua.ls Logo

Siemens SE - User Manual

Siemens SE
12 pages
Print Icon
To Next Page IconTo Next Page
Loading...
INSTRUCTION MANUAL
Hookstick disconnect switches
(types SE, SEL, SER, LER, E, EF,
B-1, B-2, EH, EHL, and EHTT)
Installation / check-out / maintenance instructions
usa.siemens.com/disconnectswitches
Question and Answer IconNeed help?

Do you have a question about the Siemens SE and is the answer not in the manual?

Summary

Field Service and Support

Customer Service and Technical Assistance

Contact Siemens for field service, technical guidance, and customer service issues.

Pre-Installation Checks

Switch Verification and Damage Check

Verify correct switch installation and inspect for shipping damage to insulators, hot parts, and components.

Interrupter and Parts Inspection

Check interrupters for damage and ensure all required parts like connectors and brackets are present.

Installation Procedures

Mounting and Fastening

Drill mounting holes, install bolts, and mount the switch securely without twisting the base.

Operational Check-out Procedure

Latch and Hook Alignment Check

Verify correct latch overlap and position when the switch is fully closed.

Interrupter Lever Position Check

Ensure interrupter lever is correctly positioned and free of contact with blade end when closed.

Blade End and Lever Contact Check

Confirm blade end casting makes metal-to-metal contact with interrupter lever before leaving jaw assembly.

Interrupter Trip Functionality

Ensure interrupter trips the load while lever arm is in contact with blade end.

Lever Reset and Push Bar Engagement

Check lever clears push bar and springs back to cocked position for next operation.

Push Bar Pickup During Closing

Verify push bar picks up lever minimum 0.500 inch during switch closing.

Push Bar Clearance During Closing

Ensure push bar maintains minimum 0.500 inch clearance from yoke during closing.

Interrupter Reset Confirmation

Confirm interrupter resets (cocks) for the next opening operation after switch closure.

Free Operation and Final Closure

Check blade rotates freely and closes completely without obstruction.

Maintenance and Care

Periodic Operation and Lubrication

Operate switch periodically, clean and lubricate jaw contacts and blade end with approved grease.

Hinge Lubrication

Lubricate the hinge with factory approved lubricant if blade rotation requires light effort.

Interrupter Action and Push Rod Maintenance

Check interrupter action; clean and lubricate push rod if stiff or corroded.

Insulator Condition Check

Inspect insulators for cracks, breaks, or flashovers.

Hot Parts and Interrupter Visual Inspection

Visually inspect hot parts, including the interrupter, for any damage.

Hardware Tightness Check

Check for loose or missing hardware, particularly mounting and terminal pad bolts.

Terminal Pad Corrosion and Overheating

Visually inspect terminal pad areas for corrosion or signs of overheating.

Product Disposal Information

Material Recycling and Handling

Guidelines for recycling metals, plastics, electronics, cables, motors, and batteries.

Overview

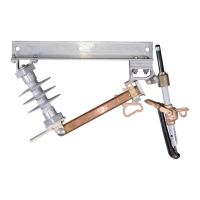
The provided document is an instruction manual for Hookstick disconnect switches manufactured by Siemens. These switches are designed for medium voltage applications and include various types: SE, SEL, SER, LER, E, EF, B-1, B-2, EH, EHL, and EHTT. The manual covers installation, check-out, and maintenance instructions, emphasizing safety and proper handling.

Function Description

Hookstick disconnect switches are high-voltage air disconnecting and load interrupter switches. Their primary function is to isolate sections of an electrical circuit for maintenance, repair, or to reconfigure the power distribution system. When equipped with interrupters, they can also interrupt load currents, allowing for safe opening under load conditions. The "hookstick" designation implies that these switches are operated manually using an insulated hookstick, providing a safe distance for the operator from energized parts. The mechanical action involves a blade that rotates to make or break contact with jaw assemblies, and for interrupter-equipped models, a lever mechanism that triggers the interrupter to extinguish the arc during load interruption.

Important Technical Specifications

While the manual does not explicitly list detailed technical specifications like voltage ratings, current ratings, or insulation levels, it provides crucial operational and mechanical tolerances that are integral to the switch's performance and safety.

Operational Tolerances (for interrupter-equipped switches):

  • Latch Overlap: When the switch is fully closed, the latch should overlap the hook by 0.150 inches (minimum) to 0.300 inches (maximum). The latch must be below the hook.
  • Lever Position (Closed & Cocked): With the switch fully closed and the interrupter cocked (set to trip), the interrupter's lever should be above the blade end, with no metal-to-metal contact between the lever and the blade end casting. A minimum clearance of 0.50 inches is indicated in a diagram.
  • Blade Opening & Interrupter Contact: As the blade opens, the blade end casting must make metal-to-metal contact with the interrupter's lever before the blade leaves the silver contacts on the jaw assembly.
  • Interrupter Trip Point: The interrupter must trip (fire) while the lever arm is in metal-to-metal contact with the blade end. This trip should occur before the blade end gets within 0.50 inches (minimum) to 0.75 inches (maximum) of the end of the lever.
  • Push Bar Engagement (Closing): As the blade rotates closed, the push bar must pick up the lever a minimum of 0.500 inches from the end of the lever.
  • Push Bar Clearance (Closing): When the lever is at 90 degrees to the interrupter, the push bar should be a minimum of 0.500 inches from the side of the yoke. At no time during closing should the push bar touch the connecting rod or yoke. A minimum clearance of 0.137 inches is indicated between the connecting rod and the blade end.

General Construction:

  • The switches are designed to be mounted on crossarms or steel structures using customer-supplied mounting bolts.
  • Interrupters, if required, are inserted and twisted into a locked position.

Usage Features

The manual outlines several key features related to the usage of these hookstick disconnect switches:

  • Manual Operation: The switches are designed for manual operation using a hookstick, which is a standard method for operating high-voltage disconnects, ensuring operator safety through distance.
  • Load Interruption Capability (with interrupters): For models equipped with interrupters, the switches can safely interrupt load currents, preventing dangerous arcing during opening. The interrupter mechanism is designed to trip (fire) at a specific point during the blade's opening sequence to effectively extinguish the arc.
  • Visual Inspection and Verification: The installation and check-out procedures heavily rely on visual inspection of mechanical clearances and actions to ensure proper operation. This includes checking the latch overlap, lever position, blade-to-lever contact points, and push bar clearances.
  • Factory Adjustment: Switches are fully adjusted and inspected at the factory, minimizing the need for field adjustments during installation.
  • Robust Design: The emphasis on careful handling during installation (e.g., "DO NOT TWIST OR BOW THE SWITCH BASE") suggests a design that, while robust, requires proper installation to maintain its integrity and performance.
  • Compatibility: The switches are designed to be integrated into existing electrical infrastructure, requiring customer-defined mounting hole locations.

Maintenance Features

The maintenance section provides guidelines to ensure the longevity and reliable operation of the hookstick disconnect switches:

  • Periodic Operation and Lubrication: Regular operation of the switch and lubrication of jaw contacts and the blade end with factory-approved grease are recommended. This prevents seizing and ensures smooth mechanical action.
  • Hinge Lubrication: If the blade requires light effort to rotate after clearing the interrupter lever, the hinge should be lubricated with a factory-approved lubricant.
  • Interrupter Mechanism Check: The mechanical action of the interrupter should be checked by hand. If stiff, the push rod should be cleaned with denatured alcohol and re-lubricated with factory-approved lubricant. Repeated manual operation helps work in the lubricant.
  • Interrupter Replacement: If the interrupter remains stiff or shows heavy corrosion on the push rod, replacement is recommended. The internal mechanism of the interrupter is not user-serviceable; any attempt to maintain it internally may cause damage.
  • Visual Inspections:
    • Insulators: Check for cracks, breaks, or signs of flashover.
    • Hot Parts: Inspect for any visual damage.
    • Hardware: Check for loose or missing mounting and terminal pad bolts.
    • Terminal Pads: Visually inspect for corrosion and/or overheating. A thermal vision test is preferred if equipment is available.
  • Maintenance Program: Users are advised to establish and follow a suitable maintenance program, with inspection frequency dependent on atmospheric contamination, operation frequency, and fault current exposure.
  • Reference to Standards: The manual recommends referring to the latest ANSI C37.35 ("IEEE guide for the Application, Installation, Operation and Maintenance of High-Voltage Air Disconnecting and Load Interrupter Switches") for additional recommendations, indicating adherence to industry standards for maintenance practices.
  • Disposal Guidelines: The manual includes detailed instructions for the environmentally responsible disposal of the switch components, including metals, plastics, small electronics, insulated cables, motors, and batteries, emphasizing recycling and adherence to local regulations. This highlights a commitment to environmental responsibility throughout the product lifecycle.

Siemens SE Specifications

General IconGeneral
BrandSiemens
ModelSE
CategorySwitch
LanguageEnglish

Related product manuals