Hardware installation
2.2 CP 1616 communications processor
CP 1604 / CP 1616
Operating Instructions, 02/2017, C70000-G8976-C218-08
27
3. Remove the CP 1604 communications processor from its packaging.
Note
When handling the module, make sure that you do not touch the con
nectors or the
4. When necessary screw the supplied threaded sleeves onto the module on which the CP
1604 will be placed.
5. Insert the CP 1604 into the prepared PC/104 Plus slot.
Make sure that the CP 1604 sits firmly and uniformly.
6. Take the 4 supplied M3 screws and screw the CP 1604 to the underlying sleeves.
7. Set the module address on the CP 1604.
8. When required, install the Microbox expansion frame for the CP 1604 with the optional
CP 1604 modules as described in the section "AUTOHOTSPOT".
9. Close the computer housing as described in the manual accompanying your PC.
10.If required, insert the connecting cables (TP) in the corresponding RJ-45 jacks of the RJ-
45 connection board for the CP 1604.
11.Plug the power supply connector into the socket again and turn on your computer.
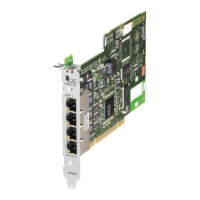
CP 1616 communications processor
2.2.1
Important information
Electrostatic sensitive devices
Please remember the measures to prevent electrostatic charge when installing the module
(ESD -
lectro
tatic
ischarge)
Opening the PC and plugging or pulling the modules is permitted only when the power is off.
Before installing the module, please read the section "Procedure for installing the CP 1616
(Page 28)" or similar in the manual of your PC and keep to the instructions.
The CP 1616 has a socket for connecting an external power supply.
 Loading...