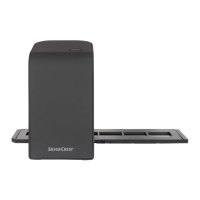
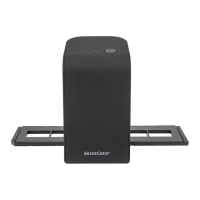
The SilverCrest SND 3600 D3 is a slide and negative scanner designed for non-commercial use, allowing users to digitize film negatives and slides. It connects to a computer via USB and is compatible with both Windows and Mac operating systems.
Function Description:
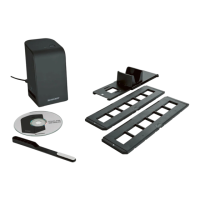
The primary function of the SND 3600 D3 is to scan and convert film negatives and slides into digital images. It features a dedicated slot for a negative holder and a slide magazine, allowing for the insertion of various film types. The device is operated in conjunction with "Image Scan Tool" software, which provides a user interface for controlling the scanning process, adjusting image settings, and saving the digitized files.
Important Technical Specifications:
- Operating Voltage/Current: 5 V (direct current) / 500 mA (via USB port)
- Interface: USB 2.0
- Operating Temperature: +5 to +40 °C
- Humidity (no condensation): ≤ 75%
- Dimensions (W x H x D): Approx. 9.4 x 16.9 x 10.4 cm
- Weight (without accessories): Approx. 450 g
- Image Sensor: 5 megapixel CMOS sensor
- Focus Range: Fixed focus
- Brightness Control: Automatic
- Colour Adjustment: Automatic
- Resolution:
- Standard: 2592 x 1680 pixels
- Interpolated: 5184 x 3360 pixels
- Scanning Method: Single pass
- Light Source: Backlight (3 white LEDs)
- System Requirements: Windows 10 / 8 / 7 / Vista / XP, Mac OS 10.6 or higher
Usage Features:
The scanner is designed for straightforward operation.
- Connecting to a Computer: The device connects to a powered-on PC via the supplied USB cable (USB to micro-USB). The computer automatically recognizes the new hardware and installs the necessary drivers. The PWR LED (1) illuminates once the scanner is properly connected.
- Software Installation: The "Image Scan Tool" software is provided on a program CD. For Windows, the installation menu typically starts automatically upon inserting the CD. If not, the "WinSetup.exe" file can be run manually. For Mac OS, users navigate to the "Mac" directory on the CD and run "ImageScan.dmg". It is recommended to back up important files before software installation.
- Inserting Negatives:
- Unlock the catch on the front of the negative holder (5) and open it.
- Lay the negative strip correctly in the holder, ensuring the holes align with the retaining tabs to prevent movement.
- Close the holder until it clicks into place.
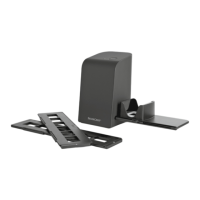
- Insert the negative holder (5) into the right slot (4), with the triangle marking visible at the front (Figure 1).
- Push the holder into the slot until it clicks into the first position. For additional negatives, push it further until it clicks into the next position.
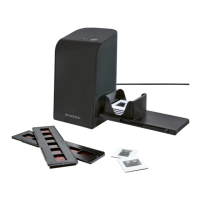
- Inserting Slides:
- Insert slides correctly into the shaft of the slide magazine (6). The magazine can hold approximately 10–12 slides, depending on their size.
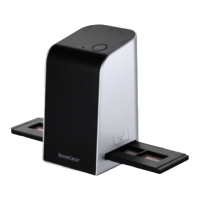
- Insert the slide magazine (6) into the right slot (4) with the viewing window at the front and the triangle marking visible (Figure 2).
- Use the pusher on the side of the slide magazine (6) to push individual slides into the scanner. First, slide the pusher away from the scanner as far as it goes, then carefully move it back towards the scanner. This action ejects the current slide and introduces a new one into the viewing area. Users should push new slides slowly to prevent them from slipping past the viewing range.
- Digitizing Negatives/Slides (Software Interface):
- Launch the "Image Scan Tool" program.
- Type Selection (A): Choose the type of film to scan (negative, slide, or black & white).
- Format Selection (B): Select the desired image format (JPG or TIFF) for saving.
- Resolution Selection (C): Choose between standard (2592 x 1680 pixels) and interpolated (5184 x 3360 pixels) resolutions.
- Scan Button (D): Click this button or press the SCAN button (2) on the device to scan an image.
- Delete Button (E): Delete the currently selected image.
- Image Display (F): Shows the currently selected image.
- Flip Image (G): Flip the currently selected image.
- Rotate Image (H): Rotate the currently selected image clockwise.
- Save Images (I): Save the scanned images. A warning appears if the save path is invalid.
- Close Program (J): Close the "Image Scan Tool" program.
- Colour/Brightness Adjustment (K): Access settings for colour and brightness before scanning. Adjustments are shown in the live view (O).
- Select Save Folder (L): Choose a folder to save the scanned images.
- Current Save Folder (M): Displays the folder where images will be saved.
- Scanned Images (N): Shows images that have been scanned but not yet saved. The currently selected image is highlighted with a green frame and displayed in window (F).
- Live View (O): Displays a real-time view of the inserted negative/slide.
- Colour and Brightness Settings: Within the software, users can adjust brightness (between -64 and 64 for Windows, 0 and 255 for Mac) and RGB colour balance (between -6 and 6 for Windows, 0 and 255 for Mac). There are options to reset to default values and to exit the settings window.
- After Use: Remove the negative holder (5) or slide magazine (6) from the slot (4) and disconnect the USB cable (8) from both the computer and the scanner.
Maintenance Features:
- Cleaning:
- The housing should be cleaned with a slightly damp cloth and a mild detergent.
- To clean the background lighting surface inside the device, use the cleaning brush (7). Insert the brush with the cleaning surface facing downwards into the right slot (4) (Figure 3).
- It is crucial to prevent moisture from entering the device during cleaning to avoid irreparable damage.
- Storage: Store the device in a dry, dust-free environment away from direct sunlight when not in use.
- Disposal: The device must not be disposed of with normal household waste. It should be taken to a designated collection point for recycling in accordance with Directive 2012/19/EU. This disposal is free of charge for the user.