GB
│
CY │ 9 ■
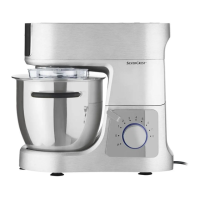
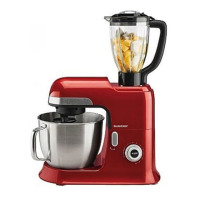
SKV 1200 A1
WARNING! RISK OF INJURY!
► Ensure that the rotary switch 3 is turned to
"0" before you place the blender t on the
blender drive i. Otherwise the appliance will
start immediately as soon as the blender t
has locked into place.
3) Place the blender t on the blender drive unit
i so that the lock tabs on the underside of
the blender t lock into the recesses on the
blender drive unit i. The
symbol on the
blender t must be pointing to the
symbol
on the appliance. Turn the blender t anti-
clockwise as far as it will go. The symbol
on the blender t must then be pointing to the
symbol on the appliance.
4) Add the ingredients.
5) Place the blender lid r with measuring cup e
in position so that the lips of the blender lid r
also seal the spout.
6) Turn the rotary switch 3 to the desired setting.
NOTE
► The ideal speed depends on the consistency
of the items being mixed. The more liquid the
contents are, the faster you can mix them.
► For short, powerful pulsed operation, turn
the rotary switch 3 anticlockwise to level P.
Level P does not lock into place so as not
to overload the motor. You should therefore
keep the rotary switch 3 in this position only
for a short time.
CRUSHING ICE
► In order to produce crushed ice, place ice
cubes in the blender t, close it and turn the
rotary switch 3 approx. 7 times to level P
for 5 seconds. You may need to adapt the
above instructions depending on the quantity
and size of the ice cubes.
Adding more ingredients
1) Turn the appliance off using the rotary switch 3.
2) Remove the blender lid r and add the ingredi-
ents
or
3) Turn the measuring cup e in the blender lid r
clockwise as far as it will go and then take it
out. Add the ingredients gradually through the
opening in the blender lid r.
After you have finished using your
appliance
1) Turn the appliance off using the rotary switch 3
(Position “0”).
2) Turn the blender t clockwise so that the
symbol on the blender t is pointing to the
symbol on the appliance and remove it.
NOTE
► Ideally, you should clean the blender t im-
mediately after use (see the section "Cleaning
and care"). This makes food residues easier
to remove.
3) Place the drive protection cover u back on
the blender drive i so that the
symbol on
the drive protection cover u is pointing to the
symbol on the appliance. Turn the drive
protection cover u anticlockwise so that the
symbol on the drive protection cover u is
pointing to the
symbol on the appliance.

 Loading...