WARNING (Continued)
■
H7 and H15 bulbs are pressurised and may burst when changing the bulb -
risk of injury! We therefore recommended wearing gloves and safety
glasses when changing a bulb.
■
Do not carry out any work on the Xenon gas discharge lamps - risk of
death!
CAUTION
■
Do not take hold of the glass bulb with naked fingers (even the smallest
amount of dirt reduces the working life of the light bulb). Use a clean cloth,
napkin, or similar.
■
The cap of the filament bulb must always be seated correctly in the head-
light, otherwise this may allow water and debris to enter the headlight - risk of
damage to the headlights.
Note
■
This Owner's Manual only describes the replacement of bulbs where it is pos-
sible to replace the bulbs on your own without any complications arising. Other
bulbs must be replaced by a specialist garage.
■
We recommend that a box of replacement bulbs always be carried in the ve-
hicle.
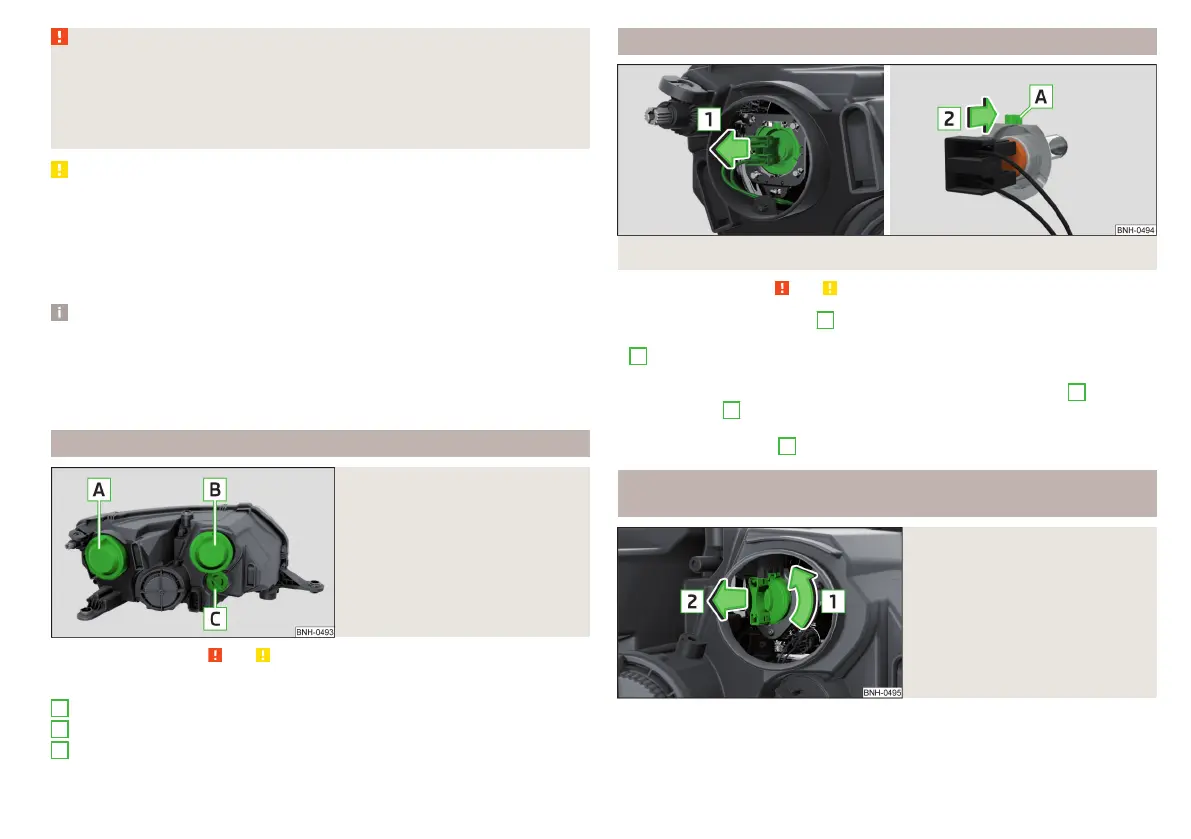
Bulb arrangement in the front headlights
Fig. 190
Left headlight
Read and observe and on page 156 first.
Bulb arrangement » Fig. 190
Low beam or low beam with Xenon gas discharge lamp
Main beam, separate daytime running lights, and parking light
Turn signal light (at the front)
A
B
C
Replacing the bulb for the side light (Halogen headlights)
Fig. 191 Changing the bulb for the low beam
Read and observe
and on page 156 first.
›
Remove the protective cap
A
» Fig. 190 on page 157.
›
Remove the socket with the bulb by jiggling it out in the direction of arrow
1
» Fig. 191.
›
Remove the connector.
›
Insert the connector with the new bulb in the direction of arrow
2
so that
the fixing lug
A
fits the bulb into the recess on the reflector.
›
Attach the connector.
›
Fit the protective cap
A
» Fig. 190 on page 157.
Changing the bulb for main beam, separate daytime running
lights, and parking light
Fig. 192
Replacing the bulb for main
beam and separate daytime run-
ning lights
157
Fuses and light bulbs

 Loading...