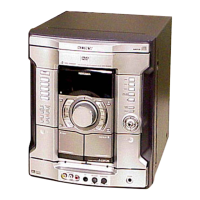
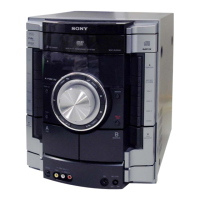
Do you have a question about the Sony HCD-RV990D and is the answer not in the manual?
Details amplifier specifications, including power output, sensitivity, and impedance for various speakers and inputs.
Lists technical specifications for video, audio, and speaker outputs, including formats and impedances.
Details specifications for the disc player, including laser, frequency response, and video formats.
Details specifications for the tape deck, including recording system and frequency response.
Lists specifications for FM and AM tuners, covering tuning ranges and frequencies.
Provides general specifications like power requirements, consumption, dimensions, and mass.
Warns about potential hazardous radiation exposure from improper control or adjustment use.
Provides precautions for handling the optical pick-up block to prevent electrostatic breakdown and damage.
Offers guidance on safely checking the laser diode emission to avoid eye hazards.
Lists model numbers and their corresponding part numbers for identification.
Provides an alphabetical list of main unit controls and their corresponding page references.
Offers an alphabetical guide to remote control buttons and their page references.
Details the functions and corresponding page references for each button on the remote control.
Details the procedure for removing the outer case of the unit, including screw locations.
Describes the steps to detach the front panel section, highlighting connector disconnections and screw removals.
Explains how to remove the DVD mechanism block, DMB03 board, and video board, noting screw and bracket locations.
Details the procedure for removing the Motor (TB) board, specifying screw locations and soldering points.
Shows the physical locations of all major circuit boards within the unit for reference.
Provides essential notes and conventions for interpreting printed wiring boards and schematic diagrams.
Explains the characteristics and handling precautions for unleaded solder used in the product.
Shows the printed wiring board layout for the DVD mechanism section (side A and side B).
Provides the schematic diagram for the DVD mechanism section, including waveforms.
Shows printed wiring boards for the DVD mechanism section, including Motor (LD), Driver, Motor (TB), Sensor, and SW boards.
Presents the schematic diagram for the DVD mechanism section, illustrating connections between various boards.
Displays the printed wiring board layout for the DMB03 section (Side A), showing component placement.
Provides the schematic diagram for the DMB03 section, illustrating circuit paths and component connections.
Presents schematic diagrams for the DMB03 section, including waveforms and IC connections.
Shows the printed wiring board layout for the main section, indicating component locations.
Presents the first part of the schematic diagram for the main section, illustrating circuit connections.
Shows the printed wiring board layout for the video section, indicating component placement.
Presents the schematic diagram for the video section, illustrating circuit connections and IC functions.
Displays the printed wiring board layout for the jack section, showing component positions.
Provides the schematic diagram for the jack section, detailing circuit connections for external interfaces.
Shows the printed wiring board layout for the front amplifier section, indicating component locations.
Presents the schematic diagram for the front amplifier section, illustrating circuit logic and IC functions.
Displays the printed wiring board layout for the surround amplifier section, indicating component placement.
Provides the schematic diagram for the surround amplifier section, showing circuit logic and interconnections.
Shows the printed wiring board layout for the panel section, including LED and remote board components.
Presents the schematic diagram for the panel section, detailing control logic and display driver connections.
Displays the printed wiring board layout for the power supply section (part 1), showing component placement.
Provides the schematic diagram for the power supply section (part 1), illustrating power distribution and transformer connections.
Shows the printed wiring board layout for the power supply section (part 2), indicating component placement on the Sub Trans board.
Presents the schematic diagram for the power supply section (part 2), detailing the Sub Trans board circuits.
Block diagram and pin description for IC001, the RF Board's signal processor.
Block diagram for IC701, the driver board's control IC.
Block diagram for IC509, the DMB03 board's servo DSP.
Block diagram for IC302, a DAC chip on the DMB03 board.
Block diagram for IC331, a DAC chip on the DMB03 board.
Block diagram for IC903, an EEPROM chip on the DMB03 board.
Block diagram for IC906, a clock generator on the DMB03 board.
Block diagram for IC204, an EEPROM on the DMB03 board.
Block diagram for IC802, an amplifier on the VIDEO board.
Block diagram for IC502, a control IC on the JACK board.
Exploded view of the main section, showing major assemblies like the Sub Trans board and main board.
Exploded view of the front panel section (part 1), detailing components like volume knob, remote, and LED boards.
Exploded view of the front panel section (part 3), detailing buttons, lenses, and front panels.
Exploded view of the DVD block section, showing the video board, DMB03 board, and mechanism.
Exploded view of the main board section (part 1), illustrating main boards and trans boards.
Exploded view of the main board section (part 2), showing front amp and surround amp boards.
Exploded view of the DVD mechanism deck (part 1), detailing parts like motors, gears, and boards.
Exploded view of the DVD mechanism deck (part 2), showing chassis, pulleys, and optical pick-up unit.
Provides important notes regarding parts list standardization, replacements, and semiconductor identification.
Lists semiconductor components with their part numbers, descriptions, and locations.
Lists capacitor components with their part numbers, descriptions, and voltage/capacitance values.
Lists coil components with their part numbers and descriptions.
Details steps to enter and use the GC Test Mode for checking indicators, LEDs, and buttons.
Explains how to perform a cold reset to clear all RAM data and return the set to initial conditions.
Describes how to perform a hot reset, which resets the set without clearing data.
Explains how to change the AM channel step between 9 kHz and 10 kHz.
Describes how to switch between VIDEO and MD functions and change input levels.
Explains how to lock and unlock the disc tray to prevent theft of demonstration discs.
Details steps for testing amplifier, tuner, and tape operations, including volume and EQ adjustments.
Explains the aging mode for checking tape deck and DVD section operations and sequences.
Details sequences for DVD section aging mode and error history display.
Describes setting the DVD and CD ship mode to protect against vibration during transport.
Explains how to enable infinite repetitions for DVD playback, which is memorized until cold reset.
Details how to enter and use the DVD OSD Test Mode for diagnosis and adjustment via the on-screen display.
Details how to check serial interface contents and execute diagnostic checks via the remote commander.
Details the process for automatic drive adjustment, covering disc types and servo settings.
Describes how to select and automatically check the type of inserted disc (CD, DVD, Hybrid).
Details how to control servos for focus, tracking, spindle, and sled operations.
Allows manual jumping of tracks and layers on DVD discs.
Details manual adjustments for focus, tracking, gain, and EQ boost without EEPROM writing.
Explains automatic adjustment of focus, tracking, gain, and EQ boost with EEPROM writing.
Allows checking of EEPROM data and comparison with stored values.
Allows measurement of mirror time for chucked discs and writing it to EEPROM.
Measures and displays error rates, including PI, PO, and CR values.
Details the procedure for performing mechanism deck aging tests, including open/close tests.
Explains how to display and scroll through servo emergency history information.
Details how to display and scroll through mechanism deck error history.
Displays the ROM version and region code for the SYScon, IF con, and Front End.
Explains how to adjust video level using color bars, ensuring NTSC standard compliance.
Provides precautions and torque specifications for performing mechanical adjustments on tape mechanisms.
Notes that the VIDEO board generally does not require adjustment, but lists checks for signal levels.
Explains the necessity and procedure for re-adjusting the servo circuit after replacing related parts.
Details how to check RF signal waveform clarity and level to determine optical pick-up block status.
Describes the procedure for checking the video signal level for NTSC standard compliance.
Instructs to demagnetize the record/playback head and warns against using magnetized screwdrivers.
Specifies applying locking compound, using rated voltage, and order of adjustments.
Details the procedure for adjusting the record/playback head azimuth for both decks.
Shows the block diagram of the DVD DSP section, illustrating signal flow and component interactions.
Illustrates the block diagram of the DAC section, showing audio signal processing and output paths.
Shows the main block diagram, illustrating the integration of various sections like DVD DSP, DAC, and control units.
Presents the block diagram for the DVD system section, detailing power supply, control, and input/output signals.
Provides pin descriptions for IC701, the DVD decoder on the DMB03 board.
Lists pin descriptions for IC207, the DVD system processor on the DMB03 board.
Provides pin descriptions for IC901, the mechanism control IC on the DMB03 board.
Lists pin descriptions for IC1104, the sound control IC on the MAIN board.
Provides pin descriptions for IC101, the system control and FL driver on the PANEL board.