25
Installing Steadicam
®
Volt™ yourself
Most operators add Volt to their rigs by ordering the complete M-2 gimbal with the Volt motor assembly
already installed on their preferred side, ready to go. We’ll cover the steps involved with complete
gimbal installs rst, followed by the full install of Volt components onto all compatible gimbals later.
The steps involved are:
Complete Volt gimbal kit:
• Install Volt control box to your top stage using included and optional hardware
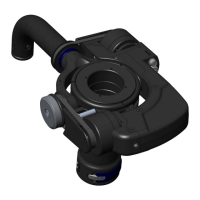
• Swap existing gimbal with new M-2 gimbal and Volt motor assembly
• Add power and gimbal cables, balance, and you’re ready to y!
Volt gimbal upgrade kits:
• Install Volt control box to your top stage using included and optional hardware
• If necessary, upgrade and balance legacy gimbals to Volt compatibility using optional Volt yoke kit
• Add pan encoder ring, pulleys, Volt motor assembly and belts to gimbal
• For right-side mounted Volt motors, ip the electronics orientation
• Add power and gimbal cables, balance and you’re ready to y!
Before beginning you should decide two details:
• Which side of the sled you’ll mount the control box knobs.
• Which side of the gimbal you’ll mount the motor assembly.
See page 7 for more details on choosing sides.
NOTE: we recommend familiarizing yourself with the complete install procedure before starting.
Types of installations