35
Steadicam
®
Volt™ for M-1, M-2, Ultra2, Shadow, Archer, and PRO gimbals
Professional installation is recommended, but a mechanically inclined, professional Steadicam
®
operator
such as yourself should be able to install a Volt in roughly an hour. Unlike other “horizon” gadgets, you’ll
probably never want to take it off. The initial steps for adding Volt to ALL gimbals require you to pull
the gimbal from your post, so take particular care if this is the rst time you’ve disassembled the com-
ponents of your system. The remaining steps can be performed with the gimbal ON or OFF the post,
though you may nd installing the belts easier with it removed.
• If you’re upgrading a non-Volt-compatible gimbal, rst exchange the yoke and balance the gimbal
using the notes starting on page 51. Then return to this page to add the Volt gimbal motor assembly.
• If you’re adding Volt to an M-2 gimbal, these instructions also work, with a few differences noted.
NOTE: This portion of the manual takes you through a detailed RIGHT-side install on an M-1 gimbal, with
special notes for LEFT-side installs. The two sides are essentially mirror images with minor differences.
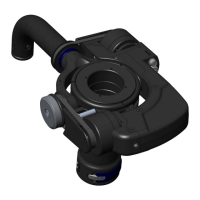
CAUTION: The external pan encoder ring included in many kits is a precisely manufactured magnet and
should NOT be exposed to strong external magnetic elds before or after installation.
To install the pan encoder
ring onto the gimbal of
any rig, you must rst
remove the top stage
from the post to gain
access to the gimbal.
The modular design of
the M-1 and M-2 makes
this extremely easy.
Installation of Volt onto bare gimbals