60
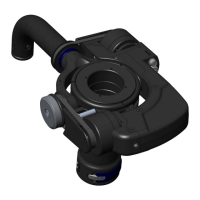
Assembly procedure
1. Remove PRO gimbal from sled and dis-assemble all parts from top bearing portion of gimbal. Be
careful to not damage any parts as some will be re-used upon re-assembly.
2. Press PRO bearing into 817-7164 gimbal ring carefully and evenly only on the outer race of the
bearing until it is fully seated. If any cleaning or re-lubrication of a used bearing is required, do it before
installation.
3. Install 817-7166 bearing cap and thread on 817-7167 encoder assembly securely using 815-7910-01
spanner tool.
4. If gimbal is not being outtted with a volt system at this time, install 2x SCI-B006N1210 into the
threaded holes in 817-7164. Omit if a volt system is to be installed.
5. Disassemble pro yoke components and then re-assemble using new 817-7165 yoke as shown noting
the use of Loctite 222 where required. Note that the use of latest pro gimbal axle (p/n GIM-11x) is
required and is not included with the gimbal upgrade kit. Image of the correct axle is shown on page 59
for comparison.
6. If volt is to be installed at this point, rst install 305-7175 pulley (not shown) onto the PRO gimbal
handle before installing the handle onto the yoke.
7. Install completed yoke assembly onto 817-7164 using initially 2 x 800-7179-01 parts on either side of
yoke.
8. Balance gimbal as required using balance procedure. Note that pin-137003 is used to install and
remove 800-7179-xx parts.
9. Complete assembly by installing 2x 815-7111 caps. Omit if a volt system is to be installed.
PRO CineLive, PRO CineHD
NOTE: Perform the gimbal balancing procedure found on
page 63, prior to Volt installation.