MS 194 C
English
7
– In hot environments, cooling will
take longer.
– The engine is air cooled. When it is
shut off, cooling air is no longer
drawn across the cylinder and the
engine temperature will rise for
several minues before starting to
cool.
After the saw has cooled appropriately,
follow the safety instructions in this
chapter for removing the cap. Never
remove the cap by turning it directly to
the open position. First check for
residual pressure by turning the cap
slowly to the vent position,
approximately 1/8 turn counter-
clockwise. Use only good quality fuel
that is appropriate for the season
(summer v. winter blends). Some
blends of gasoline, particularly winter
blends, are more volatile and can
contribute to fuel spraying.
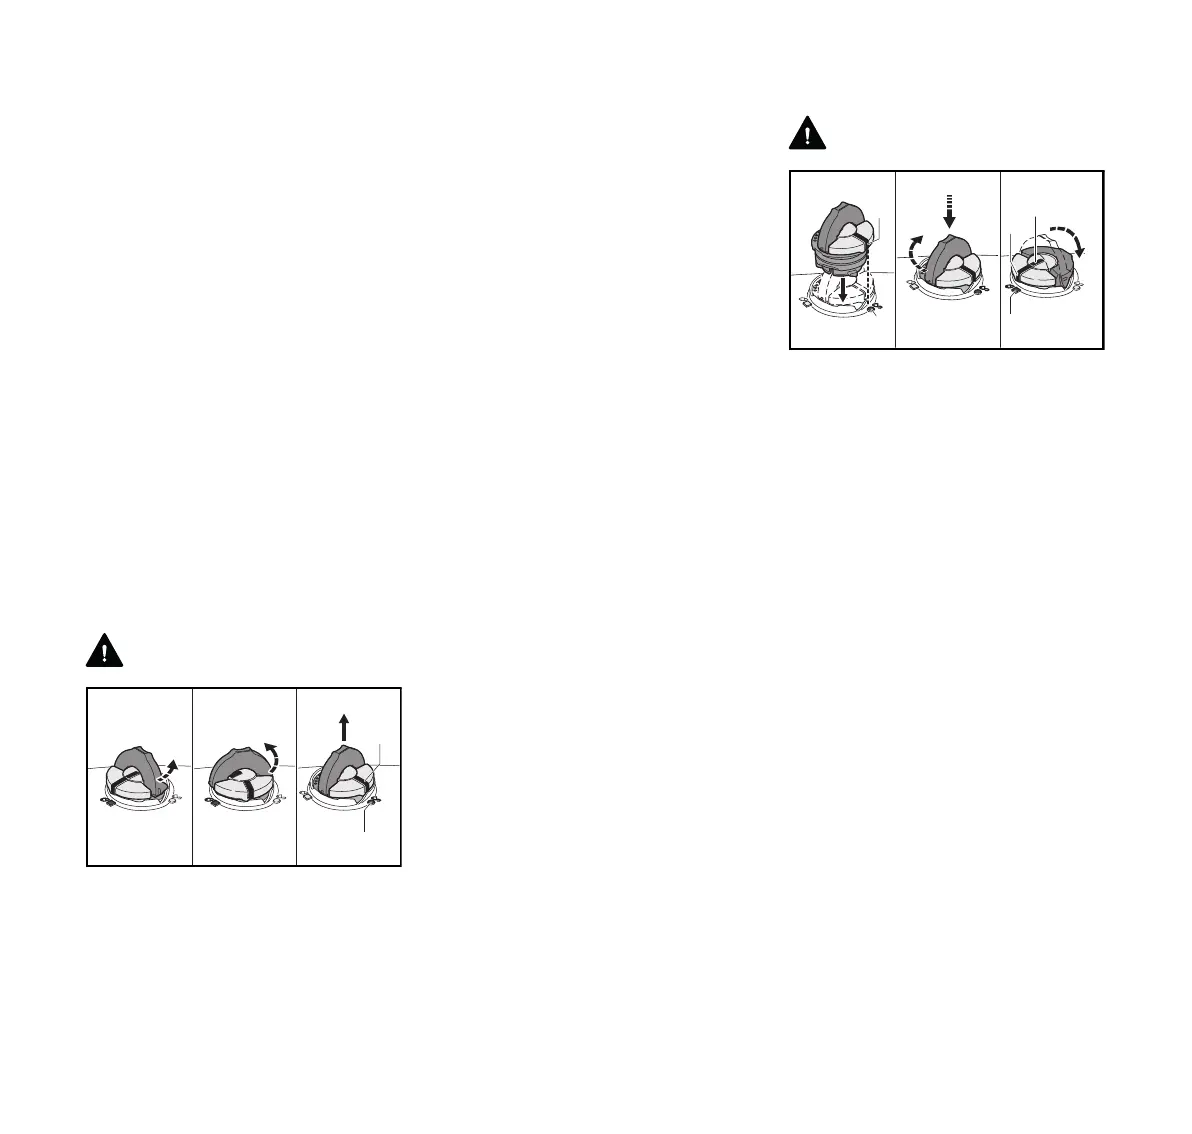
Removing the Toolless Fuel Cap: Turn
Slowly and Stop in the Vent Position
WARNING
Removing the cap on a pressurized fuel
tank can result in gasoline, vapors and
fumes being forcefully sprayed out from
the fuel tank in all directions. The
escaping gasoline, vapors or fumes can
cause serious personal injury, including
fire and burn injury, or property damage.
After allowing the chain saw to cool,
remove the fuel filler cap slowly and
carefully to allow any remaining
pressure build-up in the tank to release:
– Flip up the grip and press the cap
down firmly (1).
– While maintaining steady,
downward pressure, turn the cap
slowly counter-clockwise to the vent
position (2), approximately a
1/8 turn of the cap.
– If any significant venting occurs,
immediately re-seal the tank by
turning the cap clockwise to the
closed position. Allow the saw to
cool further before attempting to
open the tank.
– Turn the cap to the open position (3)
only after the contents of the tank
are no longer under pressure. In the
open position, the exterior
positioning mark (4) on the cap will
line up with the "unlocked"
symbol (5) on the fuel tank housing.
– Never remove the cap by turning it
directly to the open position without
first allowing the saw to cool
adequately and then letting it
release any residual pressure at the
vent position (2).
– Never attempt to remove the cap
while the engine is still hot or
running.
Installing the Toolless Fuel Cap
WARNING
An improperly tightened fuel filler cap
can loosen or come off and spill
quantities of fuel. To reduce the risk of
fuel spillage and fire from an improperly
installed fuel cap, correctly position and
tighten the cap in the fuel tank opening:
– Raise the grip on the top of the cap
until it is upright at a 90° angle.
Insert the cap in the fuel tank
opening with the exterior positioning
mark (1) lined up with the
"unlocked" symbol (2) on the fuel
tank housing.
– Using the grip, press the cap down
firmly while turning it clockwise to
the closed position (approximately
1/4 urn). In the closed position, the
interior (4) and exterior (1)
positioning marks will align with the
"locked" symbol (3) on the fuel tank
housing.
– Fold the grip flush with the top of the
cap and check for tightness.
123
4
5
0000-GXX-6419-A0
23
1
1
4
0000-GXX-6420-A0
 Loading...