Do you have a question about the Strong PRIMA VI and is the answer not in the manual?
Crucial safety guidelines for installing, using, and maintaining the receiver.
Proper procedures for storing and transporting the receiver to prevent damage.
Step-by-step instructions for setting up the receiver and its components.
List of included accessories such as remote control, batteries, and user manual.
Best practices and compatibility for using USB storage devices with the receiver.
The default PIN code for accessing secure features and settings.
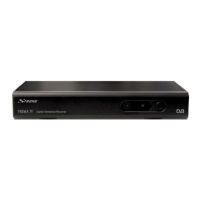
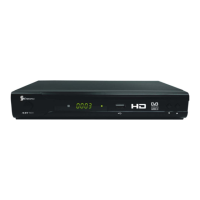
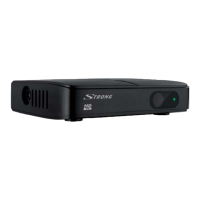
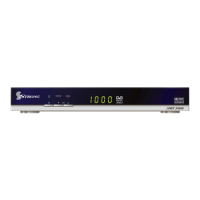
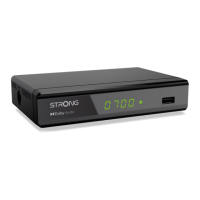
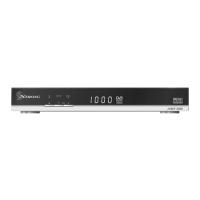
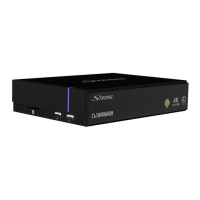
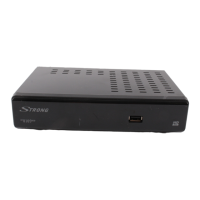
Identification and description of the receiver's front panel controls and indicators.
Detailed description of all connectors and ports on the rear panel.
Overview of all buttons on the remote control and their functions.
How to connect the receiver to a terrestrial antenna for signal reception.
Step-by-step guide for connecting the receiver to a TV via HDMI.
Instructions for establishing a connection to the TV using a SCART cable.
Guide for connecting the receiver to a digital audio system via S/PDIF.
Connecting the receiver to both a digital amplifier and TV via HDMI for optimal output.
Instructions for connecting the receiver to an analogue audio amplifier.
How to connect and use USB storage devices for recording and media playback.
Methods for navigating and switching between TV channels.
Displaying current channel and event information on screen.
How to choose preferred audio languages for broadcasts.
Accessing and navigating Teletext pages for additional information.
Selecting subtitle languages for broadcasts.
Functionality to pause and resume live TV broadcasts.
Using the EPG to view schedules and schedule recordings.
How to initiate immediate recording of the current program.
Options for managing channels, including sorting, renaming, and deleting.
Setting up the receiver, including channel scanning and antenna power.
Configuring system settings like language, TV system, and time.
Accessing utility functions like information, factory reset, and software upgrades.
Accessing and playing the built-in games on the receiver.
Accessing media playback functions like Media Player and HDD Information.
Technical details about the demodulator and transmission modes.
Specifications for video decoding profiles and resolutions.
Details on audio support, sampling rates, and modes.
Specifications for the tuner, frequency ranges, and signal levels.
Information on flash memory and SDRAM.
Supported video, audio, and picture formats.
Listing of all available input and output connectors on the receiver.
This document describes the Digital Terrestrial HD Receiver PRIMA VI, a device designed to receive and display digital terrestrial television broadcasts. The receiver offers a range of features for managing channels, recording programs, and playing multimedia content.
The primary function of the STRONG Digital Terrestrial HD Receiver PRIMA VI is to receive digital terrestrial television signals and convert them for display on a television set. It supports High Definition (HD) broadcasts, providing a high-quality viewing experience. The receiver includes a USB port, allowing users to connect external storage devices for recording TV programs (PVR function) and playing back various multimedia files, such as videos, music, and images. It also features Timeshift, which enables users to pause live TV and resume watching later.
The device can be connected to a TV using either an HDMI cable for the best possible picture and sound quality or a SCART cable for compatibility with older televisions. For enhanced audio, it can be connected to a digital audio amplifier or home theatre system via an S/PDIF coaxial output, supporting multi-channel audio depending on the broadcast. An analogue audio output is also available for connection to Hi-Fi or audio amplifiers.
The receiver is designed for user-friendly operation, controlled primarily via a remote control unit.
Upon first use, an "Easy install" menu guides the user through initial settings, including language selection, region, subtitle preferences (Normal, Hard of Hearing, Off), and aspect ratio (Auto, 4:3 Panscan, 4:3 Letterbox, 16:9). The "Scan mode" allows users to choose between storing all channels (scrambled and free-to-air) or only free-to-air channels. An "Aerial Adjustment" screen assists in optimizing antenna signal strength and quality, with an optional beeper for audible feedback. After these settings, the receiver scans for available channels. If the "Welcome" menu doesn't appear, a factory reset can be performed via the "Tools" menu.
Channels can be changed directly using the 0-9 buttons on the remote, by navigating a channel list accessed via the OK button, or by using the CH+/CH- buttons. The "Info Banner" provides current channel and event information, with multiple presses revealing extended EPG details and technical signal information. The receiver supports multiple audio languages, selectable via the AUDIO button, and subtitle languages, accessible through the SUBTITLE button. A fully featured Teletext function is also available via the TTX button.
The "Edit Channel" menu offers comprehensive channel management:
The USB port enables several advanced features:
The "System Setup" menu allows customization of various receiver parameters:
The "Tools" menu provides utilities for system maintenance:
The receiver includes two games, Othello and Sudoku, accessible from the "Main Menu."
The manual includes a troubleshooting section to address common issues such as:
By following these guidelines, users can ensure safe and optimal operation of their STRONG Digital Terrestrial HD Receiver PRIMA VI.
| Free To Air | Yes |
|---|---|
| HDTV Receiver | Yes |
| HDMI | Yes |
| Composite Video Output | Yes |
| Component Video Output | No |
| EPG | Yes |
| Teletext | Yes |
| Subtitles | Yes |
| Parental Control | Yes |
| Timer Recording | Yes |
| Timeshift | Yes |
| Video Decoding | MPEG-2, MPEG-4, H.264 |
| Audio Decoding | MPEG-1 Layer I/II |
| HDMI Output | Yes |
| Scart Output | Yes |
| Supported Resolutions | 576i, 720p, 1080i, 1080p |