This document describes the STRONG Digital HD Cable Receiver SRT 3030, a device designed for receiving digital HD cable signals. It offers a range of functionalities for viewing, managing, and recording television and radio programs.
Function Description
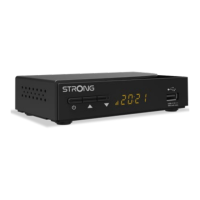
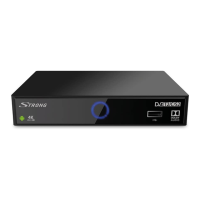
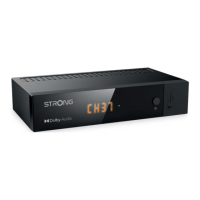
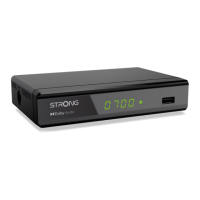
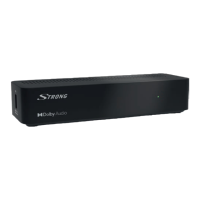
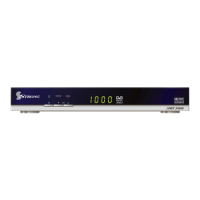
The SRT 3030 is a digital HD cable receiver that allows users to access and enjoy digital television and radio programs broadcast over a cable network. It decodes AVC video and supports various audio formats, including Dolby Digital and Dolby Digital Plus. The receiver features a front panel with a power button, channel change buttons (CH-/CH+), a standby indicator, an LED display showing the channel number or time, a hidden remote control sensor, and a USB A port for media playback, recording, and timeshift. The rear panel includes a CABLE IN connector for the cable signal, an HDMI output for connecting to a TV, a TV SCART connector for older TVs, and a power input.
Usage Features
Basic Operation:
To turn the receiver ON or to Standby, press the power button on the remote control. Channels can be changed using the CH-/CH+ buttons on the remote control or the front panel, or by entering the channel number directly using the 0-9 buttons. Pressing OK in viewing mode displays the channel list. Volume can be adjusted with the volume buttons. The BACK button allows switching between previously viewed channels.
First Time Installation:
Upon first use or after a factory reset, an "Installation guide" appears on the TV screen. Users can select their preferred OSD Language and other settings. The "Country" setting follows the OSD Language but can be changed later. The "FTA Only" option stores only Free-to-Air channels, while "All" stores all channels (though only FTA channels can be decoded by this receiver). Selecting "Channel Search" and pressing OK initiates the program search.
Channel Management:
The "Program menu" offers extensive channel management options under "Channel Edit." Users can:
- Delete TV or radio programs individually or in groups using the 1 button.
- Move programs to a new sequence using the 2 button. This requires LCN (Logical Channel Numbering) to be set to Off in the Program menu.
- Skip programs when zapping using the 3 button.
- Lock programs to restrict viewing using the 4 button and a PIN code.
- Set favourite programs by adding them to up to 32 favourite lists using the 5 button. These lists can be renamed.
- Rename channels using a virtual keyboard accessed via the GREEN button in the Channel Edit menu.
- Sort channels by LCN, broadcaster (ONID), transponder frequency, or Service ID.
Viewing Features:
- Info Banner: Pressing the INFO button once displays current and upcoming program information. Pressing it twice shows technical details about reception. The on-screen duration of the info banner can be adjusted in the OSD Settings menu.
- Audio Language Selection: Pressing the AUDIO button in viewing mode displays available audio streams and languages. Users can select a stream and choose between Mono, Left, Right, or Stereo audio.
- Teletext: The TTX button provides access to a fully featured Teletext. Pages can be selected using 0-9 or the navigation buttons. Coloured buttons offer shortcuts to suggested pages.
- Subtitles: The SUBTITLE button displays available subtitle types. HOH (Hard of Hearing) subtitles can be enabled in the Option menu.
- EPG (Electronic Programme Guide): The EPG button or "Program Guide" in the Program menu provides a 7-day program schedule. Users can book events for recording or wake-up directly from the EPG.
Recording and Timeshift:
- Instant Recording: Pressing the record button starts immediate recording of the currently watched program. Press STOP to end recording. During recording, it's possible to change channels on the same transponder.
- Timer Setting: In the "Time menu," users can schedule automatic recordings or wake-up events. Manual bookings can be added, edited, or deleted.
- PVR Management (USB menu): This section allows managing recorded programs, timeshift settings, and viewing disk information. Timeshift can be set to On, and its maximum duration can be configured. The "Section Record" option determines whether the entire timeshift buffer is included in a recording.
Multimedia Playback:
The USB menu also functions as a "Media Centre" for playing video, music, and picture files from a connected USB storage device. Supported file types include MPEG encoded video, MP3 audio, and BMP/JPEG images. During playback, users can pause, stop, fast forward, and rewind. Subtitles (internal or external .srt files) are supported for video playback.
Picture and Display Settings:
The "Picture menu" allows adjustment of video settings:
- Aspect Ratio: Options include Auto, 16:9 Widescreen, 16:9 Pillarbox, 16:9 Pan Scan, 4:3 Letterbox, 4:3 Pan Scan, and 4:3 Full to suit different TV screens and content formats.
- Resolution: Adjusts video output resolution to match TV capabilities.
- TV Format: Sets the TV standard (PAL or NTSC).
- OSD Settings: Configures transparency, brightness, chroma, contrast, and timeout duration for the On Screen Display.
- Panel Settings: Adjusts the LED brightness of the front panel display (Low, Middle, Full) and whether the time is shown in Standby mode.
System Settings:
The "System menu" offers various technical adjustments:
- System Information: Displays hardware and software versions, useful for support.
- Parental Guidance: Blocks programs based on age ratings using a password.
- Lock Control: Activates password protection for menu items ("Menu Lock") and channels ("Channel Lock").
- Change Password: Allows users to change the default PIN code (0000).
- Power On Control: Determines the receiver's state (Running, Standby, or Last state) after power is restored.
Maintenance Features
Software Upgrade:
Software updates, if available, can be downloaded from the official website and installed via a USB storage device. The "Software Upgrade" menu allows selecting the update file and initiating the process. It is crucial not to power off the receiver or remove the USB device during an upgrade to prevent damage.
Dump Function:
Within the "Software Upgrade" menu, the "Dump" function allows users to back up their settings and channel lists to a USB device. This backup file can then be used to quickly restore settings after a software upgrade or factory reset.
Factory Reset:
The "Factory Reset" option in the System menu restores the receiver to its default settings, deleting all personal settings, timers, and stored channels. This can be used to resolve irregular behavior. A password (default 0000) is required to perform a factory reset. Users are warned not to power off the receiver or remove the USB device during this process.
Troubleshooting:
The manual includes a troubleshooting section that lists common problems (e.g., no signal, no picture/sound, remote not responding, forgotten PIN) and their possible causes and solutions. For persistent issues, users are advised to contact their dealer or local Service Hotline.
Safety Precautions:
The manual emphasizes several safety instructions:
- Do not install the receiver in closed, poorly ventilated cabinets, directly on other equipment, or on surfaces that obstruct ventilation.
- Avoid exposing the receiver to direct sunlight, intense moisture, vibrations, shocks, or magnetic objects.
- Do not use damaged power cords or touch them with wet hands.
- Unplug the power cord if the receiver will not be used for a long time.
- Clean the receiver with a soft, lint-free cloth slightly dampened with mild soap solution, only after disconnecting from mains power.
- Do not place objects on top of the receiver to ensure proper cooling.
- Never attempt to open the receiver due to high voltages and electrical hazards, as this voids the warranty.
- Ensure the receiver is disconnected from mains power when connecting cables.
- Use only approved extensions and compatible wiring suitable for the equipment's electrical power consumption.
USB Device Usage:
- It is recommended to use USB 2.0 storage devices for optimal performance of multimedia, recording, and timeshift functions.
- For external USB HDDs, ensure they have an external power adapter if their power requirements exceed the receiver's output (5V/500mA).
- Users are advised to back up important data from USB devices before using them with the receiver, as STRONG is not responsible for data loss.
- USB devices should be formatted to FAT/FAT32, or formatted via the receiver.