Settings for
handpieces/
switches and
foot pedals/
switches based
on connected
devices
Select Motor
Console
System Settings
Preset
Home
Language
System Info
Motor List
Motor Settings
General
Irrigation
Motor Options
Control Options
Quick Access
Accelerate
Brake
I.D. Touch/
Torque
Brightness
Volume
Rep Info
Import/Export
Irrigation
Motor 1
Motor 2
Motor 3
Control
Permissions
Import
Export
Quick and easy navigation
Our attened menu structure lets you navigate anywhere in just a few
clicks, or use shortcuts such as User Proles and Forward/Quick Access
to jump to your desired destination. Further simplifying the process
are smart screens which automatically detect and display available
options and settings based on the devices you connect.
Getting
started
u Connect motors and
foot pedals as desired
u Press Power On
u Optional irrigation
• Place irrigation pole in rear
bracket
• Insert irrigation cassette
• Attach irrigation clips to
motor and connect tubing
to irrigation bag
• Press Initial Prime
u Manage Profiles
to your liking
u Manage System Settings
to your liking
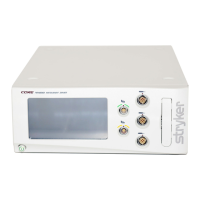
C Quick access area – allows
users to set settings such as
direction, irrigation and mode via
the Home screen.
D Motor Settings – displays
connected motors’ name and
value settings by RPM or percent
to power. To adjust, touch the
number onscreen and a slider bar
will appear.
E Increase/decrease – press to
adjust motor value settings, or
use slider bar described in “D.”
F Home key
G System Settings – push to
access options for console,
select motor, rep info, control
permissions, import/export
and irrigation
H Proles – contains default
proles and stored user
preferences, plus allows creation
of personal proles which
are permanently saved and
transferable to other Core 2
consoles via USB
The Home Screen is where most
interaction occurs and serves as
your gateway to other screens
and functions.
A Navigation bar – includes
Reset, Proles, System Settings
and Home
B Foot switch assignment –
graphically shows foot switch
assignment; touch to toggle
B C D E
A
H G F
Powering up
is simple
To turn on the console, follow
these steps and you’ll have boot
up in less than 20 seconds.
Home is your hub