9 Sensor installation
9.2.2 Installing the sensor
First please observe the flow direction
indicated on the housing or on the
shaft. It must match the flow direction
of the compressed air or gas.
1. Close the ball valve.
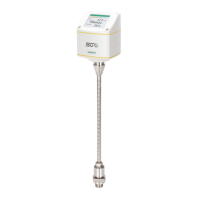
2. Make sure that he probe tip is completely
covered by the connection head (see the photo
on the left).
3. Underlay the “O-ring” at the thread of the
connection head before screwing the flow
sensor.
4. Screw the connection head tightly to the ball
valve and align flow sensor to flow direction.
5. Open the ball valve.
6. Move the shaft slightly to the determined
insertion depth by means of the scale on the
shaft.
7. Tighten the locking nut so that the flow
sensor can no longer be moved by the pressure
in the pipe but can be moved manually.
8. With the aid of the alignment key, make sure
that the actual flow direction is same as the
arrow shows. (The angle deviation should not
be larger than ±2°.)