29
30
Customer Service Toll Free: 833.3TACTILE (833.382.2845)
3. On the home screen, press the arrow button until the
CHOOSE A NEW TREATMENT option is highlighted in blue. Once
highlighted, select the button. Using the / arrow
buttons, and by pressing the button when the appropriate
option is highlighted in blue, complete the following:
1. Select the appropriate TREATMENT REGION.
2. Select the appropriate BODY TREATMENTS.
3. Select the appropriate TREATMENT LOCATION.
4. Select the prescribed TREATMENT PRESSURE.
5. Select the number of TREATMENT CYCLES.
6. Complete the treatment selection. Select DONE WITH SETUP
using the button if the treatment selection is complete.
If you would like to string an additional treatment with the
existing programmed treatment, select ADD ANOTHER
TREATMENT and complete steps 2–5 above.
7. Choose a preset to save the new treatment.
NOTES:
If you have three saved presets, you will need to overwrite one of them
to save the new treatment.
Please consult your healthcare provider before changing or adding
programs to your prescribed treatment.
After you have selected the necessary settings, you are ready
to connect the hoses to the controller unit.
CHAPTER 4
Connecting Your Hoses to the
Controller Unit
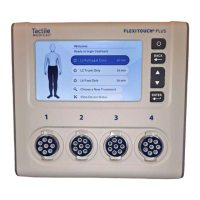
The next step is connecting your hoses to the controller unit. The
hose latches and the ports on the controller unit/bilateral port
adapter are numbered 1 through 4, so when connected properly,
latch number 1 will connect to port number 1, and so on.
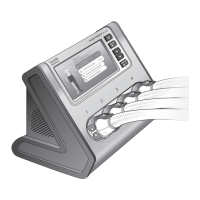
4.1 Connecting Your Bilateral Port Adapter
If you are conducting bilateral treatment, you will have received
a bilateral port adapter that connects to the controller unit
(Figure 4.1.a.). The adapter must be connected to the controller
unit prior to connecting your garments. To connect the adapter,
position it so the paddles on both sides are perpendicular to the
adapter and the ports on the back of the adapter align with the
ports on the front of the controller unit (Figure 4.1.a.). You will hear
two clicks, which conrm the ports have been properly aligned and
connected. Once the adapter has been properly connected, move
the paddles on both sides in the down direction, so they are locked
(Figure 4.1.b.). You should not be able to remove the adapter from
the controller unit without unlocking it.
NOTE: One or more of the ports will be capped if your prescribed
treatment does not use the port(s). Do not remove the port cap(s).