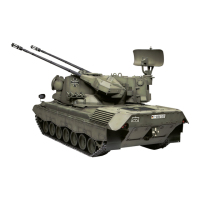
<<RADIO
CONTROL
TANK
FLA(PANZER
GEPAFD>>
<<Operatlon
ol G€pard>>
<<Cepard
irn Einsrlr>>
The
left stick of the transmitter i5lor moving the
tank torward
6nd backward
(speed
conkolstick).
The right
one
is tor
tu.n ing lhe tank right and left.
(steering
stick).
lf the
left stick is
pushed
up, the tank will move
forward. lf
it
is
pushed
down,
the tank will mov€
back. lf il is
pushed
slowly, the tank will
gradually
accelerate.
It the rightstick is
pushod
l6ltwhen:he
tank is
moving forward or backward, thelank will
turn
left. It it is
push€d
right, the tank will tu.n
right.
Th6 turn ollhe tank varl€s
according
to how
it
ls oushed.
To
controlthe turret aotation. useathird
channel:
ln
cas6 otth€ mechanism
ofthe
2
plus
1 type,
use
the
third stick.
ln ca6e
of th€ mechenism with three ormorc
chan-
nels,
usä the vortica! movement
ol the sle€ ng
stick.
Derlinke
Hebel
des Senders schaliet den Motor
vo.wärls
und rückwärts,
schnell und lanqsam.
Der rechte
Hebel steuen di€ rechte bezw.linle
Kette. Durch Abbremsen
einer
Kett€,
wird der
Whentheturret
is rotated by means
ol
the 2-chan-
nel mechanism,
both thE clutches end switch tor
turret
rotation
are
controlled by lhe samo servo.
ll €ither
th6 right or l6ft clutch is dlsengaged, the
switch
lor turret rotation will be lurned on.
Ztrei.i.rt.l AnhSc
: Kupplung undTurmdrehung
l,aben
ein Servo. Wenn also eine Kette
ee-
5toppl
wird,
kann d€r Turm ni(ht drehen.
Dtei.Kanrl Arlage : tin Servo wird durch den
dritten Kanal eusschliessli€h für die Turmdrehuns
<<Cont.ol
Syalem
ot G€pgrd>>
By
controlljng the
clutches,
you
can
enjoy sharp
tums in which either of the two tracks
i6 stdpped
and
gentle
lurns
in which
th6 two tracks
are
rotat-
ed al differenl speed. asw€llas
you
can move the
lank right
on.
Whenthe.ightand
left
clutchesare
both engag€d,
thetwo lracks rotate
at thesamespeed änd
so the
tank
goesstraight
on.lfeitherof the two clutches
is completely
disengaged, the track
on that side
stops rotation
and so the tank makes
a sharoturn,
ll eithe.
of
the
two clutches is halfdisengag€d,
the
track on that
side slows down
and so the tank
make
a
ggntle
tuan. The
tank has e variabte re-
gistered
speed
control swilch lor forward
and re-
verse movements,
by means
of which
you
can
ad-
just
the llow of
electric current to control
the
speec, of the tank.
Rechte Kette stoppt, linke läuft : Panzer dreht
schnell nach rechts.
Linke Kette
stooot,
rechte läuft : Panzer
dreht
schnell
nach links.
Rechte
Kette
läuft langsam, linke schnell : Panzer
Linke Kette
läüft lanssam, rechte schnell
:
Panzer
kur!,t nach links.
Rechle Kette vorwärts, linke Ketie
rückwars :
Panzer dreht auf der Slelle. Man
nennt dies
Achsdrehung.
Bei
Vorwärts oder Rückwärtsfahrt
drehen beide
Ketten mit gleicher
Ceschwindi8keit.
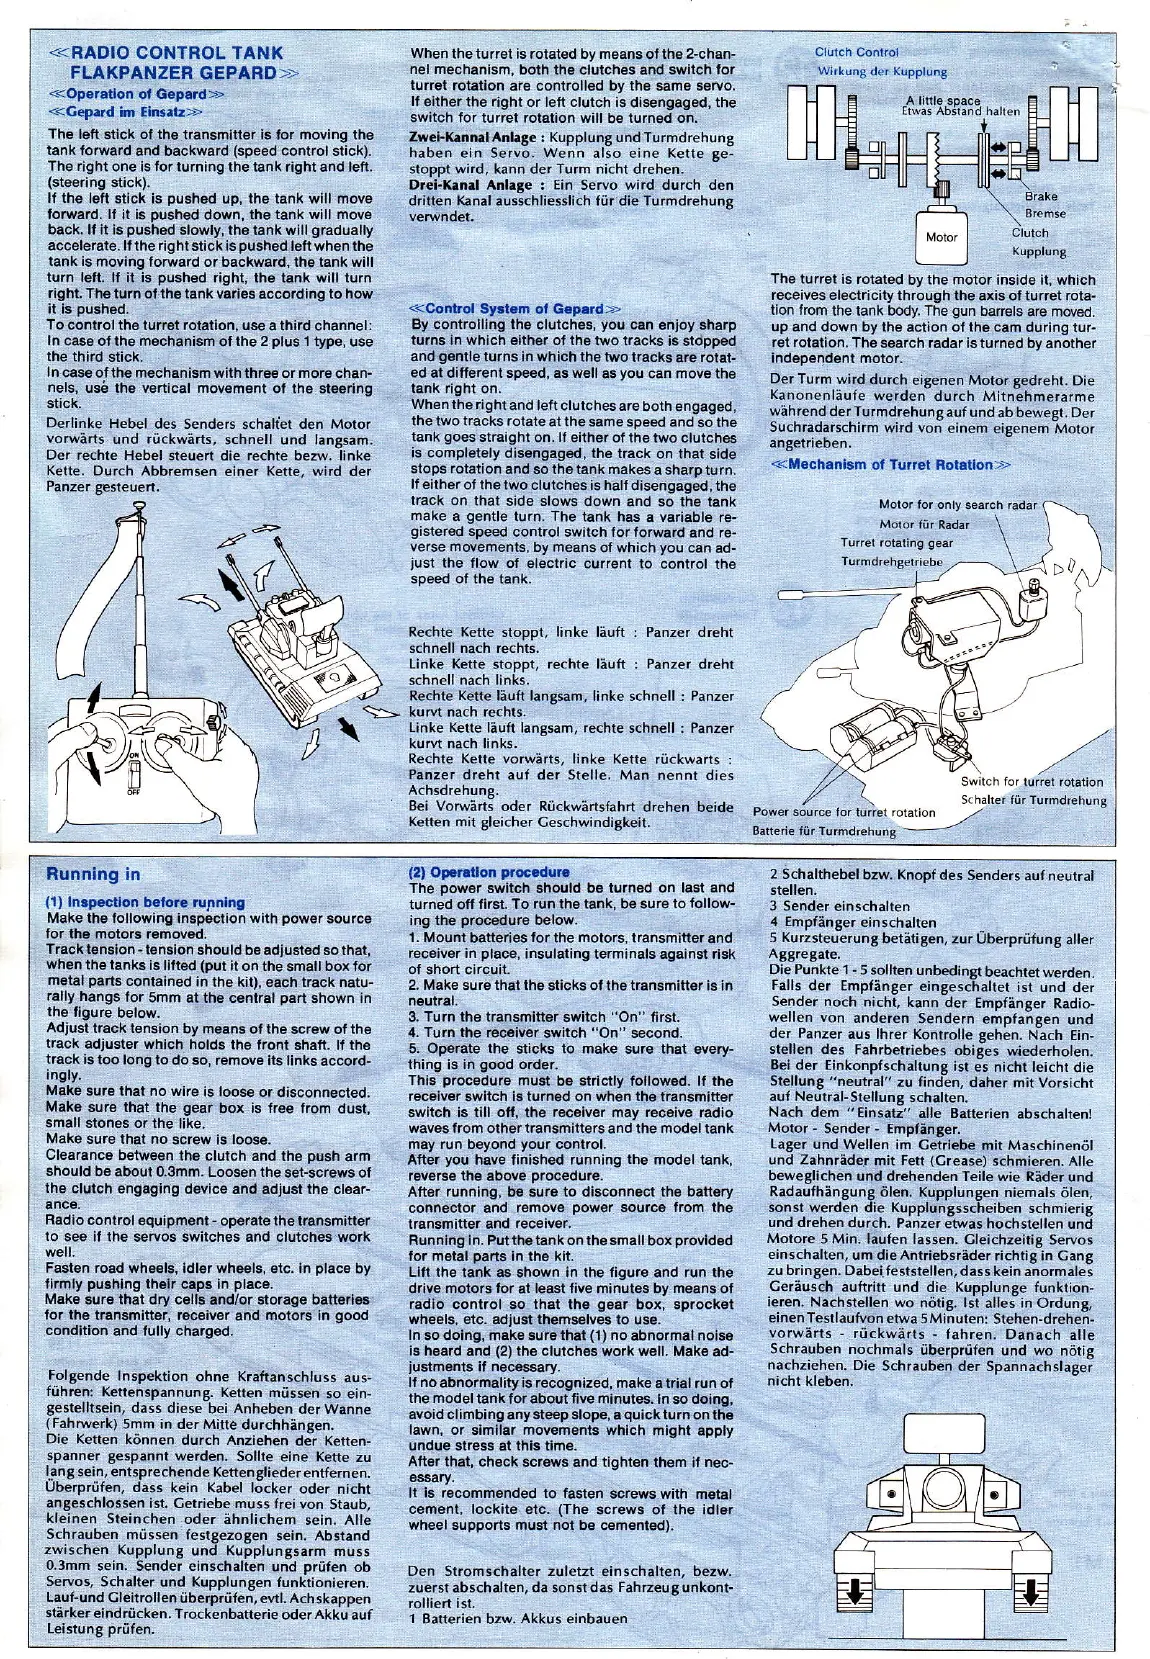
The
turrel is rotated
by the motor inside it, which
receives electricity
th
rough
the axis oiturret rota-
lion from
lhe tank body. The
gun
barels
are moved.
up and down by the
action
ol
the cam during tur-
ret
rotation.
The
search
radaristurnod
byanother
indeoendent
motor,
Der Turm
wird dur(h
eigenen Molor
tedreht.
Die
Kanonenläufe
werden
dur(h Milnehmerarme
während
derTurmdrehungauf
und ab bewe8t. De.
Suchradarschirm
wird von
einem
eieenem
Motor
angetrieben.
<<llrechanl$h
ot Tuaaet not.üon>>
Molo.lor
only
search radar
:::^::i::':: ::::::l t"::1-,---
)
Batteii€ lür Turmdtehrn6
Running in
(1)
Inip€cllon botore ruFnlag
Make the
lollowin9 inspection wilh
power
source
for lhe motors r€noved.
Tracktension-t6nsion
should beadjusled sothat,
whenthetanks
is litied
(put
it o. the
smattboxfor
metal
part6
contained
in the kit), each track natu-
lally hEngs
for
smm at the centrat
part
shown
In
the
figure
betow.
AdiuBt
track lension
by means ofthe
screw of
the
track
adjuster whjch
holds the
lront shaft. lf the
track lstoo
long to
do so, remove its tinksaccord-
In9ry.
Make
sure
lhat no wire
is loos6 or disconnected.
Make
suae that the
gear
box is free from
dust,
small
stones or the
like,
Meke
sure thal no
screw is loose.
Clearance
between lhe clulch
and th€ oush arm
should beabout
O.3mm. Loosen theset-screws
of
the
clutch engaging
d€vic€ and adjust the clear-
Radio
conirol €quipment
-
operate theVansmitter
lo se€
if the seruos switches and clutchos work
Fasl€n road wh€€16,
idler
whe€ls,
etc. in
place
by
tirmly
pushing
thek
caps in
place.
Make
sur€ lhat dry cells
and/or
storage battari€s
for the
trangmittoa, r€c€iver
and
motors ln
good
condition
and fully charged.
Folgende
tnspekrion
ohn€ Kraftanschluss
aus-
führen:
Keltenspannung.
hetten müssen
so
ein-
gestelltsein,
dass
diese
bei
Anheben
der Wanne
(fahrwerk)
5mm in der Mitte
durchhäneen.
Die Ketten können
durch Anziehen
ddr
Kenen-
spanner gespannt
werden.
Sollte
eine Kette zu
lant
sein, enl<pre.hende KettenSlieder
entfernen.
uberprüfen,
dass kein kabel locker
oder nicht
anSeschlosren
ist. Cetriebe muss freivon
Staub,
kleinen Steinchen
od€r ähnlichem
sein. Alle
Schrauben müssen festSezogen
sein. Abstand
zwischen Kupplung
und
Kupplungsarm
muss
0.3mm
sein. Sender einschalten
und
Drüfen ob
Servos,
Schalter und Kupplungen
funktionieren.
Lauf-!nd
Cl€itrollen
überprüfen, eril. Ach
skappen
stärker
eindrücken. I rocken
batterie
ode r
Ak
ku auf
Leistunt
prüfen.
(2,
OF.allon
p.oc.dute
The
power
switch should be turned
on last and
turned offlirst. To run the tank, be sure
to follow-
ing
the
proc€duro
below.
1. Mo!nl
batteries
for lhe molors,
tlansmitter
and
receivsr in
place,
jnsulating
terminals against r;sk
of
short circuit.
2. Make sure that the
sticks oI the t.ansmitter is in
neutral.
3.
Turn the transmitter
switch
"On"
ffrsl.
4.
Turn the
ßc€ivea switch
"On"
second.
5. Operate
the
sticks
to
make sure that every-
thing is in
good
order.
This
procedure
must
be
gtrictly
foltowed. lf th€
receiver switch is turn€d on when the transmittel
switch is till oll, th€ receiver may rcc€ive
Gdio
waves from other transmitters
and
the modellank
may run
boyond
your
control,
After
you
have finished running
the
model tank,
reverse the
above
procedure,
After
rlnning,
b€ sur€
to digconnect th€ battery
cohnector and tsmove
power
sourco laom the
transmitte. and tec€iv€r.
Running in. Put th€tankon the smallbox
provicl€d
for
metel
pa.ts
in the kit.
Litt the tank as
€hown
in the ligure and run the
drive
motors tor
at
leasl
liv€ minules by
meEns
of
radio
control so
ihgt
the
gear
box, sprocket
wheels, €tc.
adiust themselves to use,
ln
sodoing, makosurethat
(1)
no abnormal noiso
is heard
dnd
(2)
the clutch€s work well. Mak€
ad-
iustments
if necessary.
ll no
abnormalily is recognized, make
a
trial run
ol
the model
t6nk for about five
mlnutes.
ln so doing,
avoicl climbing
any ste€g slope, aquickturn on the
lawn, or slmilar movem€nls which
might apply
undue slress at this time.
Aft6r that, check
screws and tighten ihem it nec"
essary.
It ls recommended to fasten
screws with metal
c6ment, lockite etc.
(The
screws ot the idlsr
wheel supports must not be
cemented).
Den Stromschalter zuletzt
einschahen,
bezw.
zuerst abschalten, da sonstdas
FahrreuS
unkont-
rolliert ist.
1 Batterien
bzw.
Akkus einbauen
2 Schalthebelbzw.
Knopf des
Senders
aufnerrrar
3 Sender
einschalten
4 EmpfänEer
einschalten
5 hur;sleuerung
betäliten, zur überprütung
alter
A88re8ate.
Die
Punkre'1-
5.olhen
unbedinßt
beachret
werde..
Falls
der Empfäoger
eingesc-hallet
ist und
der
Sender no(h nicht,
k.nn der
tmpfän8er
Radio-
wellen
von
anderen
Sendern empiängen
und
der Panrer
aus lhrer Kontrolle
sehen. N-ach tin-
stellen
des Fahrbetriebes
obig]es
wiederhoten.
Bei der linkonpfschaltunS
isl
es nicht lei.ht
die
Stellunß
"neutral" zu
finden,
d.her
mit Vorsr(hl
aut Neutral-Stellune
schalten.
N.ch
dem
"Einsäd"
alle Batlerien
abschatten!
Motor
-
Sender
-
tmpfänger.
Lager
und Wellen
im Cetriebe
mit Maschinenöl
und Zahnräder
mit
Fett
(Crease)
schmieren. Alle
beweSlichen
und drehenden Teile wie Räcler
und
RädaufhänBung ölen.
Kupplungen niemals
ölen,
sonst werden die K'./pplungsscheiben
schmierig
und drehen durch.
Panzer etwas
hochstellen und
Motore
5 Min. laufen lassen.
Cleichzeiric Se.vos
etnschahen,
um die Aniriebsräder
richtig-in Cang
?u bringen. Dabeifeststellen,
d
ass kein anormales
Ceräusch
auftrilt und die Kupplun8e funktion-
ieren. Nachstellen
wo
nötig.
lst
älles in Ordun8,
einen Testlaufvon
etwa 5 Minuten:
Stehen-d rehen-
vorwärts
- rückwärls -
fahren. Danach
alle
Schrauben nochmals
überprüfen
und wo nötit
nachziehen. Die
Schrauben
der Spannachslager
nichl kleben