EasyManua.ls Logo

Teac 450 - User Manual

Teac 450
16 pages
Print Icon
To Next Page IconTo Next Page
Loading...
INSTRUCTION
MANUAL
r
r
r
I
r
r
EJECT
REC
STOP
PAUSE
U
U
U
PEAK
LEVEL
L
R
REC
ES
450
I
Stereo
Cassette
Deck
TEAC
STEREO
CASSETTE
DECK
TAPE
RUN
Question and Answer IconNeed help?

Do you have a question about the Teac 450 and is the answer not in the manual?

Summary

What is Chrome (CrO2) Tape?

Function of Controls - Part 1: Front Panel

Cassette Holder Lid Operation

Details on opening and closing the cassette holder lid for tape insertion.

Cassette Holder Mechanism

Explains how the cassette holder accommodates and ejects tapes.

EJECT Button Functionality

Describes the two-step process for ejecting a cassette tape.

REC Record Button

Explains the function of the record button, requiring tape presence.

Rewind Button Operation

Details on using the rewind button for tape rewinding and mode changes.

Play Button Operation

How to initiate playback at normal speed.

Fast Forward Button Operation

Describes engaging the fast forward function for high-speed tape movement.

STOP Button Functionality

Explains how the stop button releases other controls.

PAUSE Button Operation

Details on temporarily halting tape travel during recording or playback.

Cassette Tray Storage

Information about the integrated storage for cassette tapes.

Function of Controls - Part 2: Indicators and Input Controls

Microphone and Headphone Jacks

Details on connecting microphones and headphones.

VU Meters and Indicator Lamps

Explanation of VU meters and indicator lamps for levels and status.

Input Volume Controls

Description of MIC and LINE input volume controls.

Power and Timer Controls

Operation of the power switch and timer selector.

Dolby and Bias;EQ Selector Switches

Explanation of Dolby NR and BIAS-EQ selector switch functions.

Tape Counter Functions

Details on the tape counter and reset button.

Function of Controls - Part 3: Rear Panel Connections

Grounding Terminal

Instructions for connecting the grounding terminal.

Output Terminals and DIN Jack

Details on output terminals and IN/OUT DIN connector.

Line Input Terminals

Explanation of the LINE IN terminals for recording.

Dolby Calibration Controls

Description of Dolby FM/Copy CAL adjustment controls.

AC Outlet, Fuse, and Power Cord

Information on AC outlet capacity, fuse, and power cord connection.

Dust Cover

Details on the purpose and use of the dust cover.

The Dolby Noise Reduction System Explained

TEAC 450 System Connection Examples

General Operating Suggestions

Inserting and Starting a Cassette

Guidance on loading cassettes and initiating playback or recording.

Playback and Fast Forward;Rewind

Instructions for using playback, fast forward, and rewind functions.

Using the PAUSE Function

How to use the pause button for temporary stops during operation.

Headphone Listening and Dolby Terminology

Notes on headphone use and definitions of Dolby terms.

Playback Instructions

Playback via Line;Output Terminals

Steps for playback using standard audio connections.

Playback via DIN Connector Jack

Instructions for playback using the DIN connector.

Playback with Dolby System

How to set up for playback of Dolby-encoded tapes.

Timer-Controlled Playback

Procedure for automatic playback using a clock timer.

Preliminary Recording Instructions

Setting Recording Levels

Guidance on adjusting input levels using VU meters.

Using the Peak Level Indicator

Explanation of the peak level indicator for preventing distortion.

Monitoring Recording Input

How to monitor input signals through headphones during recording.

PAUSE Button for Recording Cueing

Using the pause button to prepare for recording start.

Using the Tape Counter

Instructions on using the tape counter for tracking.

BIAS and EQ Selector Switch Usage

How to select BIAS and EQ for different tape types.

Recording Instructions

Recording with Line;Output Terminals

Steps for recording using standard audio connections.

Recording with DIN Connector Jack

Instructions for recording using the DIN connector.

Recording with the Dolby System

How to set up for recording with the Dolby noise reduction system.

Recording Dolby FM Broadcasts

Procedure for recording Dolby FM radio broadcasts.

Copying and Duplicating Cassettes

Copying Dolby Cassettes

Steps for duplicating Dolby-encoded cassettes without re-encoding.

Copying Open Reel to Cassette

Guidance on copying open reel tape to cassette with Dolby encoding.

Preventive Maintenance

Timer Recording Setup

Instructions for setting up timer-controlled recordings.

Microphone Recording Procedure

Steps for recording using microphones.

Cleaning Heads, Pinch Rollers, Capstans

Procedures for cleaning tape path components.

Demagnetizing Heads and Capstan Shaft

Instructions for demagnetizing key internal components.

Optional Accessories

Specifications

Overview

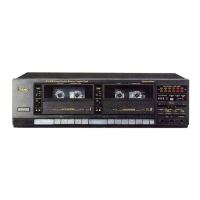
The TEAC 450 Stereo Cassette Deck is a versatile home-use stereo cassette deck designed for audiophiles, offering recording quality, features, and performance comparable to high-quality open reel recorders. It incorporates the Dolby Noise Reduction System, which significantly enhances sound quality by reducing tape hiss and noise.

Function Description:

The TEAC 450 is primarily a stereo cassette deck capable of both recording and playback. It features a two-head, four-track, two-channel stereo system. The deck is designed to work with C-60 and C-90 Philips type cassette tapes.

Key Controls and Indicators:

  • Cassette Holder Lid (1) and Cassette Holder (2): Used for inserting and ejecting cassette tapes.
  • EJECT Button (3): A two-step pushbutton control for opening the cassette holder lid and ejecting the cassette.
  • REC Button (4): Depressed for recording, must be used simultaneously with the PLAY Button.
  • Rewind Button (5): Rewinds the tape. Can be pressed halfway for faster speed or fully to lock.
  • Play Button (6): Runs the tape at normal speed (1-7/8 ips) for playback or recording.
  • Fast Forward Button (7): Fast forwards the tape. Can be pressed halfway for faster speed or fully to lock.
  • STOP Button (8): Releases other control buttons from their depressed positions.
  • PAUSE Button (9): Provides quick stop/start control during recording or playback without disturbing settings.
  • Cassette Tray (10): A storage compartment for up to six cassette tapes.
  • MIC (Microphone Jacks) (11): L and R jacks for 600-10,000 ohms microphones.
  • PHONES (Headphone Jack) (12): For connecting 8-ohm stereo headphones.
  • VU Meters (13): Indicate output level during playback and input level during record operation.
  • REC (Record Indicator Lamp) (14): Lights up when the deck is in record mode.
  • Peak Level Indicator (15): Warns when the input level is too high, indicating potential distortion.
  • MIC (Microphone Input Volume Control) (16): Adjusts input levels from microphones or DIN terminals.
  • LINE (Line Input Volume Control) (17): Adjusts input levels from a tuner, record player, or tape recorder.
  • OUTPUT (Output Volume Control) (18): Adjusts playback volume or recording monitor levels.
  • POWER (Power On-Off Switch) (19): Turns the tape deck on or off.
  • TIMER (Timer Selector Switch) (20): Allows automatic recording or playback at a preset time when combined with a commercial timer.
  • DOLBY FM/COPY (IN/OUT Switch) (21): Used for copying Dolbyized source material or decoding for listening.
  • DOLBY NR (Noise Reduction Selector Switch) (22): Activates the Dolby noise reduction circuit.
  • BIAS-EQ (Equalization/Bias Selector Switches) (23): Selects between CrO2, HIGH, and NORMAL positions based on tape type.
  • Tape Counter Reset Button (24): Resets the tape counter to "000".
  • Tape Counter (25): Indicates the amount of tape run.
  • TAPE RUN (Tape Travel Indicator Lamp) (26): Illuminates when the tape is moving.
  • GND (Grounding Terminal) (27): For grounding the unit and connected components.
  • OUTPUT (Output Terminals) (28, 29): Two pairs of output terminals for playback and monitor output.
  • IN/OUT (DIN Jack) (30): For single-cable recording or reproduction through a stereo amplifier.
  • LINE IN (Line Input Terminals) (31): Input terminals for recording from another amplifier or tape deck.
  • DOLBY FM/COPY CAL (32): Calibration controls for setting Dolby circuitry for FM broadcasts.
  • AC Outlet (150W Max.) (33): Provides AC power for other audio components.
  • FUSE 2A (Fuse Holder) (34): Holds the 2A fuse.
  • AC Power Cord (35): Connects to an AC wall outlet.
  • Dust Cover (36): Protects the cassette tray and top panel from dust.

Important Technical Specifications:

  • Heads: Two (erase and record-playback).
  • Type of Tape: Cassette tape C-60 and C-90 (Philips type).
  • Tape Speed: 1-7/8 ips.
  • Motor: Hysteresis synchronous outer-rotor motor.
  • Wow and Flutter: 0.07%.
  • Frequency Response:
    • Chromium dioxide tape: 30-16,000 Hz (+2, -3dB 40-14,000 Hz)
    • Hi-Fi tape: 30-13,000 Hz (+2, -3dB 40-12,500 Hz)
    • Regular tape: 30-10,000 Hz (+2, -3dB 40-10,000 Hz)
  • Signal to Noise Ratio: 52 dB (60 dB with Dolby process).
  • Fast Winding Time: Approximately 95 seconds for C-60.
  • Inputs:
    • Microphone: 0.25 mV/-72 dB (600-10,000 ohms)
    • Line: 0.1 V, 100,000 ohms or more
  • Outputs:
    • Line: 0.3 V for load impedance of 10,000 ohms or more
    • Headphones: 8 ohms
  • Power Requirements: 117 V AC, 60 Hz, 18 W.
  • Dimensions: 6-15/16" (H) x 17-1/2" (W) x 10-5/8" (D).
  • Weight: 21 lbs, net.

Usage Features:

  • Dolby Noise Reduction System: Reduces tape hiss and transistor noise by 5 dB at 1 kHz and 10 dB at 10 kHz, providing clear-tone recording and playback. The B-Type Dolby system is incorporated for popular use.
  • Tape Compatibility: Provides three switch positions (CrO2, HIGH, NORMAL) for BIAS and EQ selection to optimize performance for different tape types (chromium dioxide, high-performance Hi-Fi, and ordinary tapes).
  • Timer Control: Can be combined with a commercial timer to automatically start recording or playback at a preset time.
  • Monitoring: Allows monitoring of input signals through headphones during recording and playback. The VU meters and Peak Level Indicator assist in setting optimal recording levels.
  • Pause Function: Enables quick stop/start control of the tape during recording or playback without resetting other controls.
  • End Stop Mechanism: Automatically releases control buttons and stops the tape when the tape end is reached.
  • Microphone/Line Mixing: Permits mixing input from microphones and line sources during recording.
  • Dolby FM/Copy Calibration: Allows calibration for Dolby FM broadcasts using dedicated controls.
  • Inter-deck Compatibility: Dolby-encoded tapes are best reproduced by similar Dolby-system recorders. Playback on ordinary decks may result in a slight treble emphasis.

Maintenance Features:

  • Cleaning: Regular cleaning of heads, pinch roller, and capstan is recommended to prevent loss of highs, audible skips, and tape entanglement. TEAC offers the TZ-261 head and rubber cleaner set.
  • Demagnetization: After many hours of use, the head and metal parts may become magnetized, leading to performance deterioration. Demagnetization using a TEAC E-1 head eraser (available as an option) is recommended every 50 hours of use. The manual provides detailed steps for demagnetizing the head and capstan shaft.
  • Warranty and Service: The warranty period is described on an enclosed card. For repairs, users should contact their dealer, TEAC Sales Office, or Service Center. Repairs due to misuse or improper operation may incur charges even within the warranty period.

The TEAC 450 is designed for ease of use while delivering professional-grade audio performance, making it a valuable asset for home audio enthusiasts.

Teac 450 Specifications

General IconGeneral
BrandTeac
Model450
CategoryCassette Player
LanguageEnglish

Related product manuals